Tutorial: Demystifying Python Lists
In this tutorial, you'll learn how to work with Python lists as one of the most powerful data types in Python.
After you finish this tutorial, you’ll know the following:
- How to define Python lists
- How to create Python lists and access or change items within them
- How to create a list of lists
- How to slice lists
- How to add or remove items from lists
- How to use a for loop to iterate over items of a list
In this tutorial, we're assuming that you know the fundamentals of Python, including variables, data types, and basic structures. If you’re not familiar with these or are eager to brush up your Python skills, please try our Variables, Data Types, and Lists in Python course .
What Are Python Lists?
A Python list is a mutable collection of heterogeneous elements (items) under one variable name. In this context, mutability means the elements inside a list can be changed while the program is running. We also can add or remove elements from a list whenever we want. In Python, we define lists by enclosing the elements between square brackets and separating them with commas. Each list’s element has an index representing the element's position in the list with a starting index of zero.
Creating Python Lists
To define a Python list, you need to use the following syntax:
variable_name = [item1, item2, item3, … , itemN]As an example, let's create our first Python list.
shopping_list = ["eggs", "milk", "bread", "butter"]The code above implements a Python list with four elements that all are strings. Now, let’s create a list that holds only the prices of what we have on the shopping list.
price_list = [13.99, 8.50, 7.90, 12.50]As we mentioned in the definition of the Python lists, the list items don't have to all be the same data type. They can be any object since everything is an object in Python.
a_mixed_list = ["dataquest.io", 100, "python.org", 10.01, True, 'A']Now, let’s check the data type of these lists:
print(type(shopping_list))
print(type(price_list))
print(type(a_mixed_list))
Go ahead, and run the code. No matter which data types are stored in the lists, all the type() functions return <class 'list'>, which is the data type of list objects.
Accessing Items Within Python Lists
As we have seen, each item in a list has its own index, so they can be retrieved using their associated indices. Let’s try the code:
print(shopping_list[0])
print(price_list[2])
Run the code; it outputs eggs and 7.90. The first value is eggs because it is the first item in the shopping list with index 0, and the second value is 7.90 because it is the third item in the price list with index 2. The following illustration represents a list with six integer elements and their indices starting from zero. It's also nice to know that Python supports negative indexing, which means the last element’s index is -1, the second to last element’s index is -2, and the k-th last element’s index is -k.

Let’s first define the num_list list and then look at some examples:
num_list = [21, 13, 17, 39, 17, 51]
print(num_list[-1])
print(num_list[0])
print(num_list[-6])
Now run the code, and check its output. The first print statement returns 51, which is the last element in the list, and the last two print statements return 21 because both refer to the first element of the list. Sometimes, we need to know how many elements are within a list. To do so, we use len() function, like this:
print("The length of the list is {}.".format(len(num_list)))Running the code outputs The length of the list is 6 because the number of elements within the list is six.
Changing Values in Lists
Modifying an item within a list is like re-declaring a variable to a new value. Let’s look at the following example:
num_list = [21, 13, 17, 39, 17, 51]
print(num_list)
num_list[4] = 33
print(num_list)
In the code above, before we modify the value at index 4, it outputs [21, 13, 17, 39, 17, 51], and after changing the value at the index 4 to 33, it outputs [21, 13, 17, 39, 33, 51]. In other words, our code selects the item at position four and sets its value to 33.
Creating a List of Lists
In Python, we can store lists within another list (nested lists). To check how we can create a nested list, let's try the following code that makes one list containing other lists and values with different data types.
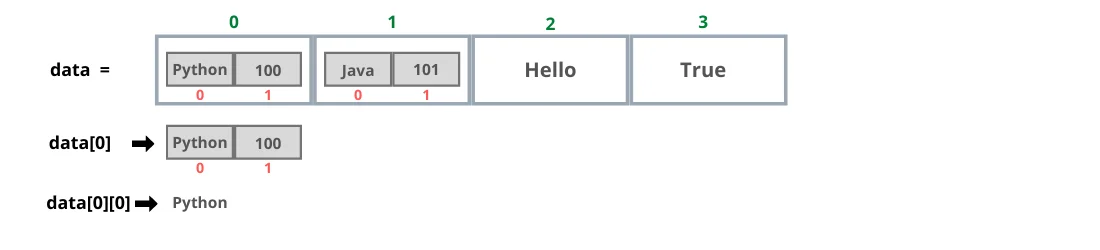
data = [["Python", 100], ["Java", 101], "Hello", True]
print(data)
print(data[1])
Run the code, and check its output.
['Python', 100], ['Java', 101], 'Hello', True]
['Java', 101]
The first line shows the entire list stored in the data variable, and the second line displays the second element of the data that itself is a list with two elements. So far, you've learned how to create nested lists. But what if we want to retrieve a specific element from an inner list. In Python, to access an item within a list, we put the item’s index between a pair of square brackets. However, if the item is inside an inner list, we have to add a second set of square brackets after the first set. Let’s check out an example:
print(data[0][0])
inner_list = data[1]
print(inner_list[0])
Running the code above outputs Python and Java. In the first line of code, the first index enclosed between the first set of square brackets refers to the first item in the data list, which itself is a list, and the second index enclosed between the second set refers to the first value of the inner list, which results in Python. The illustration below represents how Python is retrieved from the data list.

In the second line of code, the value at index 1 of the data list, which itself is also a list assigned to the inner_list variable; then in the last line, we are accessing the first element of the inner list stored in the inner_list variable, which is Java. The illustration below shows how Java is retrieved from the data list.
Slicing Lists
Python allows us to create list subsets using slicing techniques. To create a list slice, we specify the index of the first and last items. The items from the first index up to, but not including, the last index are copied into the slice, and it's evident that the copying doesn't modify the original list. There are different ways for slicing a list; let’s look at some of them.
Slicing with a Starting Index
Omitting the ending index means that the slice contains the list elements from the starting index to the end of the list. Let’s check it out:
num_list = [21, 13, 17, 39, 17, 51]
print(num_list[3:])
Slicing with an Ending Index
Omitting the starting index means that the slice contains the list elements from the beginning of the list up to the ending index. Let’s try the code:
num_list = [21, 13, 17, 39, 17, 51]
print(num_list[:4])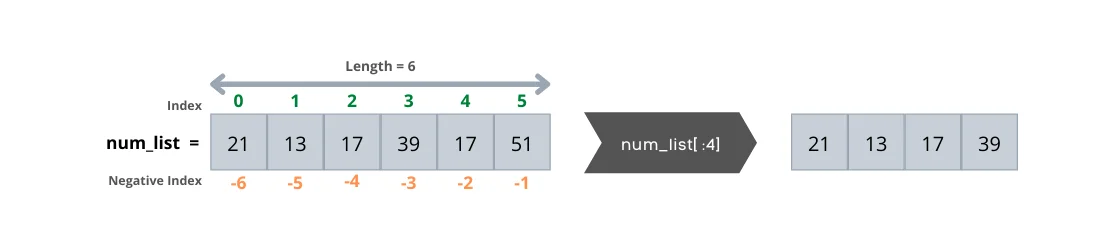
NOTE
Omitting both the starting and ending indices results in the entire list.
print(num_list[:])
[21, 13, 17, 39, 17, 51]
Slicing with Steps
We can use a step to return items at specified intervals. The step is optional — by default, it is 1. The following code returns every other item of num_list.
num_list = [21, 13, 17, 39, 17, 51]
print(num_list[ : :2])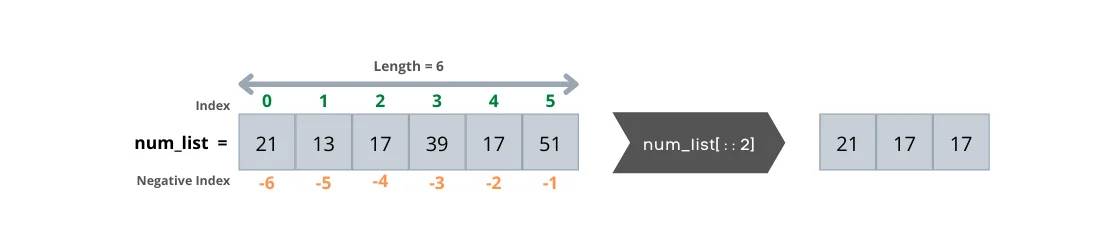
Reversing a List with Negative Step
We can reverse a list by specifying the step as -1. The following code returns the num_list items in reverse order.
num_list = [21, 13, 17, 39, 17, 51]
print(num_list[ : :-1])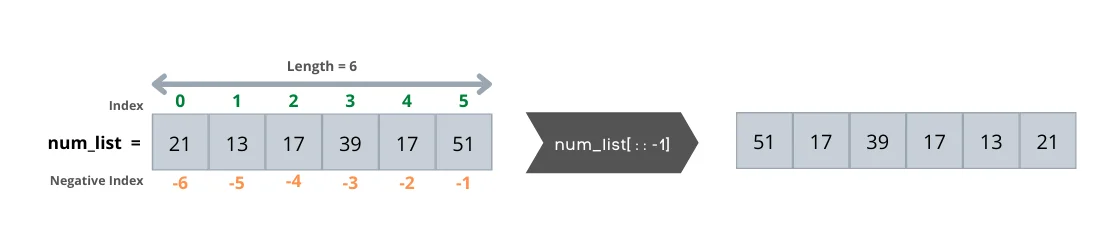
NOTE
In the code above, although we didn’t specify the start and end indices, both are assumed as negative indices as follows:
print(num_list[-1:-9:-1])
[51, 17, 39, 17, 13, 21]
Adding Items to a List
There are two methods for adding new items into a list, insert() and append() methods. The new item can be a string, a number, or even another list. We can use both methods to expand a list.
.insert()
The insert() method adds an item at a specified location within a list. Let’s see how it works.
fruits = ["apple", "orange", "cherry"]
fruits.insert(1, "pineapple")
print(fruits)
The code above inserts pineapple into the list at index 1 and outputs as follows: ['apple', 'pineapple', 'orange', 'cherry']
.append()
The append() method adds an item at the end of a list. Let’s check it out.
fruits = ["apple","orange","cherry"]
fruits.append("pineapple")
print(fruits)
The code above adds pineapple at the end of the list and prints it out. ['apple', 'orange', 'cherry', 'pineapple']
NOTE
You can add a list of objects at the end of a list with += operator. If the left operand of += is a list, the right operand must be a list or any other iterable object.
students = ["Mary", "James","Patricia"]
students += ["Robert"]
students += ["Emma", "William"]
print(students)
['Mary', 'James', 'Patricia', 'Robert', 'Emma', 'William']
The square brackets around the student name create a single-element list in the second line, which is appended to the students list using the += operator. In the same way, the third line appends a list of two students to the students list. We also can concatenate two lists using the + operator. The result is a new list containing the students of class A followed by the students of class B.
classA = ["Mary", "James","Patricia"]
classB = ["Robert", "Emma", "William"]
students = classA + classB
print(students)
['Mary', 'James', 'Patricia', 'Robert', 'Emma', 'William']
Removing Items from a List
There are two primary methods for removing items from a list, pop() and remove() methods.
.pop()
The pop() method removes an item at a specified index from a list and returns the item, which can be assigned to a variable and used later. The default value of the index is -1, which means if the index value isn't provided, it removes the last item.
fruits = ["apple", "orange", "cherry", "pineapple"]

second_fruit = fruits.pop(1) # removes the second item
last_fruit = fruits.pop() # removes the last item

print("Second Fruit is {}.".format(second_fruit))
print("Last Fruit is {}.".format(last_fruit))
print(fruits)
The code above removes two items: the first item is at index 1, and the second item is at the end of the list. Also, while popping these items out of the list, it saves them into the second_fruit and last_fruit variables, which prints them out later along with the modified fruits list.
Second Fruit is orange.
Last Fruit is pineapple.
['apple', 'cherry']
.remove()
The remove() method removes the first occurrence of an element with a specified value.
fruits = ["apple", "orange", "cherry", "pineapple"]
fruits.remove('cherry')
print(fruits)
Running the code outputs the fruits list without "cherry" because the remove() method removed it successfully.
['apple', 'orange', 'pineapple']But what happens if the item that we're going to remove doesn’t exist in the list? Let’s run the following code and see the result:
fruits = ["apple", "orange", "cherry", "pineapple"]
fruits.remove('blueberry')
print(fruits)
The code raises an error that the value isn't in the list. Let's see how we can fix it by using a try-except block to catch exceptions.
fruits = ["apple", "orange", "cherry", "pineapple"]
try:
  fruits.remove('blueberry')
  print(fruits)
except:
  print("The fruit name does not exist in the list.")
Run the code. This time our code doesn't crash, and it outputs a proper message that the item (fruit name) doesn't exist in the list.
The fruit name does not exist in the list.The in and not in Operators
Basically, the in operator checks whether a specified value is in a list or not. When the in operator is used in a condition, the statement returns a Boolean value evaluating into either True or False. When the specified value is found inside the list, the statement returns True; otherwise, it returns False.
num_list = []
if not num_list:
  print(“The list is empty.”)
The code outputs “The list is empty” since the num_list is empty.
NOTE
We can create an empty list by assigning empty square brackets to a variable. The length of an empty list is zero, and we can always add elements to the empty list using the append() or insert() methods.
The for Loop and Lists
We can use the for loop to iterate over a list of items and take one item at a time until no more items remain to process. Let's look at the code.
fruits = ["apple", "orange", "cherry", "pineapple"]
for fruit in fruits:
  print(fruit)
Running the code above prints each item within the list on a separate line. In other words, for every fruit in the fruits list, it prints the fruit’s name.
apple
orange
cherry
pineapple
Conclusion
In this tutorial, you learned how to work with Python lists through simple and concise snippets. We'll look at some advanced techniques in upcoming tutorials.
