Python vs. Anaconda — What's the Difference?
What are the key differences between Python and Anaconda? Here's what you need to know.
Python is a multi-purpose programming language used in everything from from machine learning to web design. It uses pip (a recursive acronym for "Pip Installs Packages" or "Pip Installs Python") as its package manager to automate installation, update, and package removal.
Anaconda is a distribution (a bundle) of Python, R, and other languages, as well as tools tailored for data science (i.e., Jupyter Notebook and RStudio). It also provides an alternative package manager called conda.
So, when you install Python, you get a programming language and pip (available in Python 3.4+ and Python 2.7.9+), which enables a user to install additional packages available on Python Package Index (or PyPi).
In contrast, with Anaconda you get Python, R, 250+ pre-installed packages, data science tools, and the graphical user interface Anaconda Navigator.
Thus, the main difference between Python and Anaconda is that the former is a programming language and the latter is software to install and manage Python and other programming languages (such as R).
In this article, we'll discuss how to use Anaconda to manage and install packages as well as when to use pip or conda. Furthermore, we will discuss the differences between conda varieties (i.e., miniconda and mamba).
Package and Environment Managers
Please note that I am using Linux as my primary system as it is highly convenient for programming projects (together with macOS), so on Windows, the following commands may differ. I advise installing Anaconda and using Anaconda Command Prompt to run the commands on Windows.
In data science, and generally in programming, we use virtual environments to isolate package dependencies used in different projects so that they don't conflict with each other. For example, you may have two projects: one using pandas 0.25 and the other pandas 1.5. You cannot install both versions system-wide, but you can create isolated environments for each of these projects, activate them, and start coding.
Note, however, that it is possible to install multiple versions of Python system-wide with pyenv and use its plugin pyenv-virtualenv to manage virtual environments on Unix.
Both Python and Anaconda offer solutions for virtual environment creation and package management.
Python
Python incorporates a built-in module venv (from "virtual environment"), which can create isolated sets of Python versions and affiliated packages.
- Run
python3 -m venv /path/to/dirto create an environment. For example, the commandpython3 -m venv ./venv_dirwill create a virtual environment in the directoryvenv_dirlocated in the current working directory. - Activate it by running
source venv_dir/bin/activate. - You will see the name of the environment in parentheses appear before your user name.
- List the packages installed in this environment by running
pip list. There are not that many at the moment as it is a fresh environment. - Deactivate it with the
deactivatecommand.
python3 -m venv ./venv_dir
source venv_dir/bin/activate
pip list

Package       Version
------------- -------
pip           20.0.2
pkg-resources 0.0.0
setuptools    44.0.0
Now, let's install a few packages in this environment. We can do this with pip, but first, we have to activate the environment again. Next, run the command pip install pandas==1.2.5 seaborn. This will install the version of pandas as of June 2021 and the latest available version of seaborn (0.11.2 as of August 2021).
Note that pip collects and installs the dependencies of these packages, such as numpy (required for pandas) and matplotlib (required for seaborn).
pip install pandas==1.2.5 seabornAnaconda
Anaconda offers its own open-source package manager called conda. It's very similar to pip even though it doesn't always have the most up-to-date packages and is moderately slower than pip. However, conda allows us to install packages outside the Python ecosystem. conda provides different channels from which we can install packages. pip has one central public repository, PyPi, but it is also possible to create and host your own repository.
To create a virtual environment with Anaconda, we can use the GUI Anaconda Navigator or the command line. Let's start with Anaconda Navigator.
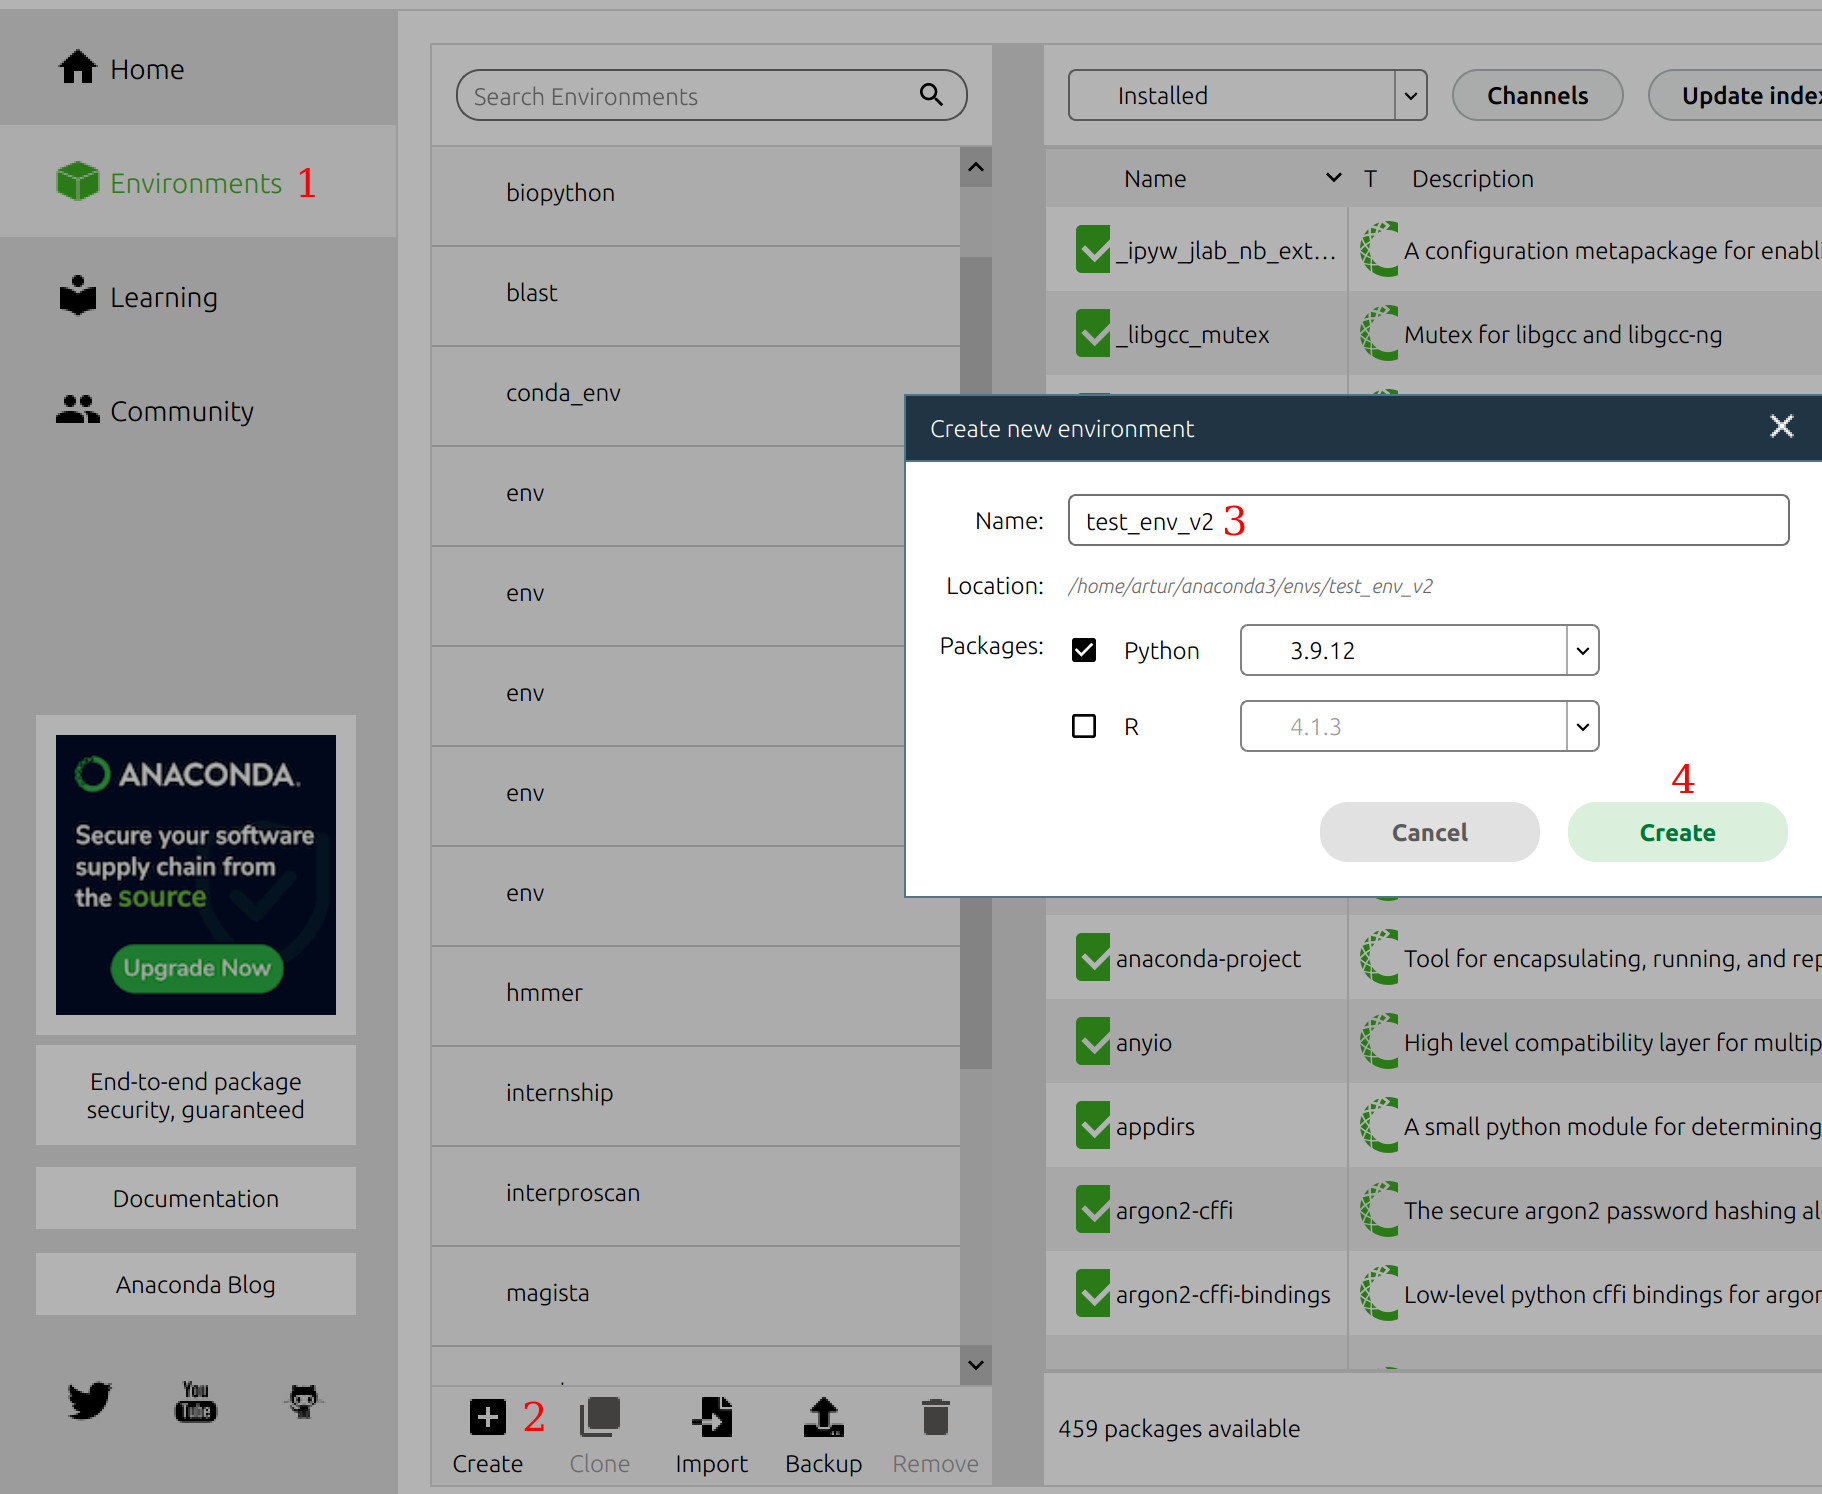
- First, open Anaconda Navigator and click on "Environments" on the left pane (1). Then, click on
Createat the bottom (2), write the name of your environment (3), choose the Python (or R) version, and click the green button "Create" (4):
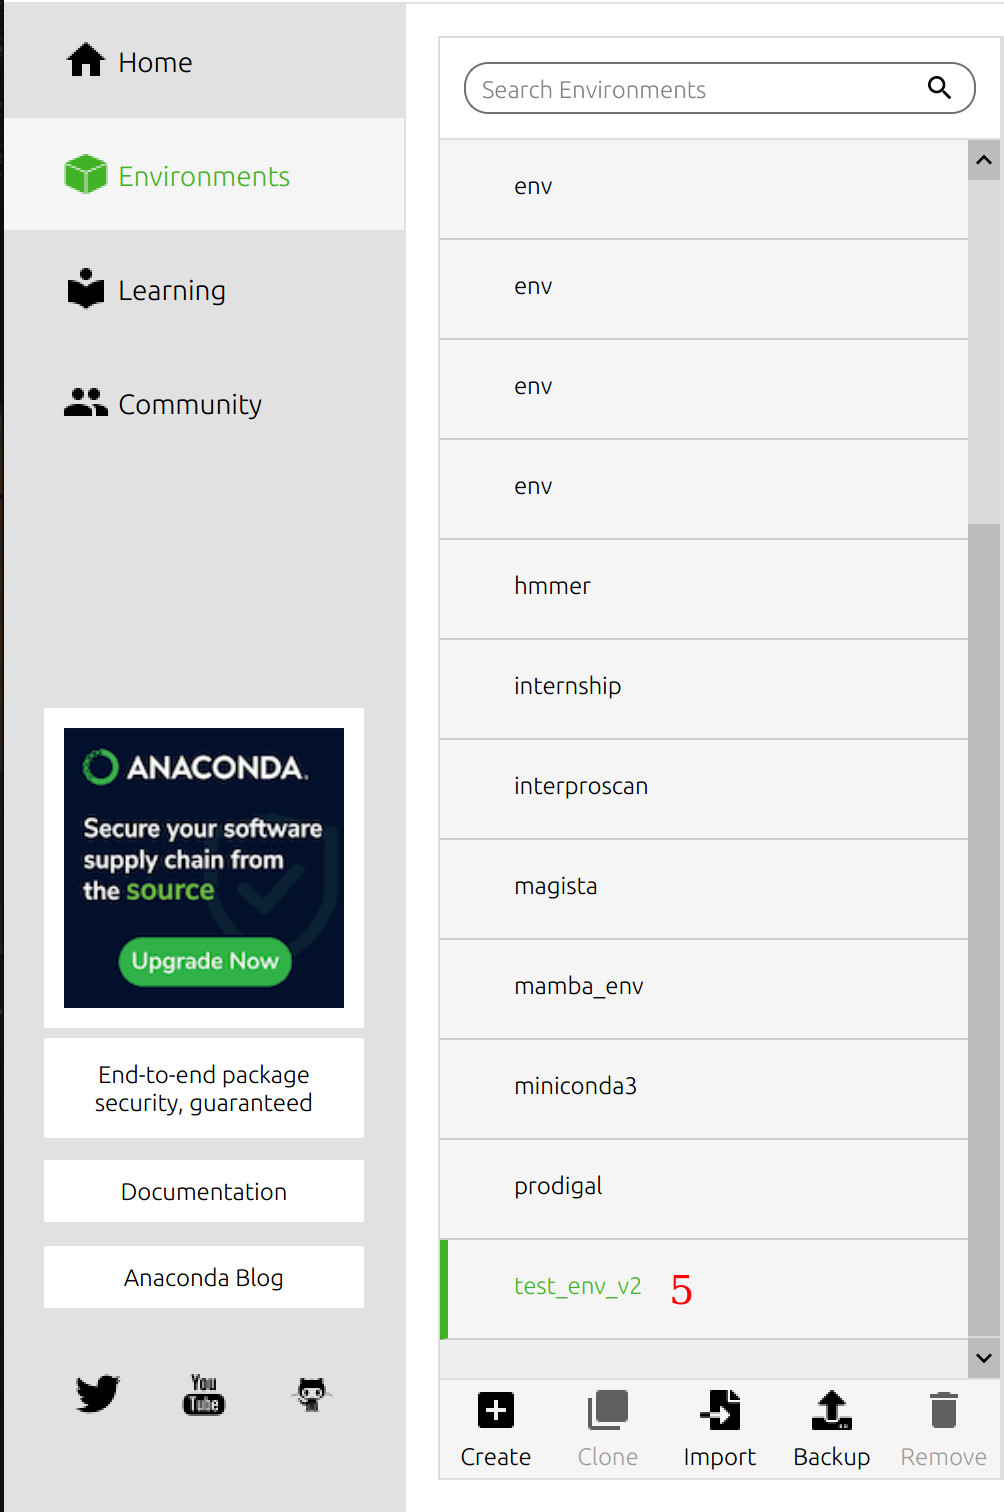
- Now, click on the environment to activate it (5):
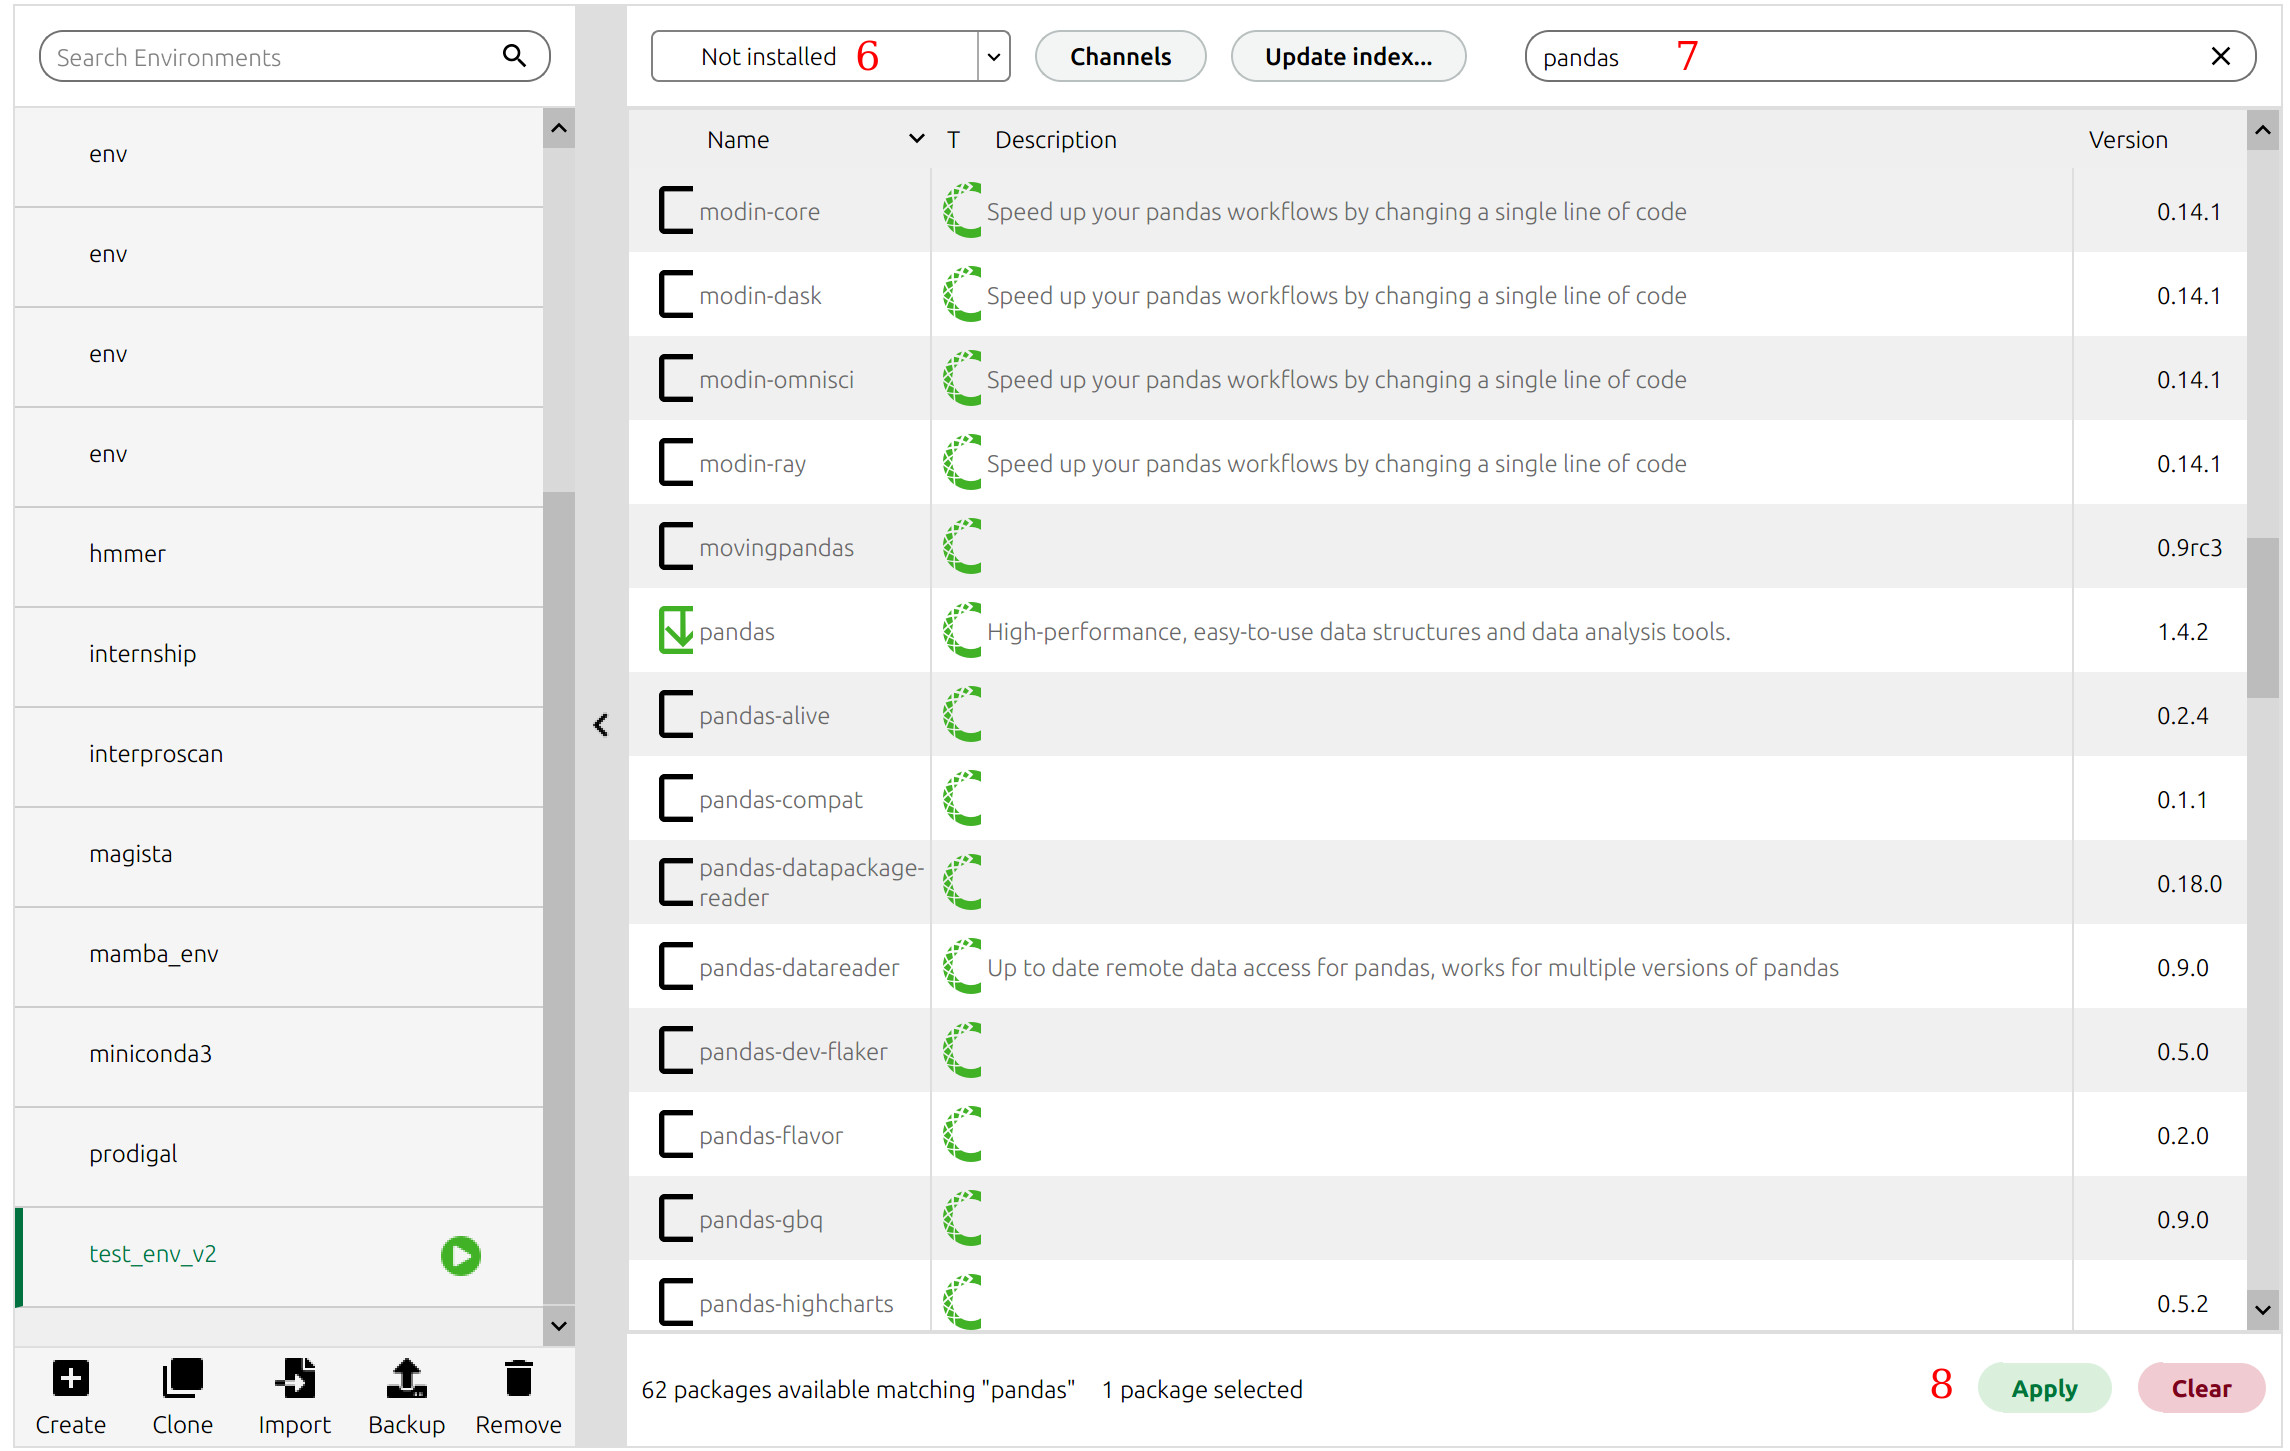
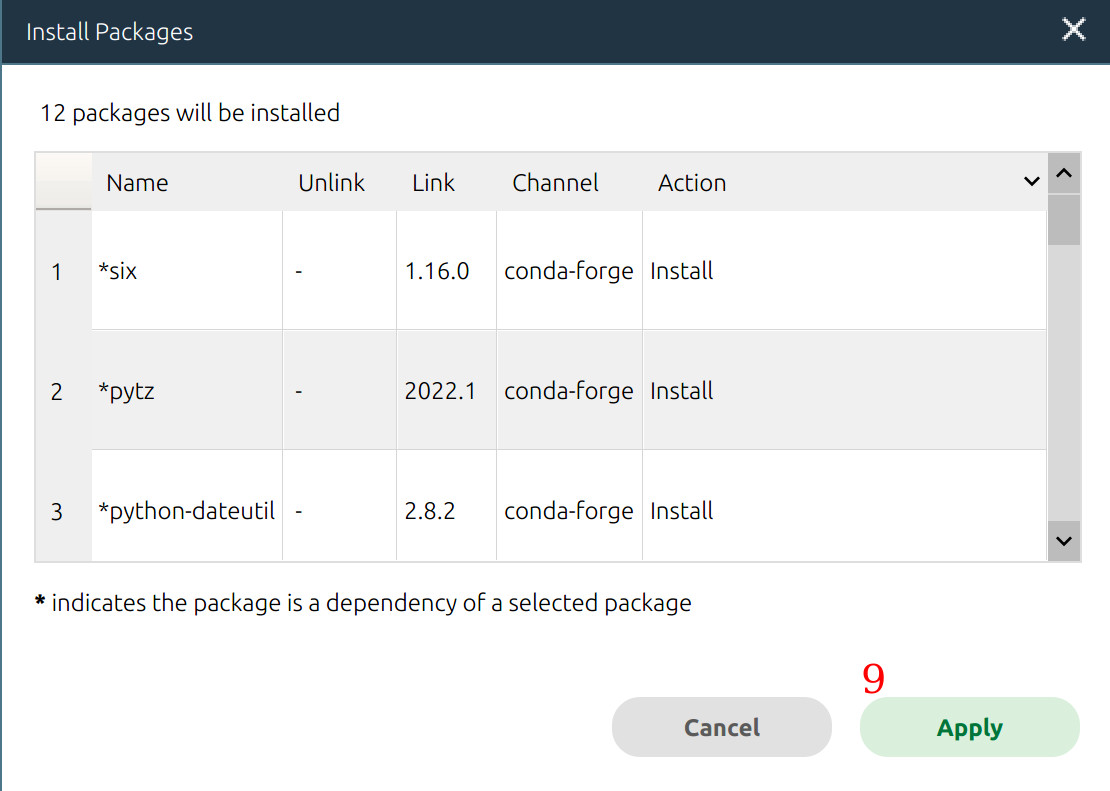
- We already have some installed packages in the environment, but to install some more, select "Not installed" in the drop-down menu at the top (6) and search for a package with a search bar (7). We now have to locate the required package, select it, click "Apply" at the bottom (8), and again "Apply" when it asks for our confirmation (9):
Finally, get back to the "Home" page, select the environment, and run the required application (for example, JupyterLab).
Although using a GUI is beginner-friendly compared to the command line, it's really slow and more complex. I strongly recommend learning the command line basics to significantly speed up your work.
Let's now create a virtual environment with the command line.
- Type
conda create -n test_env_v2. This will create an environment calledtest_env_v2. It will ask you if you want to create an environment in a directory, typey, and press Enter to confirm. Notice that I am creating the environment in theminiconda3directory. Keep it in mind; I will explain whatminicondais later. - To activate the environment, run
conda activate test_env_v2. Notice that the environment name appeared before your user and computer name (artur@artur-Zenbook, in my case). - Now install
pandas,seaborn, andjupyterlabby runningconda install pandas=1.2.5 seaborn jupyterlab. - You can now run JupyterLab by running
jupyterlabcommand.
conda create -n test_env_v2

Collecting package metadata (current_repodata.json): done
Solving environment: done

## Package Plan ##

  environment location: /home/artur/miniconda3/envs/test_env_v2

Proceed ([y]/n)? y

Preparing transaction: done
Verifying transaction: done
Executing transaction: done
#
# To activate this environment, use
#
#     $ conda activate test_env_v2
#
# To deactivate an active environment, use
#
#     $ conda deactivate

conda activate test_env_v2

(test_env_v2) artur@artur-Zenbook:~$

(test_env_v2) artur@artur-Zenbook:~$ conda install pandas=1.2.5 seaborn jupyterlab

(test_env_v2) artur@artur-Zenbook:~$ jupyterlab
Notice that installation with conda takes longer than with pip, but the syntax is somewhat similar and more straightforward.
A significant advantage of conda is that it provides multiple channels to install packages for different purposes. The main package channel used by default is managed by Anaconda Inc. and may contain outdated packages. On the other hand, the channel conda-forge (their website) is maintained by the community and usually offers a greater number of up-to-date packages.
Run conda config --add channel conda-forge to add this channel. Now, whenever you want to install packages from conda-forge, just add -c conda-forge option to conda install — for example, conda install -c conda-forge pandas seaborn installs pandas and seaborn from the conda-forge channel.
(test_env_v2) artur@artur-Zenbook:~$ conda config --add channel conda-forge

(test_env_v2) artur@artur-Zenbook:~$ conda install -c conda-forge pandas seaborn
Of course, there are many other channels created for different purposes. For instance, I am a bioinformatician and install many tools for my work that are only available on the channel bioconda. Another example is the pytorch channel offered by a machine learning framework PyTorch.
When to Use Python or Anaconda?
But when do we use pip or conda? It depends.
PyPi comprises 350,000+ packages designed specifically for Python, while Anaconda offers only around 20,000 packages among the main channel and conda-forge. However, Anaconda packages aren't Python-specific! That is, there can also be, for example, R packages or even entire software distributions that use Python, R, and Perl simultaneously.
Moreover, Anaconda mainly contains packages for data science, while PyPi can install packages for any use case (i.e., networking or website building). In addition, Anaconda has a beginner-friendly GUI.
So, you may have already determined when to use one or the other at this point. If you're a beginner in data science, use Anaconda; if you're more experienced with the command line and cannot find packages for your project (that can be outside the data science domain), then go for Python's pip and PyPi.
Now let's discuss the differences between Anaconda and Miniconda.
Anaconda vs. Miniconda
Miniconda is yet another Python distribution, but, in contrast to Anaconda, it contains just a few pre-installed packages (instead of 250+ in Anaconda). Of course, it also incorporates the package manager conda.
In other words, Miniconda is a lightweight version of Anaconda. You should use it if you want to install all the necessary packages yourself using the command line and don't want to waste disk space for packages you won't use. You can install it following the instructions for your platform here.
However, if you're not very experienced with the command line but want to start coding right away, opt for Anaconda and its Graphical User Interface, Anaconda Navigator.
Mamba
Remember that I told you that the conda package manager is somewhat slower than pip? Well, we have a better alternative to speed things up.
Mamba is Miniconda rewritten on C++, so it's faster and uses less computing resources. It uses exactly the same syntax: you just have to change conda to mamba in the commands.
To install Mamba run conda install -c conda-forge mamba.
I determined that on my machine, with already-established environments and tons of cached packages (as well as added channels), conda actually is slightly faster! However, I always use mamba on my Amazon EC2 instance (a tiny server offered by Amazon Web Services) with just one gigabyte of RAM as the conda process gets killed because it runs out of memory. Moreover, mamba performs much faster on new machines than conda. In the end, it's up to you to choose the package manager for your project.
Conclusions
In this article, I discussed the differences between Python, Anaconda, Miniconda, and Mamba. Let's summarize:
- If you want to use only Python packages for data science and other domains, use Python's
pippackage manager. - If you're a beginner in data science and want to start creating outstanding projects right away, use Anaconda and the GUI Anaconda Navigator.
- If you have more knowledge of the command line and don't want to waste storage space, use
miniconda. - If you want to speed things up or run
minicondaon a slow machine, use formamba.
Now you know how to choose the instruments you need for your Python project. Happy coding!
If you have any questions or doubts, reach out to me on LinkedIn and GitHub.