How to Install PIP on Windows (w/ Screenshots)
In this tutorial, we will identify PIP for Python, when we use it, how to install it, how to check its version, how to configure it on Windows, and how to upgrade (or downgrade) it.
What Is PIP for Python?
PIP stands for "PIP Installs Packages", which is a recursive acronym (the one that refers to itself) coined by its creator. In more practical terms, PIP is a widely used package-management system designed to install libraries that aren't included in the standard distribution of the Python programming language on our local machine — and then manage them from the command line.
By default, PIP fetches such libraries from Python Package Index (PyPI), which is a central online repository containing a vast collection of third-party packages for various applications. If necessary, PIP can also connect to another local or online repository as long as it complies to PEP 503.
How to Install PIP on Windows
Before proceeding to PIP installation on Windows, we need to make sure that Python is already installed and PIP is not installed.
Check If Python Is Available
To verify that Python is available on our local machine, we need to open the command line (in Windows search, type cmd and press Enter to open Command Prompt or right-click on the Start button and select Windows PowerShell), type python, and press Enter.
If Python is properly installed, we will see a notification like the one below:
Python 3.10.2 (tags/v3.10.2:a58ebcc, Jan 17 2022, 14:12:15) [MSC v.1929 64 bit (AMD64)] on win32 Type "help," "copyright," "credits," or "license" for more information.
In the opposite case, we will see the following notification:
'python' is not recognized as an internal or external command, operable program or batch file.
This means that Python is either not installed on our local machine or is installed incorrectly and needs setting system variables. If you need further guidance on how to properly install Python on Windows, you can use this article in the Dataquest blog: Tutorial: Installing Python on Windows.
Check If PIP Is Already Installed
Now that we verified that Python is installed on Windows (or, if it was not, have installed it), let's check if PIP is already installed on our system.
The latest releases Python 3.4+ and Python 2.7.9+, as well as the virtual environments virtualenv and pyvenv, automatically ship with PIP (we can check our Python version by running python --version or python -V in the command line). However, the older versions of Python don't have this advantage by default. If we use an older Python release and cannot upgrade it for some reason (e.g., when we have to work with the projects made in old versions of Python incompatible with the newer versions), we may need to manually download and install PIP on Windows.
To check if PIP is already installed on Windows, we should open the command line again, type pip, and press Enter.
If PIP is installed, we will receive a long notification explaining the program usage, all the available commands and options. Otherwise, if PIP is not installed, the output will be:
'pip' is not recognized as an internal or external command, operable program or batch file.
This is exactly the case when we have to manually install PIP on Windows.
Download PIP
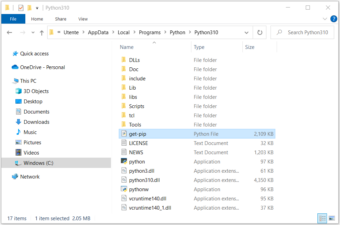
Before installing PIP, we have to download the get-pip.py file. We can do this two ways:
- Go to https://bootstrap.pypa.io/get-pip.py and save this file as
get-pip.pyin the same folder where Python is located.
By default, the Python installation is stored in the folderAppData. The entire path could look like the following:
C:\Users\User\AppData\Local\Programs\Python\Python310
The folder User can be called differently on a particular machine, and also the final folder in the above path depends on the version of Python. In our case – Python 3.10:
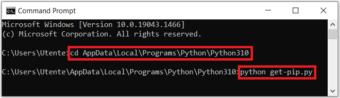
- Open the command line and navigate to the folder where Python is stored using the
cdcommand (see the previous point if you are not sure about Python's location).
Now, run the following curl command:
curl https://bootstrap.pypa.io/get-pip.py -o get-pip.py

Install PIP on Windows
Now that we downloaded the get-pip.py file, we need to complete the followings steps.
- Open the command line
- Navigate to the folder where Python and the
get-pip.pyfile are stored using thecdcommand - Launch the installer by running the following command:
python get-pip.py
After a quick installation process, a message appears with all the details of the installation, and the final line appears as follows:
Successfully installed pip-22.0.1 wheel-0.37.1
PIP is now successfully installed on Windows.
Verify the PIP Installation Process and Check the PIP Version
To double-check if PIP has been installed properly and check its version, we need to run one of these commands in the command line:
pip --version
or
pip -V
If PIP is installed correctly, we will see a message indicating the version of PIP and its location on the local system, like the following:
pip 22.0.2 from C:\Users\Utente\AppData\Local\Programs\Python\Python310\lib\site-packages\pip (python 3.10).
If instead, an error is thrown, it is necessary to repeat the installation process.
Add PIP to Windows Environment Variables
To be able to run PIP without issues from any folder in the command line (rather than navigating every time to the folder where the PIP installer is stored, as we did earlier), we have to add the path to the folder with the get-pip.py file to Windows environment variables. This is especially important in that rare case when, we have installed several versions of Python, including old ones. In this situation, to avoid installing PIP separately for each old version of Python, we should install it only for one of them and then perform the following steps:
- Open
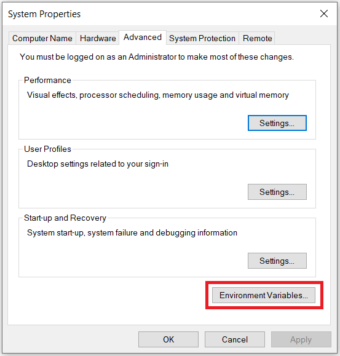
Control Panel(typing it in Windows search), selectSystem and Security, then selectSystem. - Go to the end of the opened window and select
Advanced system settings:

- Click
Environment Variables:
- In the
System variablessection, find and double-click the variablePath:
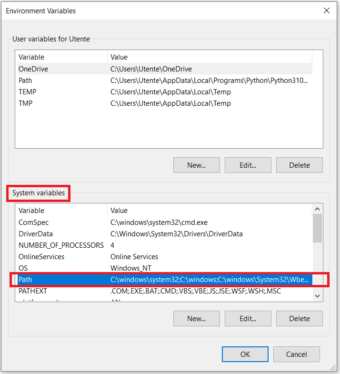
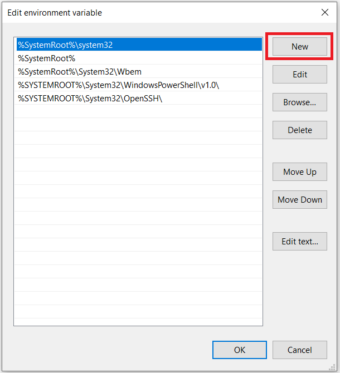
- Click
Newand add the path to the folder where the PIP installer is stored:
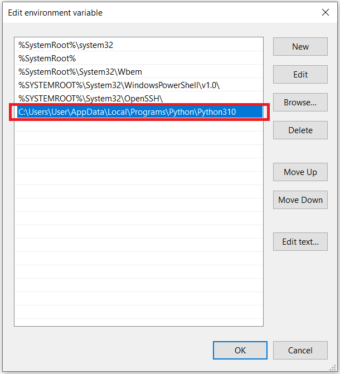
- Click
OKto confirm modifications.
Upgrade PIP on Windows
Sometimes, we may need to update PIP on Windows to the latest version to keep it up-to-date and working flawlessly. For this purpose, we can run the following command in the command line:
python -m pip install --upgrade pip
As a result, the old version of PIP will be uninstalled and the most recent release will be installed.
Downgrade PIP on Windows
We can also want to downgrade PIP to a specific older version. This operation may be necessary in certain cases, for example, if a new version works with some compatibility issues. To downgrade PIP on Windows, we need to open the command line and run a command with the following syntax:
python -m pip install pip==<version>
Let's say, we want to downgrade it to v20.3. Then the exact command will be:
python -m pip install pip==20.3
After downgrading PIP, we can verify that we now have the necessary version of it by running python -V.
Conclusion
In this tutorial we covered various topics regarding the installation of PIP on Windows:
- How PIP works
- How to check if Python and PIP are already installed
- When it may be necessary to manually install PIP on Windows
- How to download and install PIP on Windows
- How to verify if PIP has been successfully installed and check its version
- How to configure PIP on Windows and when it may be necessary
- When and how to upgrade or downgrade PIP on Windows
Now that we have PIP properly installed on Windows, we can begin using it to manage Python libraries. Let's start with running pip help in the command line and exploring the available commands and options for this program.