Deploying Airflow to the Cloud with Amazon ECS (Part III)
You’ve come a long way.
In Part I, you built and tested an ETL pipeline entirely on your local machine using Apache Airflow and Docker. You developed a real DAG that simulated data generation, transformed it, and prepared it for upload — all within a portable development setup.
In Part II, you extended that pipeline into the cloud. You provisioned AWS infrastructure — including an S3 bucket for storage, RDS for metadata, IAM roles, security groups, and an Application Load Balancer for future UI access. You also reconfigured your Airflow setup to run the DAG locally, while uploading processed data to S3 and using RDS to persist state.
Now, it’s time to complete the transition.
In this final part of the tutorial, you’ll deploy your entire Airflow environment to the cloud using Amazon Elastic Container Service (Fargate). No more relying on your local machine — your workflows will now run in containers, fully managed by AWS and accessible from anywhere.
In this stage, you’ll build a custom Docker image with your Airflow code and DAGs, define how components run using an ECS task definition, and launch a persistent webserver service. You’ll run one-time tasks to initialize the metadata DB and create an admin user, spin up background workers like the scheduler, triggerer, and DAG processor, and expose the Airflow UI through your existing Application Load Balancer.
By the end, you’ll have a production-grade, cloud-native orchestration system that:
- Runs your workflows automatically and reliably — even when your laptop is off
- Logs and persists metadata in Amazon RDS
- Scales using ECS and Fargate
- Eliminates the need for manual restarts or local dependencies
Every deployment step is broken down clearly, with diagrams, explanations, and tested commands.
Customize Your Airflow Docker Image
If you’ve followed along in the previous tutorials, your ETL pipeline is already running locally inside Docker using docker-compose.yaml, and you’ve successfully tested it from end to end. Now, it’s time to prepare that project for deployment by packaging it into a custom Docker image — one that contains your DAGs, dependencies, and cloud-specific settings.
This image is what we’ll later push to Amazon ECS Repository and run inside ECS using Fargate (serverless compute engine).
Update docker-compose.yaml to Use a Custom Image
Open your docker-compose.yaml file and locate the x-airflow-common section. Update it to look like this:
x-airflow-common:
  &airflow-common
  build: .
  image: airflow-image:latest
Why this matters:
- The
build: .line tells Docker Compose to look for aDockerfilein the current directory and build a new image from it.- The
image: airflow-image:latestline assigns a specific name to the image you’re building. This name will be used to tag and push the image to Amazon Elastic Container Registry (ECR) later on.Together, these lines replace the default Apache Airflow image:
image: ${AIRFLOW_IMAGE_NAME:-apache/airflow:3.0.1}and signal that we’re now working with a self-contained, production-ready image that includes all the components needed to run your pipeline in the cloud. Make sure to comment it out.
Create Your Dockerfile
Now, in the same folder as your docker-compose.yaml, create a file named Dockerfile (no extension) and paste in the following configuration:
FROM apache/airflow:3.0.1-python3.12

USER airflow

RUN pip install --no-cache-dir "apache-airflow[webserver,auth]==3.0.1"
COPY requirements.txt .
RUN pip install --no-cache-dir -r requirements.txt
RUN pip install apache-airflow-providers-fab==2.0.2

ENV AIRFLOW__CORE__AUTH_MANAGER=airflow.providers.fab.auth_manager.fab_auth_manager.FabAuthManager
ENV AIRFLOW__CORE__EXECUTOR=LocalExecutor
ENV AIRFLOW__LOGGING__HOSTNAME_CALLABLE=socket.gethostname
ENV AIRFLOW__DATABASE__SQL_ALCHEMY_CONN=postgresql+psycopg2://**your-database-username**:**your-database-password**@**your-database-endpoint**/postgres
ENV AIRFLOW__API__BASE_URL=http://**your-alb-dns**
ENV AIRFLOW__LOGGING__BASE_URL=http://**your-alb-dns**

COPY dags/ /opt/airflow/dags/

RUN airflow db migrate
What Each Line Does, and What You Must Replace
Let’s walk through the key sections and environment variables you just added.
AIRFLOW__DATABASE__SQL_ALCHEMY_CONN
ENV AIRFLOW__DATABASE__SQL_ALCHEMY_CONN=postgresql+psycopg2://your-database-username:your-database-password@your-database-endpoint/postgresThis line tells Airflow how to connect to your PostgreSQL database on Amazon RDS — the same one you set up in Part 2. Replace the placeholders with your actual RDS credentials and endpoint:
your-database-username: the username you specified when creating your RDS instanceyour-database-password: the password you usedyour-database-endpoint: the RDS endpoint (e.g.,your-db.abc123xyz.us-east-1.rds.amazonaws.com)postgres: the default database name AWS RDS assigns at creation (i.e., no need to change this value)
This connection string ensures that Airflow stores all of its metadata — including task states, logs, DAG runs, and user accounts — in a persistent, cloud-hosted database.
AIRFLOW__API__BASE_URL and AIRFLOW__LOGGING__BASE_URL
ENV AIRFLOW__API__BASE_URL=http://your-alb-dns
ENV AIRFLOW__LOGGING__BASE_URL=http://your-alb-dns
These two values should both point to your Application Load Balancer DNS name, which you created in Part 2. It typically looks like:
http://my-airflow-alb-1234567890.us-east-1.elb.amazonaws.comThese settings make sure that:
- Links in the Airflow UI correctly route through your load balancer
- Logs are served from the right location when viewed through the interface
If these URLs are wrong or missing, you won’t be able to access the Airflow UI or task logs reliably from the browser.
AIRFLOW__CORE__AUTH_MANAGER
ENV AIRFLOW__CORE__AUTH_MANAGER=airflow.providers.fab.auth_manager.fab_auth_manager.FabAuthManagerThis enables Flask AppBuilder (FAB) authentication and role-based access control. It lets you:
- Log into the Airflow UI with your own credentials
- Create users and assign roles (Admin, Op, Viewer, etc.)
- Control access to DAGs and sensitive operations
Without this setting, authentication won’t work — and your UI may fall back to default behavior without proper user controls.
AIRFLOW__CORE__EXECUTOR
ENV AIRFLOW__CORE__EXECUTOR=LocalExecutorThis sets Airflow to use LocalExecutor, which allows it to run multiple tasks in parallel within the same container. This is perfect for ECS Fargate, where each container acts as an isolated worker.
We switched from CeleryExecutor to LocalExecutor back in Part 1 to avoid needing Redis or external workers. This keeps our architecture simple and scalable.
AIRFLOW__LOGGING__HOSTNAME_CALLABLE
ENV AIRFLOW__LOGGING__HOSTNAME_CALLABLE=socket.gethostnameThis tells Airflow to use the ECS container’s hostname when generating log paths.
Why this matters:
When your Airflow services run on ECS behind a load balancer, each container has its own hostname. Setting this explicitly ensures logs are correctly linked to the right ECS task and can be viewed seamlessly in the UI.
COPY dags/ /opt/airflow/dags/
This command copies your entire dags/ folder from your project into the container’s DAG directory.
COPY dags/ /opt/airflow/dags/
In local dev, Airflow reads DAGs from a mounted folder. But in ECS, there is no shared volume — so all DAGs must be included inside the image itself. This step ensures that when the container starts in the cloud, your workflows are already loaded and ready to run.
RUN airflow db migrate
This final line is where Airflow initializes its metadata database by creating all the necessary internal tables in your connected RDS instance:
RUN airflow db migrateThis step must run successfully and exit with code 0. If there are any errors, check:
- That your database credentials are correct
- Your security group allows traffic on port
5432 - Your RDS instance is in the “Available” state
Without this step, ECS will launch your containers but Airflow will fail because the metadata tables don’t exist yet.
requirements.txt
Before building your image, make sure your project directory includes a requirements.txt file with the following packages:
apache-airflow-providers-fab==2.0.2
pandas==2.1.1
boto3==1.38.21
This file lists the external Python dependencies your Airflow project needs to run properly.
apache-airflow-providers-fabenables authentication and role management.pandasis used to structure and transform your event data in the DAG.boto3allows your tasks to interact with AWS services like S3.
Make sure this file is in the same folder as your Dockerfile, since it’s referenced during the image build process.
Once your Dockerfile, requirements.txt, and docker-compose.yaml are correctly configured, you're ready to build your image locally and push it to Amazon ECR, which we’ll cover in the next step.
Let’s go!
Pushing the Image to Amazon ECS Repository
Now that your Dockerfile is configured, it's time to build your custom Airflow image and upload it to the Amazon ECS private registry, which is a secure container repository built into the ECS console.
Before we can push anything to the ECS repository, we need to build the image locally first. Here are the steps:
Step 1: Build the Image Locally
In your terminal, make sure you're still in the same project directory (with your Dockerfile and docker-compose.yaml).
Then run the following command to build your custom Airflow image:
docker build --no-cache -t airflow-image:latest .This command will:
- Build your image using the instructions in the
Dockerfile- Install all required dependencies
- Embed your DAGs and environment configuration
The build should finish with no errors and exit with code 0. If the build fails, double-check your
Dockerfileand make sure Docker Desktop is running.You can confirm the image was built successfully by running:
docker images airflow-image
The image name airflow-image and the latest tag need to match exactly what you specified in your docker-compose.yaml. This ensures consistency when tagging and later pushing the image to your ECS repository.
Step 2: Create a Repository in Amazon
Before you can push the image, you need a destination for it inside AWS, a private repository with the same name as your image.
Go to the AWS Console and search for Elastic Container Service → Click Repositories → Click Create repository.
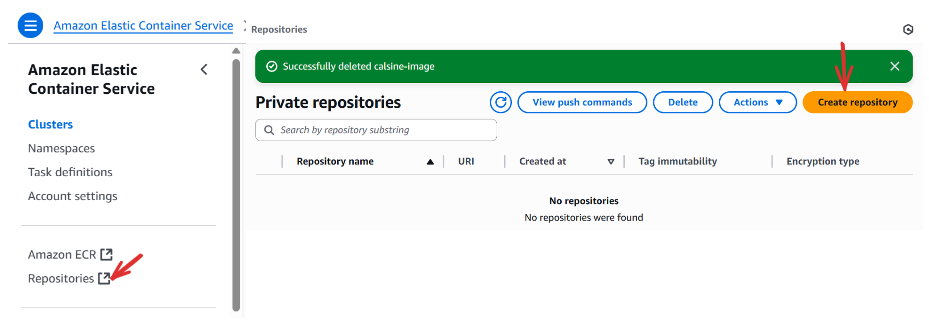
- Under General settings, set Repository name to
airflow-image(this must match the image name you used in yourdocker-compose.yaml) - Leave the other settings as default
- Click Create
Once created, AWS will give you a unique repository URI , something like:
123456789012.dkr.ecr.us-east-1.amazonaws.com/airflow-imageYou’ll need to use this in the next step when tagging and pushing your image.
Step 3: Authenticate Docker to ECS repository
In order to push your image securely, you need to log in to ECR from your terminal. Run:
aws configureThis will prompt you to enter your credentials when you created your AWS account in the:
- AWS Access Key ID
- Secret Access Key
- Default region (e.g.,
us-east-1) - Output format (you can use
jsonor leave it blank)
You can confirm your settings with:
aws configure listThen, authenticate Docker to your ECR registry:
aws ecr get-login-password --region us-east-1 | docker login --username AWS --password-stdin 123456789012.dkr.ecr.us-east-1.amazonaws.com- Replace
123456789012with your actual AWS account ID - Replace
us-east-1with the region you selected during the creation of your resources
Step 4: Tag and Push the Image
Now that Docker is authenticated, you can tag your local image with the full URI of your ECS repository:
docker tag airflow-image:latest 123456789012.dkr.ecr.us-east-1.amazonaws.com/airflow-image:latest- Make sure to replace
123456789012with your actual AWS account ID, andus-east-1with the correct region if different.
Then push the image to your ECS private registry:
docker push 123456789012.dkr.ecr.us-east-1.amazonaws.com/airflow-image:latest- This step uploads your custom Airflow image to your ECS repository, making it available when launching your containers in Amazon ECS.
That’s it!
You’ve successfully built, tagged, and pushed your custom Airflow image to your private AWS repository inside ECS.
Now that your image lives in the cloud, you’re ready to deploy Airflow using Amazon ECS (Fargate), and bring your pipeline to life. Let’s keep going.
Configuring ECS Resources
Now that we’ve moved your Airflow Docker project from local development into the cloud by building and pushing a custom Docker image, it’s time to put that image to work. In this section, we’ll configure Amazon ECS to actually run your container automatically, reliably, and at scale.
We’ll walk through the three key pieces of ECS setup:
- Creating a Cluster
- Defining a Task Definition
- Creating a Service to keep your container running
By the end of this section, you’ll have a fully operational Airflow API server deployed and managed inside ECS, connected to your database and accessible through your public-facing ALB.
Amazon ECS – Running Airflow in Containers
Amazon ECS allows you to run Docker containers in a managed, scalable environment. Here’s how the components fit together:
- A cluster is your container home base: where ECS resources are grouped.
- A task definition is a blueprint for your containers: it tells ECS what image to use, how much memory to allocate, and how to start the container.
- A service ensures that your container stays running: it handles scaling and recovery if something fails.
i. Creating a Cluster
From the Amazon Console, go to Elastic Container Service → Clusters → Create cluster. Under Cluster configuration set the Cluster name → your-cluster-name (e.g., my-airflow-cluster). Ensure AWS Fargate (serverless) is selected under Infrastructure - optional. Click Create.
ii. Creating a Task
On ECS, click on Task definitions → Create new task definition
Task definition configuration:
- Task definition family →
your-task-name(e.g.,my-airflow-task)
Infrastructure requirements:
- Launch type →
AWS Fargate - Task roles - conditional →
ecsTaskExecutionRole - Task execution role →
ecsTaskExecutionRole - Remeber ,
ecsTaskExecutionRoleis the role we created in part two fo this tutorial, when we were creating our S3 bucket.
Container – 1:
- Container details:
- Name →
your-container-name(e.g.,my-airflow-container) - Image URI →
enter-your-repository-uri:your-image-tag(your image URI in your image repository, and make sure to add the tag. It will be something like:123456789012.dkr.ecr.us-east-1.amazonaws.com/airflow-image:latest - Essential container →
Yes
- Name →
- Port mappings:
- Container port →
8080 - Protocol →
TCP - Port name →
8080(any name here will do) - App protocol →
HTTP
- Container port →
-
Under Environment variables - optional, click Add environment variable to add the following key-value pairs:
AIRFLOW__API__AUTH_BACKEND=airflow.api.auth.backend.session AIRFLOW__API__BASE_URL=http://your-dns AIRFLOW__CORE_AUTH_MANAGER=airflow.providers.fab.auth_manager.fab_auth_manager.FabAuthManager AIRFLOW__CORE__DAGS_ARE_PAUSED_AT_CREATION=True AIRFLOW__CORE__EXECUTOR=LocalExecutor AIRFLOW__CORE__LOAD_EXAMPLES=False AIRFLOW__DATABASE__SQL_ALCHEMY_CONN=postgresql+psycopg2://your-db-username:your-db-password@your-db-endpoint/postgres AIRFLOW__LOGGING__BASE_URL=http://your-dns AIRFLOW__LOGGING__HOSTNAME_CALLABLE=socket.gethostnameReplace:
your-dnswith the DNS name of your Application Load Balanceryour-db-username,your-db-password, andyour-db-endpointwith the credentials and endpoint of the PostgreSQL RDS instance you created in Part 2
These environment variables configure how Airflow behaves inside the ECS container — including how it connects to the database, handles authentication, serves the API, and logs task execution. Setting them during task creation ensures that each container instance runs with the correct configuration for accessing services like RDS and ALB, and follows your custom workflow settings.
Even though these variables were already defined in your Dockerfile, ECS can sometimes override or ignore them unless they’re explicitly declared in the task definition. It’s a good practice to paste the exact same variables here during task setup to avoid unpredictable behavior — especially for API routing, logging, and database connectivity. You can copy them directly from your Dockerfile to keep everything consistent.
- Docker configuration - optional:
- Entry point →
airflow - Command →
api-server
- Entry point →
Leave everything as default, and click Create.
And there you go! You’ve successfully created your first ECS task, which in this case launches the airflow api-server. This should start the Airflow UI, but note that the task will not run independently until a service is created to manage and run it. Creating a service activates the task definition and maintains the task lifecycle within the ECS cluster.
iii. Creating a Service:
Click Task definitions → Select your task → Deploy → Create service
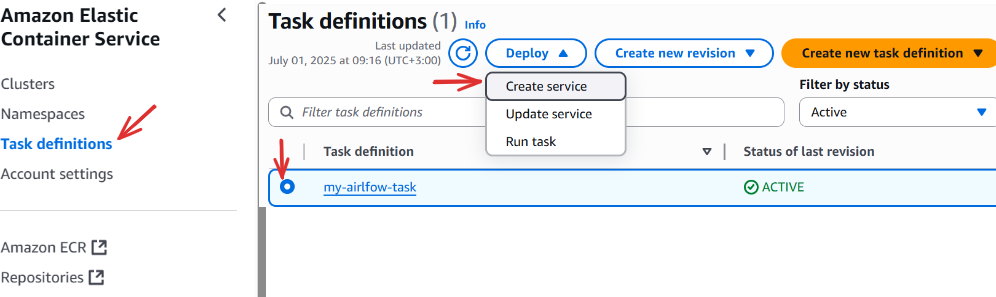
Service details:
- Task definition revision → choose your latest revision, for new tasks:
1 (LATEST) - Service name →
your-service-name(e.g.,my-airflow-service)
Environment:
- Existing cluster →
select-your-cluster-name(the one you created in step i above), this will automatically fill in details for associated resources like network.
Networking:
- VPC → Keep it as default
- Subnets → keep all the selected subnets associated with the above vpc. If not selected by default, select all the availblle subnets.
- Security group →
Use an existing security group - Security group name →
select-your-security-group-name(We created this in Part two of this tutorial series). You can also add the default security group to this section, though it’s optional.
Note that, the network section will be automatically filled for us as long we include the Existing cluster we are working. However always double check to ensure your security group is selected in the security group section, this doesn’t happen by default.
Load balancing - optional:
- Check -
Use load balancing - VPC →
select-your-default-vpc - Load balancer type →
Application Load Balancer - Container →
select-your-existing-container - Application Load Balancer →
Use an existing load balancer - Load balancer →
select-your-existing-load-balancer(we created this in Part 2) - Listener →
Use an existing listener→HTTP:80 - Target group →
Use an existing target group- Target group name →
select-your-existing-target-group-name(we created this in Part 2)
- Target group name →
Scroll down and click Create.
And just like that, you’ve successfully deployed your first ECS service for Airflow! Creating a service automatically starts a task; in our case, a task called api-server, which runs our Airflow app.
You should now be able to access the Airflow UI at http://your-dns. It may take up to 3 minutes for the service to fully start and for the interface to become available.
What Exactly Happens when we create a service:
- ECS pulls your custom Airflow image from your ECS repository
- It launches the container using the task definition you configured
- The container registers with your Application Load Balancer
- After a short delay, we then access the Airflow UI at:
http://your-dnsReplace your-dns with the actual DNS name of your ALB.
Running Tasks in ECS
You may be wondering: What credentials should I use to log into the Airflow UI now that it’s running? When we worked locally, Airflow came with a default username and password (airflow / airflow). But in our ECS setup, that's no longer the case. Since we’re using a remote PostgreSQL database on Amazon RDS (set up in Part 2), we need to explicitly initialize the metadata tables and create our own user.
This brings us to our next step, running one-time ECS tasks.
Step 1: Migrate the Metadata Database
Before anything can run, including DAGs or logins, Airflow needs to initialize its backend database (PostgreSQL). This is where it stores everything: DAG runs, user accounts, logs, connections, and more.
We’ll run a one-time task inside ECS to perform the migration.
- Go to ECS Console →
Task Definitions - Select your Airflow task definition(e.g.
my-ariflow-task) - Click Deploy →
Run task
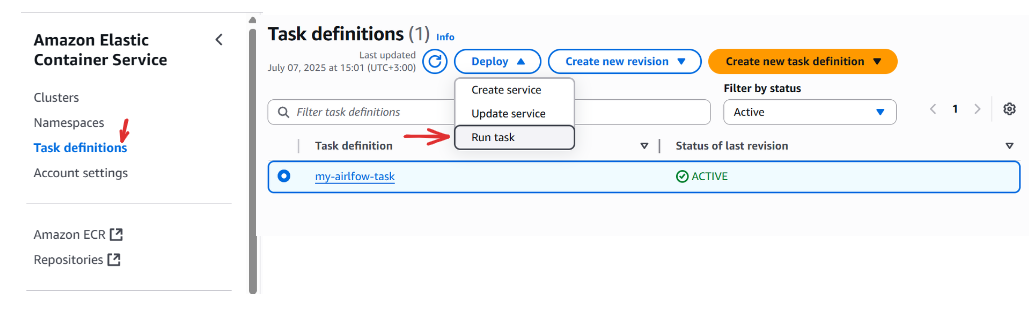
Under Run task, fill in:
- Task definition revision:
Select the latest(e.g. 1 (LATEST)) - Environment:
Choose your existing cluster(e.g.my-airflow-cluster) -
Container overrides:
- Expand your container
-
Under Command override, type the following (each on its own line):
db
migrate
You don’t need to prefix with airflow — it’s already the default entry point defined in your task.
Then click Create to run the task.
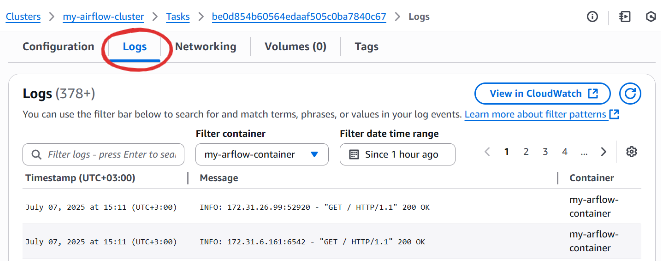
Now go to Clusters → Select your cluster → Scroll down to Tasks → Click the newly created task → Go to the Logs tab.
After a minute or two, you should see something like:
Database migration done!Once you see that message, your PostgreSQL instance now contains all Airflow’s internal tables and is ready to power your UI.
Before You Run Any Task...
Keep these three key rules in mind. If something feels off, this checklist will save you:
- Always select the latest task definition revision
- Always specify your existing ECS cluster — otherwise networking and roles may fail
- Always override the command — if you skip this, ECS will run the default
api-serveragain
Step 2: Create an Admin User for the UI
Now that the database is ready, we need to create a user to log into the Airflow web interface.
Follow the same process as before to run a new task:
- Go to Task Definitions → Select your Airflow task
- Click Deploy →
Run task - Select the latest revision and your existing cluster
- In the Container overrides, enter the following in Command override:
users
create
--username
admin
--firstname
Brayan
--lastname
Opiyo
--role
Admin
--email
[email protected]
--password
admin123
You can change the values above to suit your setup — just be sure to give yourself the Admin role so you can manage everything inside the UI.
Click Create to run the task. Then go back and check the Logs tab for this newly created task (in Clusters) to confirm the user was created successfully.
With this task, we're creating a user with first name Brayan and last name Opiyo, assigning them the username admin, the role of Admin, and setting their email and password to grant them access to the Airflow web interface with administrative privileges.
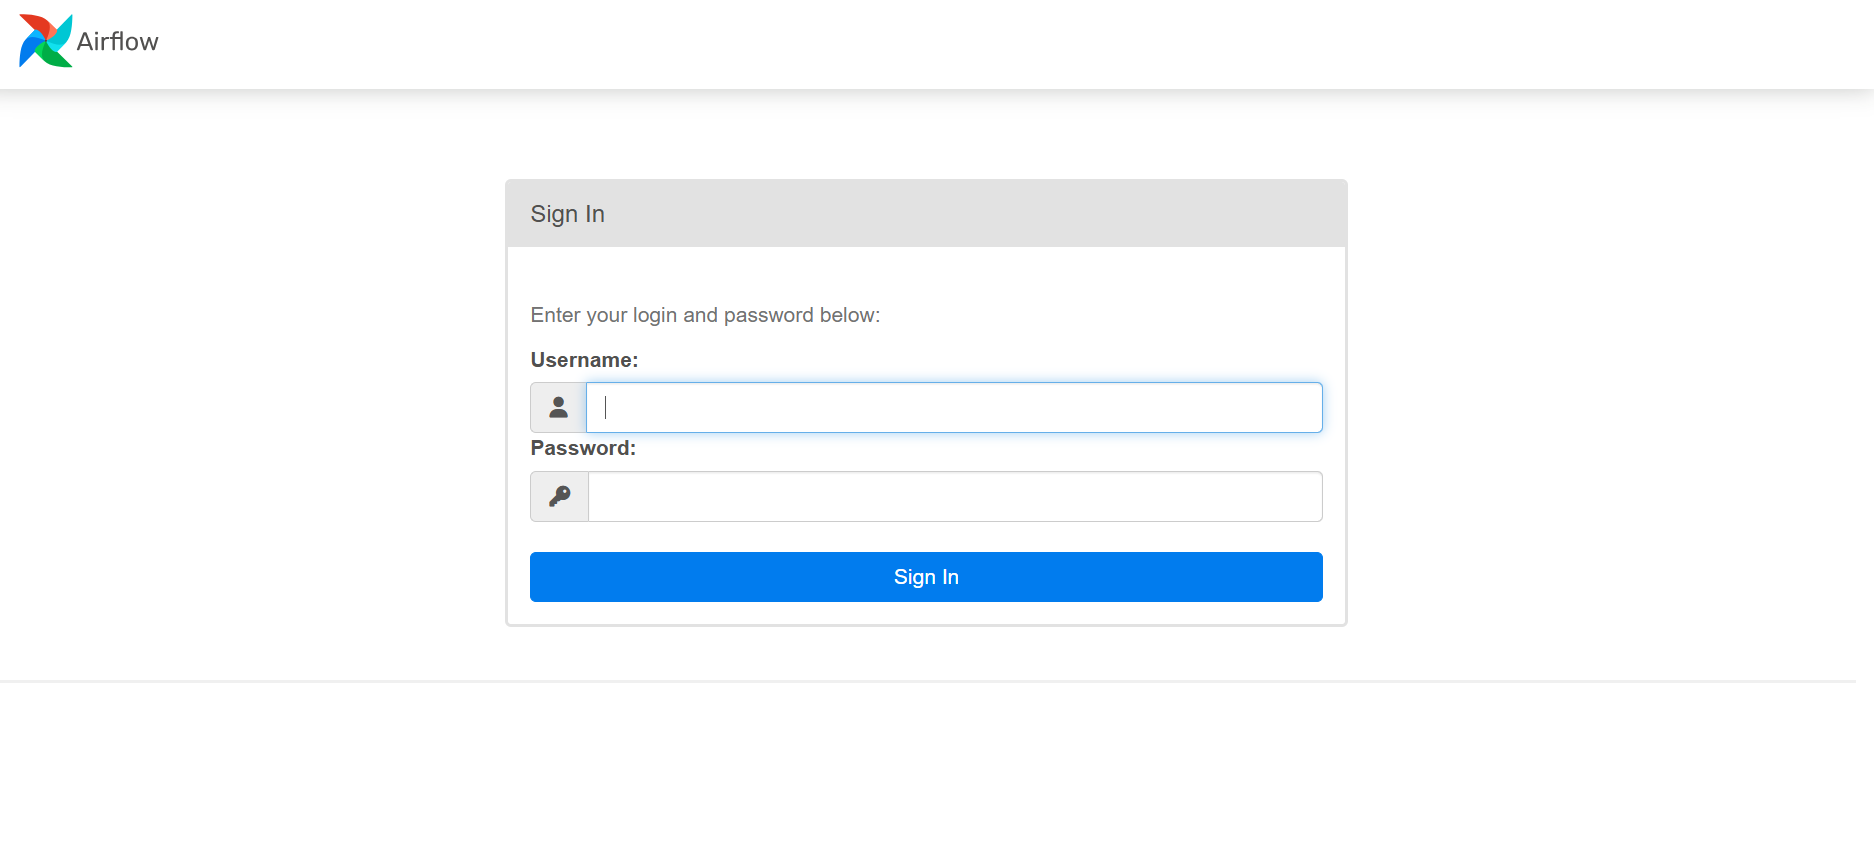
Login to the Airflow UI
Now head back to your browser and open:
http://your-dnsReplace your-dns with the actual DNS of your Application Load Balancer.
Log in using the credentials you just created. Once you're in, you should see your Airflow dashboard, just like you did locally — but now running entirely in the cloud!

Up next, we’ll launch the background components that make everything run: the scheduler, triggerer, and DAG processor. Let’s keep going.
Launching Background Tasks: Scheduler, Triggerer, DAG Processor
When you open the UI, you may notice that the scheduler, triggerer, and DAG processor are not running yet. That’s expected — these components need to be launched manually.
Just like with the earlier tasks:
- Go to Task Definitions → Select your task
- Click Deploy → Run task
-
Under Container overrides, provide the appropriate command:
Remember, just before this step, we need to select the Task Definition revision and also the environment (existing cluster).
To run the task for the
Scheduler:- We will launch a task with the command
scheduler.
For the
Triggerer:- The command is
triggerer
For the
DAG Processor:- The command is
dag-processor
- We will launch a task with the command
Each of these need to be run individually using the process above. Once you've started each one separately (i.e., as individual tasks), return to your ECS cluster and scroll down to Tasks. You should see these tasks listed as running.
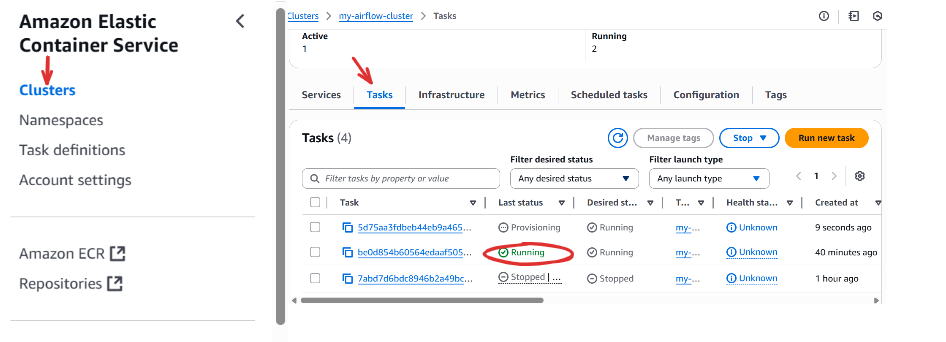
Refresh the Airflow UI to confirm that the system components are active (green checks).

You can always inspect logs if anything fails — go to the running task, click on it, then check the Logs tab.
Why Some Tasks Run Continuously
You’ll notice that tasks like api-server (this is the default run we get any time we create or update our service), scheduler, triggerer, and dag-processor keep running — that’s intentional. These are background services that must stay active for Airflow to function properly. On the other hand, tasks like db migrate or users create run once and then stop — because they are one-time commands.
Updating Your Task Definitions
Whenever you update your Docker image, be sure to:
- Go to your task definition → Click Create new revision
- Choose the existing Cluster
-
Scroll down and click Create
In short, when we make an update locally, such as adding new DAGs, we first need to
buildthe new image,tagit, andpushit to our ECS repository, which hosts the image URL.By default, these changes are not automatically picked up by the running ecs container. We must create a new task definition revision by clicking Create revision on that same task, then scrolling down and clicking
Create.Unless you explicitly update the image URL (which is not the recommended approach), clicking Create will cause your task to pull the latest image version and load the changes into the existing container.
Then, we must ensure that our service is updated to this new task revision;
- Go to Task definations → Select your task → Click Deploy → Update service
- Choose the latest task revision (e.g.
2 (LATEST)) → Click Create
To ensure all running tasks are using the latest version, you must also re-run each key task manually (e.g., scheduler, triggerer, dag-processor) using the Run task option, with the latest revision.
Final Step – Run Your DAG!
Now that everything is up and running, go to your Airflow UI and trigger a DAG manually or wait for the scheduled run. If everything is configured correctly, you should see a new file uploaded to your S3 bucket.
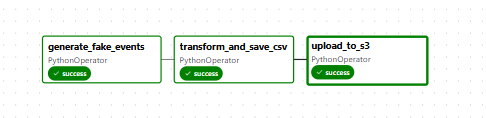
Congratulations! You’ve just deployed a working, production-ready Airflow pipeline using Amazon ECS and S3.
If something goes wrong, be sure to check the task logs for helpful error messages. Troubleshooting usually starts with inspecting task details inside the ECS cluster.
Debugging Common Airflow + ECS Issues
Deploying Airflow to the cloud is a major milestone, but when something goes wrong, it can feel like a maze of moving parts. Don’t worry — this section is here to help you spot and fix common issues that might arise when running your Airflow pipeline on Amazon ECS with Fargate.
Whether your UI won’t load, DAGs refuse to run, or everything seems fine but nothing happens, we’ve been there. Let’s walk through the most important things to check.
1. Your DAGs Fail Silently or Never Load
Check: Did you include the following line in your Dockerfile?
RUN airflow db migrateWhy this matters:
Without this command, Airflow never creates the backend tables in your PostgreSQL database — and the system won’t know how to track DAGs, users, logs, or metadata. Even if your container starts, the UI will silently fail or the DAGs will never appear.
Fix:
Rebuild your image after ensuring the line is present, then push it and create a new ECS task definition and update your service.
2. Airflow UI Shows a Blank Screen or 504 Gateway Timeout
Check 1: Did you enter the correct ALB DNS in your environment variables?
ENV AIRFLOW__API__BASE_URL=http://your-alb-dns
ENV AIRFLOW__LOGGING__BASE_URL=http://your-alb-dns
If the DNS is incorrect, the UI won’t be able to route requests — and you’ll either get a blank screen or a gateway timeout.
Check 2: Did you misspell your environment variable names?
This is critical:
Correct:
AIRFLOW__API__BASE_URLIncorrect:
AIRFLOW_API_BASE_URL # (this will be ignored entirely)Notice the double underscores () between config sections like AIRFLOWAPI__... and single underscores within a section. Airflow strictly relies on this naming convention.
Fix:
Update your Dockerfile or ECS task definition environment section to use the correct variable names and ALB DNS, then redeploy.
3. 503/504 Gateway Errors Even When the Task is Running
Check: Go to EC2 Console → Target Groups, select your target group, and verify the Health Checks tab.
If the status is unhealthy, your ALB won’t route any traffic to your container — even if it’s running.
Fix:
- Make sure the security group used by the ALB can send HTTP traffic (
port 80) to the container's security group - Confirm that the container's task is listening on port 8080 and routing traffic correctly via HTTP
Also, make sure both the ALB and ECS containers are using the same VPC and subnets.
4. Database Migration Fails or Freezes
Check: Look closely at the log for your db migrate task.
One common cause is a missing database connection string or bad credentials in your environment:
ENV AIRFLOW__DATABASE__SQL_ALCHEMY_CONN=postgresql+psycopg2://your-db-username:your-db-password@your-db-endpoint/postgresFix:
Double-check your: Username, Password, RDS endpoint and, Security group (port 5432 must be open between ECS and RDS)
Update your credentials and task definition if needed, then run the task again.
5. Some ECS Tasks Are Running a Different Image Revision
You may notice one task (like api-server) is using the latest image, but others (like scheduler or dag-processor) are not.
Fix:
- Go to the Task Definitions tab
- Select your task
- Click Deploy → Update service and select the latest revision
- Then re-run each ECS task (scheduler, triggerer, etc.) using that same revision
All Airflow components must be on the same task definition revision to work together correctly.
6. Image URL or Tag Not Working
Check: When defining your ECS task, did you use this format?
123456789012.dkr.ecr.us-east-1.amazonaws.com/airflow-image:latestIf you forgot to append :latest (or whatever tag you used during docker build), ECS will not know what version to pull — and the task will fail at launch.
Fix:
Go back and edit your task definition to include the tag in the image field.
Understanding Cost: What You'll Actually Pay For
Before we wrap up, let’s talk money.
Airflow on ECS is powerful — but what does it actually cost to run? While much of this setup uses the AWS Free Tier, there are still a few services that can generate charges if left running long-term. Let’s break down each component so you can manage your cloud spend wisely.
1. Amazon RDS – Free for Development
If you selected the Free Tier when creating your PostgreSQL RDS instance (e.g., db.t3.micro), you're entitled to:
- 750 hours/month of database usage
- 20 GB of storage
So long as you're within these limits and using one instance, your RDS database is essentially free.
2. ECS Fargate – Charged per Task per Second
Each ECS task you run (like api-server, scheduler, dag-processor, triggerer) incurs a cost based on:
- vCPU used
- Memory allocated
- Running time (billed per second, with a 1-minute minimum)
Here’s a rough breakdown (as of 2025 pricing in us-east-1):
| Configuration | Approximate Cost/hour |
|---|---|
| 0.25 vCPU, 0.5 GB | \$0.0026 |
| 0.5 vCPU, 1 GB | \$0.0052 |
| 1 vCPU, 2 GB | \$0.0104 |
If you’re running four containers continuously (api-server, scheduler, triggerer, dag-processor) at 0.5 vCPU each, you’re looking at ~\$0.02/hour or ~\$15/month if left running 24/7.
To save money:
- Stop unnecessary tasks when not in use
- Delete services after testing
- Run background services only when needed
3. Application Load Balancer (ALB)
The ALB that exposes your Airflow UI is not free — pricing depends on:
- \$0.0225/hour base charge
- \$0.008 per GB of data processed
So, if your ALB runs 24/7:
-
24 hours x 30 days x \$0.0225 = ~\$16.20/month (before traffic)
Best practice:
If you're not actively using the UI, delete the ALB or stop the service to avoid idle charges.
4. Target Group – No Cost (Sort of...)
The target group itself doesn’t generate charges — but it’s tied to your ALB, which does. So if your ALB is running, assume the cost is accounted for.
5. Security Groups – Free
Security groups are virtual firewalls, they do not cost anything to create or maintain. Use them as freely as needed for isolation and access control.
6. ECR (Container Registry) – Free within Limits
You get 500 MB/month of storage in Amazon ECR as part of the free tier. Your custom Airflow image is unlikely to exceed that unless you’ve added huge libraries.
If you shut things off when not in use (e.g., stop your ALB and tasks), your monthly cost can drop below \$10 easily.
Final Tips to Minimize Cost
- Use the AWS Billing Dashboard to monitor usage in real-time
- Use Spot Instances for cheaper compute (advanced use)
- Don’t forget to delete services you no longer need, especially the ALB
- Consider auto-shutdown scripts if you’re working in a dev environment
You're not just building Airflow in the cloud, you’re learning to manage scalable systems cost-effectively.
Wrap-Up
You’ve successfully taken Apache Airflow from a local experiment to a production-grade, cloud-hosted orchestration system. Along the way, you built a custom Docker image, pushed it to Amazon ECR, configured supporting services in ECS, and exposed a fully functional Airflow UI through an Application Load Balancer, all backed by a persistent PostgreSQL database on RDS. You also learned how to troubleshoot deployment issues, manage ECS tasks, and control cloud costs by understanding what resources incur charges and how to scale them wisely. Your workflow now runs automatically, scales on demand, and operates independently in the cloud, stable, observable, and ready for real-world data workloads.
From here, you might continue by building more DAGs and trying to deploy them through new image versions and ECS revisions. You could explore more advanced Airflow features or refine your AWS setup. Welcome to the cloud!