How I Built a Slack Bot in Python to Help Me Find an Apartment in San Francisco
When I moved from Boston to the Bay Area a number of years ago, Priya (my then girlfriend, now wife) and I heard all sorts of horror stories about the rental market. The fact that searching for "How to find an apartment in San Francisco" on Google yields dozens of pages of advice is a good indicator that apartment hunting is a painful process.
Boston is cold, but finding an apartment in SF is scary. We read that landlords hold open houses, and that you have to bring all of your paperwork to the open house and be willing to put down a deposit immediately to even be considered.
We started exhaustively researching the process, and figured out that a lot of finding an apartment comes down to timing. Some landlords want to hold an open house no matter what, but for others, being one of the first people to see the apartment usually means that you can get it. You eneed to find the listing, quickly figure out if it meets your criteria, then call the landlord to arrange a showing to have a shot.
We looked around at some of the apartment rental sites recommended by internet posters, like Padmapper and Apartmentguide, but none of them gave us a feed of real-time listings that we could look at and rate together. None of them gave us the ability to specify additional criteria, like very specific neighborhoods only, or proximity to transportation. As most apartment listings in the Bay Area are originally on Craigslist, then scraped by the other sites, there's also a fear that maybe not all the listings are scraped, or that they're not scraped quickly enough to make the alerts real-time. We wanted a way to:
- Get notified in near real-time when a posting was made to Craigslist.
- Filter out listings that didn't fall into our desired neighborhoods.
- Filter out listings that didn't match additional criteria, like proximity to public transit.
- Collaborate on listings and rate them together.
- Easily get in touch with the landlord for listings we liked.
<ul>
  <li>
    Scrape listings from Craigslist.
  </li>
  <li>
    Filter out listings that don't match our criteria.
  </li>
  <li>
    Post the listings to <a href="https://slack.com/">Slack</a>, a team chat tool, so we can discuss and rate them.
  </li>
  <li>
    Wrap the whole process into a persistent loop and deploy it to a server (so it would run continuously).
  </li>
</ul>
In the rest of this post, we'll walk through how each piece was built, and how the final Slack bot was used to help us find an apartment. Using this bot, Priya and I found a reasonably priced (for SF!) one bedroom that we love in about a week, far less time than we thought it would take.
If you want to look at the code as you go through this post, here's a link to the finished project, and here's a link to the README.md.
Step one — Scraping listings from Craigslist
The first step in building our bot is to get listings from Craiglist. Craiglist unfortunately doesn't have an API, but we can get posts using the python-craiglist package. python-craigslist scrapes the content of the page, then uses BeautifulSoup to extract relevant pieces from the page, and convert it to structured data.
The code for the package is fairly short, and worth a read-through. Craigslist apartment listings for San Francisco are located at https://sfbay.craigslist.org/search/sfc/apa. In the below code, we:
-
Import
CraigslistHousing, a class inpython-craigslist. -
Initialize the class with the following arguments:
-
site-- the Craigslist site that we want to scrape. Thesiteis the first part of the URL, likehttps://sfbay.craigslist.org. -
area-- the subarea within the site that we want to scrape. Theareais the last part of a URL, likehttps://sfbay.craigslist.org/sfc/, which will only look in San Francisco. -
category-- the type of listing we want to look for. Thecategoryis the last part of a search URL, likehttps://sfbay.craigslist.org/search/sfc/apa, which lists all the apartments. -
filters-- any filters we want to apply to the results.-
max_price-- the maximum price we're willing to pay. -
min_price-- the minimum price we want to look for.
-
-
  <li>
    Get the results from Craigslist using the <code>get_results</code> method, which is a <a href="https://wiki.python.org/moin/Generators">generator</a>. <ul>
      <li>
        Pass the <code>geotagged</code> argument to attempt to add coordinates to each result.
      </li>
      <li>
        Pass the <code>limit</code> argument to only get <code>20</code> results.
      </li>
      <li>
        Pass the <code>newest</code> argument to only get the newest listings.
      </li>
    </ul>
  </li>

  <li>
    Get each <code>result</code> from the <code>results</code> generator and print it.
  </li>
</ul>
from craigslist import CraigslistHousing

cl = CraigslistHousing(site='sfbay', area='sfc', category='apa',
                       filters={'max_price': 2000, 'min_price': 1000})
results = cl.get_results(sort_by='newest', geotagged=True, limit=20)

for result in results:
    print result
We've finished the first step of the bot pretty quickly! We're now able to scrape Craigslist and get listings. Each result is a dictionary with several fields:
```python
{'datetime': '2016-07-20 16:39',
'geotag': (37.783166, -122.418671),
'has_image': True,
'has_map': True,
'id': '5692904929',
'name': 'Be the first in line at Brendas restaurant!SQuiet studio available',
'price': '$1995',
'url': 'https://sfbay.craigslist.org/sfc/apa/5692904929.html',
'where': 'tenderloin'
}
```
Here's a description of the fields:
<ul>
  <li>
    <code>datetime</code> — when the listing was posted.
  </li>
  <li>
    <code>geotag</code> — the coordinate location of the listing.
  </li>
  <li>
    <code>has_image</code> — whether there's an image in the Craigslist posting.
  </li>
  <li>
    <code>has_map</code> — whether there's a map associated with the listing.
  </li>
  <li>
    <code>id</code> — the unique Craigslist id for the listing.
  </li>
  <li>
    <code>name</code> — the name of the listing that shows up on Craigslist.
  </li>
  <li>
    <code>price</code> — the monthly rent.
  </li>
  <li>
    <code>url</code> — the URL to view the full listing.
  </li>
  <li>
    <code>where</code> — what the person who created the listing put in for where it is.
  </li>
</ul>

<h2 id="steptwofilteringtheresults">
  Step two — Filtering the results
</h2>
Now that we have a way to get listings from Craigslist, we just need a way to filter them and only see the ones we like.
Filtering the results by area
When Priya and I were searching for apartments, we wanted to look at places in a few areas, including:
- San Francisco
  <li>
    Berkeley
  </li>
  <li>
    Oakland <ul>
      <li>
        <a href="https://en.wikipedia.org/wiki/Adams_Point,_Oakland,_California">Adams Point</a>
      </li>
      <li>
        <a href="https://en.wikipedia.org/wiki/Lake_Merritt">Lake Merritt</a>
      </li>
      <li>
        <a href="https://en.wikipedia.org/wiki/Rockridge,_Oakland,_California">Rockridge</a>
      </li>
    </ul>
  </li>

  <li>
    Alameda
  </li>
</ul> In order to filter by neighborhood, we'll first need to define bounding boxes boxes around the areas:

<img src="/wp-content/uploads/2019/01/bounding_box.png" alt="bounding_box" />
Drawing a box around Lower Pacific Heights
The bounding box above was created using BoundingBox. Be sure to specify the CSV option in the bottom left to get the coordinates of the box. You can also define a bounding box yourself by finding the coordinates for the bottom left and the top right using a tool like Google Maps. After finding the boxes, we'll create a dictionary of neighborhoods and coordinates:
```python
BOXES = {
"adams_point": [
[37.80789, -122.25000],
[37.81589, -122.26081],
],
"piedmont": [
[37.82240, -122.24768],
[37.83237, -122.25386],
],
...
}
```
Each dictionary key is a neighborhood name, and each key contains a list of lists. The first inner list is the coordinates of the bottom left of the box, and the second is the coordinates of the top right of the box. We can then perform the filtering by checking to see if the coordinates for a listing are inside any of the boxes. The below code will:
-
Loop through each of the keys in
BOXES. - Check to see if the result is inside the box.
- Set the appropriate variables if so.
def in_box(coords, box):
    if box[0][0] < coords[0] < box[1][0] and box[1][1] < coords[1] < box[0][1]:
        return True
    return False

geotag = result["geotag"]
area_found = False
area = ""

for a, coords in BOXES.items():
    if in_box(geotag, coords):
        area = a
        area_found = True
Unfortunately, not all results from Craigslist will have coordinates associated with them. It's up to the person who posts the listing to specify a location, which coordinates can be calculated from. The more familiar the person posting the listing is with Craigslist, the more likely they are to include a location.
Usually, the listings that are posted by agents who are more likely to charge high rent have associated locations. The postings by owners are more likely to not have coordinates, but are also usually better deals. Thus, it makes sense to have a failsafe to figure out if listings without coordinates associated with them are in the neighborhoods we want.
We'll create a list of neighborhoods, then do string matching to see if the listing falls into one of them. This is less accurate than using coordinates, because many listings misreport their neighborhood, but it's better than nothing:
NEIGHBORHOODS = ["berkeley north", "berkeley", "rockridge", "adams point", ... ]To do name-based matching, we can loop through each of the NEIGHBORHOODS:
location = result["where"]
for hood in NEIGHBORHOODS:
    if hood in location.lower():
        area = hood
Once a result has been processed by the two parts of code we've written so far, we'll have removed any listings that aren't in the neighborhoods we want to live in. We'll have a few false positives, and we may miss some listings that don't have a neighborhood or location specified, but this system catches the vast majority of listings.
Filtering the results by proximity to transit
Priya and I knew we'd both be traveling to San Francisco a lot, so we wanted to live near public transit if we weren't going to be SF. In the Bay Area, the main form of public transit is called BART.
BART is a partially underground regional transit system that connects Oakland, Berkeley, San Francisco, and the surrounding areas. In order to build this functionality into our bot, we'll first need to define a list of transit stations. We can get the coordinates of transit stops from Google Maps, then create a dictionary of them:
TRANSIT_STATIONS = {
    "oakland_19th_bart": [37.8118051,-122.2720873],
    "macarthur_bart": [37.8265657,-122.2686705],
    "rockridge_bart": [37.841286,-122.2566329],
    ...
}
Every key is the name of a transit station, and has an associated list. The list contains the latitude and longitude of the transit station. Once we have the dictionary, we find the closest transit station to each result. The below code will:
- Loop through each key and item in
TRANSIT_STATIONS. - Use the
coord_distancefunction to find the distance in kilometers between two pairs of coordinates. You can find an explanation of this function here. - Check to see if the station is the closest to the listing.
- If the station is too far (farther than
2kilometers, or about1.2miles), it is ignored. - If the station is closer than the previous closest station, it's used.
- If the station is too far (farther than
min_dist = None
near_bart = False
bart_dist = "N/A"
bart = ""
MAX_TRANSIT_DIST = 2 # kilometers
for station, coords in TRANSIT_STATIONS.items():
    dist = coord_distance(coords[0], coords[1], geotag[0], geotag[1])
    if (min_dist is None or dist < min_dist) and dist < MAX_TRANSIT_DIST:
        bart = station
        near_bart = True

    if (min_dist is None or dist < min_dist):
        bart_dist = dist
After this, we know the closest transit station to each listing.
Step three — Creating our Slack Bot in Python
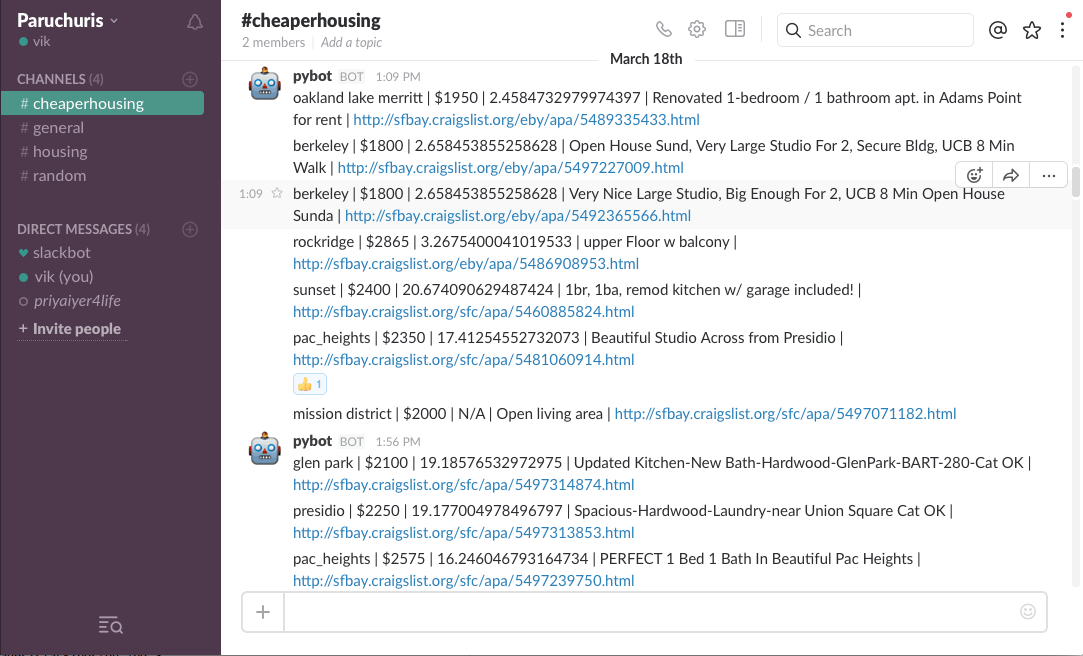
After we filter down our results, we're ready to post what we have to Slack. If you're unfamiliar with Slack, it's a team chat application. You create a team in Slack, and can then invite members. Each Slack team can have multiple channels where members exchange messages. Each message can be annotated by other people in the channel, such as adding a thumbs up or other emoticons. Here's more information on Slack.
If you want to get a feel for it, I suggest installing Slack and trying it out. To implement our Slack bot in Python, we'll need to:
- Create a Slack team, which we can do here.
- Create a channel for the listings to be posted into. Here's help on this. It's suggested to use
#housingas the name of the channel. - Get a Slack API token, which we can do here. Here's more information on the process.
After these steps, we're ready to create the code that posts the listings to Slack.
Coding it up
After getting the right channel name and token, we can post our results to Slack. To do this, we'll use python-slackclient, a Python package that makes it easy to use the Slack API. python-slackclient is initialized using a Slack token, then gives us access to many API endpoints that manage the team and messages. The below code will:
- Initialize a
SlackClientusing theSLACK_TOKEN. - Create a message string from the
resultcontaining all the information we need to see, such as price, the neighborhood the listing is in, and the URL. - Post the message to Slack with the username
pybot, and a robot as an avatar.
from slackclient import SlackClient
SLACK_TOKEN = "ENTER_TOKEN_HERE"
SLACK_CHANNEL = "#housing"

sc = SlackClient(SLACK_TOKEN)
desc = "{0} | {1} | {2} | {3}
| <{4}>".format(result["area"], result["price"], result["bart_dist"], result["name"], result["url"])
sc.api_call(
    "chat.postMessage", channel=SLACK_CHANNEL, text=desc,
    username='pybot', icon_emoji=':robot_face:')
Once everything is hooked up, the Slack bot will post listings into Slack that look like this:
Step four -- Operationalizing everything
Now that we have the basics nailed out, we'll need to run the code persistently. After all, we want our results to be posted to Slack in real-time, or close to it. In order to operationalize everything, we'll need to go through a few steps:
- Store the listings in the database, so we don't post duplicates into Slack.
- Separate the settings, like
SLACK_TOKEN, from the rest of the code to make them easy to adjust. - Create a loop that will run continuously, so we're scraping results 24/7.
Storing listings
The first step is to use a Python package called SQLAlchemy to store our listings. SQLAlchemy is an Object Relational Mapper, or ORM, that makes it easier to work with databases from Python. Using SQLAlchemy, we can create a database table that will store listings, and a database connection to make it easy to add data to the table.
We'll use SQLAlchemy in conjunction with the SQLite database engine, which will store all of our data into a single file called listings.db. The below code will:
- Import SQLAlchemy.
- Create a connection to the SQLite database
listings.dbthat will be created in our current directory. - Define a table called
Listingthat contains all the relevant fields from a Craigslist listing.- The
uniquefieldscl_idandlinkwill prevent us from posting duplicate listings to Slack.
- The
- Create a database session from the connection, which will allow us to store listings.
from sqlalchemy import create_engine
from sqlalchemy.ext.declarative import declarative_base
from sqlalchemy import Column, Integer, String, DateTime, Float, Boolean
from sqlalchemy.orm import sessionmaker

engine = create_engine('sqlite:///listings.db', echo=False)
Base = declarative_base()

class Listing(Base):
    """
    A table to store data on craigslist listings.
    """

    __tablename__ = 'listings'
    id = Column(Integer, primary_key=True)
    link = Column(String, unique=True)
    created = Column(DateTime)
    geotag = Column(String)
    lat = Column(Float)
    lon = Column(Float)
    name = Column(String)
    price = Column(Float)
    location = Column(String)
    cl_id = Column(Integer, unique=True)
    area = Column(String)
    bart_stop = Column(String)

Base.metadata.create_all(engine)

Session = sessionmaker(bind=engine)
session = Session()
Now that we have our database model, we'll just need to store each listing into the database, and we'll be able to avoid duplicates.
Separating configuration from code
The next step is to separate the configuration from the code. We'll create a file called settings.py that stores our configuration. Configuration includes SLACK_TOKEN, which is a secret, and we don't want to commit to git accidentally and push to Github, as well as other settings like BOXES that aren't secret, but we want to be able to edit easily. We'll move the following settings to settings.py:
-
MIN_PRICE— the minimum listing price we want to search for. -
MAX_PRICE— the minimum listing price we want to search for. -
CRAIGSLIST_SITE— the regional Craigslist site we want to search in. -
AREAS— a list of areas of the regional Craiglist site that we want to search in. -
BOXES— coordinate boxes of the neighborhoods we want to look in. -
NEIGHBORHOODS— if the listing doesn't have coordinates, a list of neighborhoods to match on. -
MAX_TRANSIT_DIST— the farthest we want to be from a transit station. -
TRANSIT_STATIONS— the coordinates of transit stations. -
CRAIGSLIST_HOUSING_SECTION— the subsection of Craigslist housing that we want to look in. -
SLACK_CHANNEL— the Slack channel we want the bot to post in.
We'll also want to create a file called private.py, that is ignored by git, and contains the following key:
-
SLACK_TOKEN— the token to post to our Slack team.
You can see the finished settings.py file here.
Create a loop
Finally, we'll need to create a loop that runs our scraping code continuously. When called from the command line, the below code will:
- Print a status message containing the current time.
- Run the craigslist scraping code by calling the
do_scrapefunction. - Quit if the user types
Ctrl + C. - Handle other exceptions by printing the traceback and continuing.
- If no exceptions, print a success message (corresponds to the
elseclause below). - Sleeping for a defined interval before scraping again. By default, this is set to
20minutes.
from scraper import do_scrape
import settings
import time
import sys
import traceback

if __name__ == "__main__":
    while True:
        print("{}: Starting scrape cycle".format(time.ctime()))
        try:
            do_scrape()
        except KeyboardInterrupt:
            print("Exiting....")
            sys.exit(1)
        except Exception as exc:
            print("Error with the scraping:", sys.exc_info()[0])
            traceback.print_exc()
        else:
            print("{}: Successfully finished scraping".format(time.ctime()))

time.sleep(settings.SLEEP_INTERVAL)
We'll also need to add SLEEP_INTERVAL to settings.py in order to control how often the scraping happens. By default, this is set to 20 minutes.
Running it yourself
Now that the code is wrapped up, let's look into how you can run the Slack bot yourself.
Running on your local computer: You can find the project on Github here. In the README.md, you'll find detailed installation instructions. Unless you're experienced installing programs, and are running Linux, it's suggested to follow the Docker instructions.
Docker is a tool that makes it easy to create and deploy applications, and makes it very fast to get started with this Slack bot on your local machine. Here are basic instructions for installing and running the Slack bot with Docker:
- Create a folder called
config, then put a file calledprivate.pyinside.- Any settings you specify in
private.pywill override the defaults that are insettings.py. - By adding settings in
private.py, you can customize the behavior of the bot.
- Any settings you specify in
- To run the bot with your own configuration:
docker run -d -e SLACK_TOKEN={YOUR_SLACK_TOKEN} -v {ABSOLUTE_PATH_TO_YOUR_CONFIG_FOLDER}:/opt/wwc/apartment-finder/config dataquestio/apartment-finder</li> </ol>Deploying the bot
Unless you want to leave your computer on 24/7, it makes sense to deploy the bot to a server, so it can run continuously. We can create a server on a hosting provider called DigitalOcean. Digital Ocean can automatically create a server with Docker installed. Here's a guide on how to get started with Docker on DigitalOcean.
If you don't know what the author means by "shell", here's a tutorial on how to SSH into a DigitalOcean droplet. If you don't want to follow a guide, you can also get started here. After creating a server on DigitalOcean, you can ssh into the server, then follow the Docker installation and usage instructions above.
Next steps
After following the steps above, you should have a Slack bot that finds apartments for you automatically. Using this bot, Priya and I found a great apartment in San Francisco for more than we hoped to pay, but less than we thought a one bedroom in SF would end up costing. It also took us a lot less time than we'd expected it to. Even though it worked for us, there are quite a few extensions that could be made to improve the bot:
- Taking thumbs up and thumbs down from Slack, and training a machine learning model.
- Automatically pulling the locations of transit stops from an API.
- Adding in points of interest like parks and other items.
- Adding in the walkscore or other neighborhood quality scores, like crime.
- Automatically extracting landlord phone numbers and emails.
- Automatically calling landlords and scheduling showings (if someone does this, you're awesome).
Feel free to submit pull requests to the project on Github, and please let me know if this tool is helpful for you. Looking forward to seeing how you use it! When I'm not building slackbots to help me find apartments, I'm working on my startup Dataquest, the best online platform for learning Python and Data Science. If that interests you, you can sign up and complete our basic courses for free.
  <li>Specify new values for any of the settings above in <code>private.py</code>.
  <ul>
      <li>For example, you could put <code>AREAS = ['sfc']</code> in <code>private.py</code> to only look in San Francisco.</li>
      <li>If you want to post into a Slack channel not called <code>housing</code>, add an entry for <code>SLACK_CHANNEL</code>.</li>
      <li>If you don't want to look in the Bay Area, you'll need to update the following settings at the minimum:
      <ul>
          <li><code>CRAIGSLIST_SITE</code></li>
          <li><code>AREAS</code></li>
          <li><code>BOXES</code></li>
          <li><code>NEIGHBORHOODS</code></li>
          <li><code>TRANSIT_STATIONS</code></li>
          <li><code>CRAIGSLIST_HOUSING_SECTION</code></li>
          <li><code>MIN_PRICE</code></li>
          <li><code>MAX_PRICE</code></li>
        </ul>
      </li>
    </ul>
  </li>

  <li>Install Docker by following <a href="https://docs.docker.com/engine/installation/">these instructions</a>.</li>
  <li>To run the bot with the default configuration:
docker run -d -e SLACK_TOKEN={YOUR_SLACK_TOKEN} dataquestio/apartment-finder