Running and Managing Apache Airflow with Docker (Part II)
In the previous tutorial, we set up Apache Airflow inside Docker, explored its architecture, and built our first real DAG using the TaskFlow API. We simulated an ETL process with two stages — Extract and Transform, demonstrating how Airflow manages dependencies, task retries, and dynamic parallel execution through Dynamic Task Mapping. By the end, we had a functional, scalable workflow capable of processing multiple datasets in parallel, a key building block for modern data pipelines.
In this tutorial, we’ll build on what you created earlier and take a significant step toward production-style orchestration. You’ll complete the ETL lifecycle by adding the Load stage and connecting Airflow to a local MySQL database. This will allow you to load transformed data directly from your pipeline and manage database connections securely using Airflow’s Connections and Environment Variables.
Beyond data loading, you’ll integrate Git and Git Sync into your Airflow environment to enable version control, collaboration, and continuous deployment of DAGs. These practices mirror how data engineering teams manage Airflow projects in real-world settings, promoting consistency, reliability, and scalability, while still keeping the focus on learning and experimentation.
By the end of this part, your Airflow setup will move beyond a simple sandbox and start resembling a production-aligned environment. You’ll have a complete ETL pipeline, from extraction and transformation to loading and automation, and a clear understanding of how professional teams structure and manage their workflows.
Working with MYSQL in Airflow
In the previous section, we built a fully functional Airflow pipeline that dynamically extracted and transformed market data from multiple regions , us, europe, asia, and africa. Each branch of our DAG handled its own extract and transform tasks independently, creating separate CSV files for each region under /opt/airflow/tmp. This setup mimics a real-world data engineering workflow where regional datasets are processed in parallel before being stored or analyzed further.
Now that our transformed datasets are generated, the next logical step is to load them into a database, a critical phase in any ETL pipeline. This not only centralizes your processed data but also allows for downstream analysis, reporting, and integration with BI tools like Power BI or Looker.
While production pipelines often write to cloud-managed databases such as Amazon RDS, Google Cloud SQL, or Azure Database for MySQL, we’ll keep things local and simple by using a MySQL instance on your machine. This approach allows you to test and validate your Airflow workflows without relying on external cloud resources or credentials. The same logic, however, can later be applied seamlessly to remote or cloud-hosted databases.
Prerequisite: Install and Set Up MySQL Locally
Before adding the Load step to our DAG, ensure that MySQL is installed and running on your machine.
Install MySQL
-
Windows/macOS: Download and install MySQL Community Server.
-
Linux (Ubuntu):
sudo apt update sudo apt install mysql-server -y sudo systemctl start mysql -
Verify installation by running:
mysql -u root -pCreate a Database and User for Airflow
Inside your MySQL terminal or MySQL Workbench, run the following commands:
CREATE DATABASE IF NOT EXISTS airflow_db;
CREATE USER IF NOT EXISTS 'airflow'@'%' IDENTIFIED BY 'airflow';
GRANT ALL PRIVILEGES ON airflow_db.* TO 'airflow'@'%';
FLUSH PRIVILEGES;
This creates a simple local database called airflow_db and a user airflow with full access, perfect for development and testing.

Network Configuration for Linux Users
When running Airflow in Docker and MySQL locally on Linux, Docker containers can’t automatically access localhost.
To fix this, you need to make your local machine reachable from inside Docker.
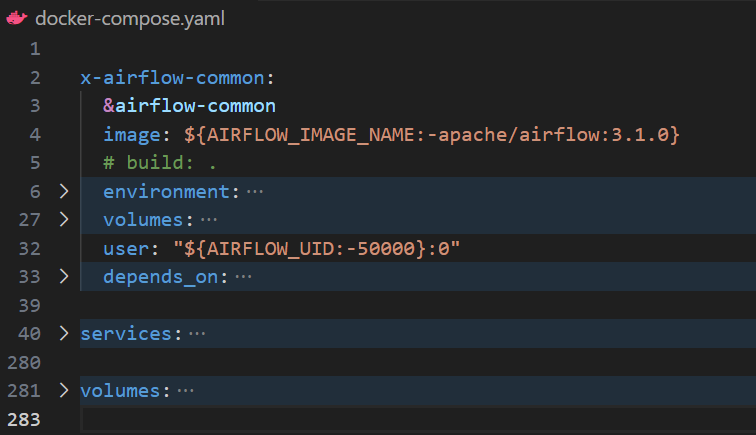
Open your docker-compose.yaml file and add the following line under the x-airflow-common service definition:
extra_hosts:
  - "host.docker.internal:host-gateway"
This line creates a bridge that allows Airflow containers to communicate with your local MySQL instance using the hostname host.docker.internal.
Switching to LocalExecutor
In part one of this tutorial, we worked with CeleryExecutor to run our Airflow. By default, the Docker Compose file uses CeleryExecutor, which requires additional components such as Redis, Celery workers, and the Flower dashboard for distributed task execution.
Since we’re running Airflow to make it production-ready, we can simplify things by using LocalExecutor, which runs tasks in parallel on a single machine, eliminating the need for an external queue or worker system.
Find this line in your docker-compose.yaml:
AIRFLOW__CORE__EXECUTOR: CeleryExecutor Change it to:
AIRFLOW__CORE__EXECUTOR: LocalExecutorRemoving Unnecessary Services
Because we’re no longer using Celery, we can safely remove related components from the configuration. These include Redis, airflow-worker, and Flower.
You can search for the following sections and delete them:
- The entire redis service block.
- The airflow-worker service (Celery’s worker).
- The flower service (Celery monitoring dashboard).
- Any
AIRFLOW__CELERY__...lines inside environment blocks.
Extending the DAG with a Load Step
Now let’s extend our existing DAG to include the Load phase of the ETL process. Already we had extract_market_data() and transform_market_data() created in the first part of this tutorial. This new task will read each transformed CSV file and insert its data into a MySQL table.
Here’s our updated daily_etl_pipeline_airflow3 DAG with the new load_to_mysql() task.
You can also find the complete version of this DAG in the cloned repository([email protected]:dataquestio/tutorials.git), inside the part-two/
folder under airflow-docker-tutorial .
def daily_etl_pipeline():

    @task
    def extract_market_data(market: str):
        ...

    @task
    def transform_market_data(raw_file: str):
        ...

    @task
    def load_to_mysql(transformed_file: str):
        """Load the transformed CSV data into a MySQL table."""
        import mysql.connector
        import os

        db_config = {
            "host": "host.docker.internal",  # enables Docker-to-local communication
            "user": "airflow",
            "password": "airflow",
            "database": "airflow_db",
            "port": 3306
        }

        df = pd.read_csv(transformed_file)

        # Derive the table name dynamically based on region
        table_name = f"transformed_market_data_{os.path.basename(transformed_file).split('_')[-1].replace('.csv', '')}"

        conn = mysql.connector.connect(**db_config)
        cursor = conn.cursor()

        # Create table if it doesn’t exist
        cursor.execute(f"""
            CREATE TABLE IF NOT EXISTS {table_name} (
                timestamp VARCHAR(50),
                market VARCHAR(50),
                company VARCHAR(255),
                price_usd DECIMAL,
                daily_change_percent DECIMAL
            );
        """)

        # Insert records
        for _, row in df.iterrows():
            cursor.execute(
                f"""
                INSERT INTO {table_name} (timestamp, market, company, price_usd, daily_change_percent)
                VALUES (%s, %s, %s, %s, %s)
                """,
                tuple(row)
            )

        conn.commit()
        conn.close()
        print(f"[LOAD] Data successfully loaded into MySQL table: {table_name}")

    # Define markets to process dynamically
    markets = ["us", "europe", "asia", "africa"]

    # Dynamically create and link tasks
    raw_files = extract_market_data.expand(market=markets)
    transformed_files = transform_market_data.expand(raw_file=raw_files)
    load_to_mysql.expand(transformed_file=transformed_files)

dag = daily_etl_pipeline()
When you trigger this DAG, Airflow will automatically create three sequential tasks for each defined region (us, europe, asia, africa):
first extracting market data, then transforming it, and finally loading it into a region-specific MySQL table.
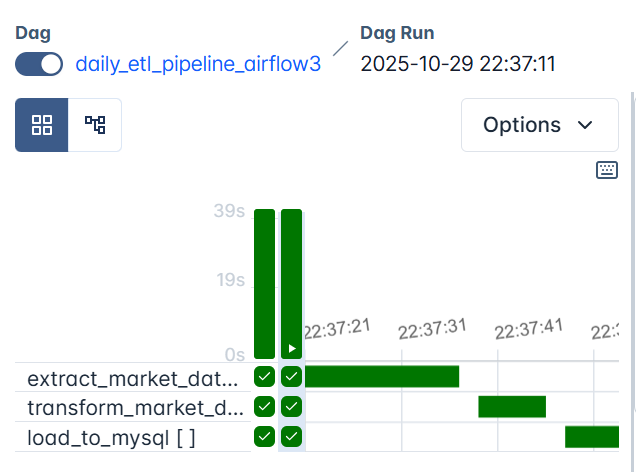
Each branch runs independently, so by the end of a successful run, your local MySQL database (airflow_db) will contain four separate tables, one for each region:
transformed_market_data_us
transformed_market_data_europe
transformed_market_data_asia
transformed_market_data_africa
Each table contains the cleaned and sorted dataset for its region, including company names, prices, and daily percentage changes.
Once your containers are running, open MySQL (via terminal or MySQL Workbench) and run:
SHOW TABLES;
You should see all four tables listed. Then, to inspect one of them, for example us, run:
SELECT * FROM transformed_market_data_us;
From above, we can see the dataset that Airflow extracted, transformed, and loaded for the U.S. market, confirming your pipeline has now completed all three stages of ETL: Extract → Transform → Load.
This integration demonstrates Airflow’s ability to manage data flow across multiple sources and databases seamlessly, a key capability in modern data engineering pipelines.
Absolutely, here’s the updated subsection with your requested note added in the right place.
It keeps the professional teaching tone and gently reminds learners that these connection values must match the local MySQL setup they created earlier.
Previewing the Loaded Data in Airflow
By now, you’ve confirmed that your transformed datasets are successfully loaded into MySQL, you can view them directly in MySQL Workbench or through a SQL client. But Airflow also provides a convenient way to query and preview this data right from the UI, using Connections and the SQLExecuteQueryOperator.
Connections in Airflow store the credentials and parameters needed to connect to external systems such as databases, APIs, or cloud services. Instead of hardcoding passwords or host details in your DAGs, you define a connection once in the Web UI and reference it securely using its conn_id.
To set this up:
- Open the Airflow Web UI
- Navigate to Admin → Connections → + Add a new record
- Fill in the following details:
| Field | Value |
|---|---|
| Conn Id | local_mysql |
| Conn Type | MySQL |
| Host | host.docker.internal |
| Schema | airflow_db |
| Login | airflow |
| Password | airflow |
| Port | 3306 |
Note: These values must match the credentials you defined earlier when setting up your local MySQL instance.
Specifically, the database
airflow_db, userairflow, and passwordairflowshould already exist in your MySQL setup.The
host.docker.internalvalue ensures that your Airflow containers can communicate with MySQL running on your local machine.
- Also note that when you use
docker compose down -v, all volumes, including your Airflow connections, will be deleted. Always remember to re-add the connection afterward.If your changes are not volume-related, you can safely shut down the containers using
docker compose down(without-v), which preserves your existing connections and data.
Click Save to register the connection.
Now, Airflow knows how to connect to your MySQL database whenever a task specifies conn_id="local_mysql".
Let’s create a simple SQL query task to preview the data we just loaded.
    @task
    def extract_market_data(market: str):
        ...

    @task
    def transform_market_data(raw_file: str):
        ...

    @task
    def load_to_mysql(transformed_file: str):
        ...

        from airflow.providers.common.sql.operators.sql import SQLExecuteQueryOperator

        preview_mysql = SQLExecuteQueryOperator(
            task_id="preview_mysql_table",
            conn_id="local_mysql",
            sql="SELECT * FROM transformed_market_data_us LIMIT 5;",
            do_xcom_push=True,  # makes query results viewable in Airflow’s XCom tab
        )
        # Dynamically create and link tasks
    raw_files = extract_market_data.expand(market=markets)
    transformed_files = transform_market_data.expand(raw_file=raw_files)
    load_to_mysql.expand(transformed_file=transformed_files)

dag = daily_etl_pipeline()
Next, link this task to your DAG so that it runs after the loading process, update this line load_to_mysql.expand(transformed_file=transformed_files) to this:
load_to_mysql.expand(transformed_file=transformed_files) >> preview_mysqlWhen you trigger the DAG again (always remember to shut down the containers before making changes to your DAGs using docker compose down, and then, once saved, use docker compose up -d), Airflow will:
- Connect to your MySQL database using the stored connection credentials.
- Run the SQL query on the specified table.
- Display the first few rows of your data as a JSON result in the XCom view.
To see it:
- Go to Grid View
- Click on the
preview_mysql_tabletask - Choose XCom from the top menu
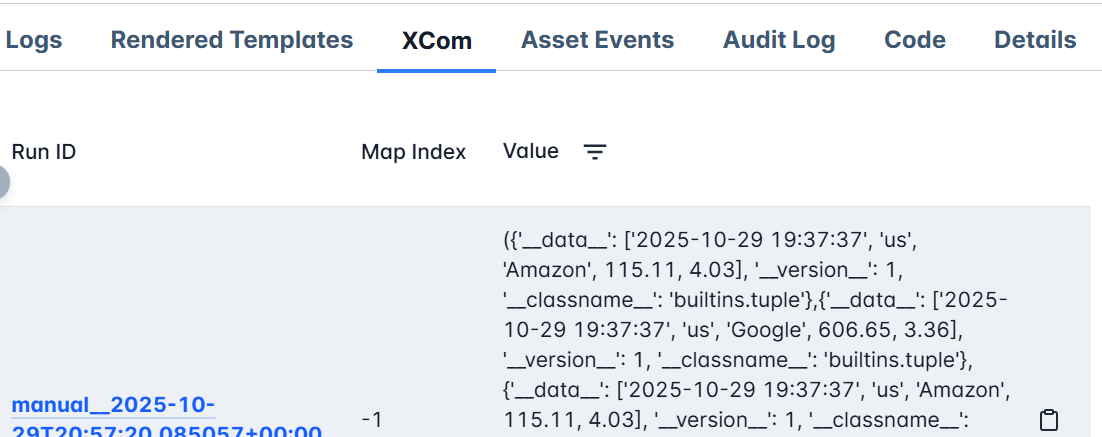
You’ll see your data represented in JSON format, confirming that the integration works, Airflow not only orchestrates the workflow but can also interactively query and visualize your results without leaving the platform.
This makes it easy to verify that your ETL pipeline is functioning correctly end-to-end: extraction, transformation, loading, and now validation, all visible and traceable inside Airflow.
Git-Based DAG Management and CI/CD for Deployment (with git-sync)
At this stage, your local Airflow environment is complete, you’ve built a fully functional ETL pipeline that extracts, transforms, and loads regional market data into MySQL, and even validated results directly from the Airflow UI.
Now it’s time to take the final step toward production readiness: managing your DAGs the way data engineering teams do in real-world systems, through Git-based deployment and continuous integration.
We’ll push our DAGs to a shared GitHub repository called airflow_dags, and connect Airflow to it using the git-sync container, which automatically keeps your DAGs in sync. This allows every team member (or environment) to pull from the same source, the Git repo, without manually copying files into containers.
Why Manage DAGs with Git
Every DAG is just a Python file, and like all code, it deserves version control. Storing DAGs in a Git repository brings the same advantages that software engineers rely on:
- Versioning: track every change and roll back safely.
- Collaboration: multiple developers can work on different workflows without conflict.
- Reproducibility: every environment can pull identical DAGs from a single source.
- Automation: changes sync automatically, eliminating manual uploads.
This structure makes Airflow easier to maintain and scales naturally as your pipelines grow in number and complexity.
Pushing Your DAGs to GitHub
To begin, create a public or private repository named airflow_dags (e.g., https://github.com/<your-username>/airflow_dags).
Then, in your project root (airflow-docker), initialize Git and push your local dags/ directory:
git init
git remote add origin https://github.com/<your-username>/airflow_dags.git
git add dags/
git commit -m "Add Airflow ETL pipeline DAGs"
git branch -M main
git push -u origin main
Once complete, your DAGs live safely in GitHub, ready for syncing.
How git-sync Works
git-sync is a lightweight sidecar container that continuously clones and updates a Git repository into a shared volume.
Once running, it:
- Clones your repository (e.g.,
https://github.com/<your-username>/airflow_dags.git), - Pulls updates every 30 seconds by default,
- Exposes the latest DAGs to Airflow automatically, no rebuilds or restarts required.
This is how Airflow stays up to date with your Git repo in real time.
Setting Up git-sync in Docker Compose
In your existing docker-compose.yaml, you already have a list of services that define your Airflow environment, like the api-server, scheduler, triggerer, and dag-processor. Each of these runs in its own container but works together as part of the same orchestration system.
The git-sync container will become another service in this list, just like those, but with a very specific purpose:
- to keep your
/dagsfolder continuously synchronized with your remote GitHub repository.
Instead of copying Python DAG files manually or rebuilding containers every time you make a change, the git-sync service will automatically pull updates from your GitHub repo (in our case, airflow_dags) into a shared volume that all Airflow services can read from.
This ensures that your environment always runs the latest DAGs from GitHub ,without downtime, restarts, or manual synchronization.
Remember in our docker-compose.yaml file, we had this kind of setup:
Now, we’ll extend that structure by introducing git-sync as an additional service within the same services: section and also an addition in the volumes: section(other than postgres-db-volume: we we have to also add airflow-dags-volume: for uniformity accross all containers).
Below is a configuration that works seamlessly with Docker on any OS:
services:
  git-sync:
    image: registry.k8s.io/git-sync/git-sync:v4.1.0
    user: "0:0"    # run as root so it can create /dags/git-sync
    restart: always
    environment:
      GITSYNC_REPO: "https://github.com/<your-username>/airflow-dags.git"
      GITSYNC_BRANCH: "main"           # use BRANCH not REF
      GITSYNC_PERIOD: "30s"
      GITSYNC_DEPTH: "1"
      GITSYNC_ROOT: "/dags/git-sync"
      GITSYNC_DEST: "repo"
      GITSYNC_LINK: "current"
      GITSYNC_ONE_TIME: "false"
      GITSYNC_ADD_USER: "true"
      GITSYNC_CHANGE_PERMISSIONS: "1"
      GITSYNC_STALE_WORKTREE_TIMEOUT: "24h"
    volumes:
      - airflow-dags-volume:/dags
    healthcheck:
      test: ["CMD-SHELL", "test -L /dags/git-sync/current && test -d /dags/git-sync/current/dags && [ \"$(ls -A /dags/git-sync/current/dags 2>/dev/null)\" ]"]
      interval: 10s
      timeout: 3s
      retries: 10
      start_period: 10s

volumes:
  airflow-dags-volume:
In this setup, the git-sync service runs as a lightweight companion container that keeps your Airflow DAGs in sync with your GitHub repository.
The GITSYNC_REPO variable tells it where to pull code from, in this case, your DAG repository (airflow_dags). Make sure you replace <your-username> with your exact GitHub username. The GITSYNC_BRANCH specifies which branch to track, usually main, while GITSYNC_PERIOD defines how often to check for updates. Here, it’s set to every 30 seconds, meaning Airflow will always be within half a minute of your latest Git push.
The synchronization happens inside the directory defined by GITSYNC_ROOT, which becomes /dags/git-sync inside the container. Inside that root, GITSYNC_DEST defines where the repo is cloned (as repo), and GITSYNC_LINK creates a symbolic link called current pointing to the active clone.
This design allows Airflow to always reference a stable, predictable path (/dags/git-sync/current/dags) even as the repository updates in the background, no path changes, no reloads.
A few environment flags ensure stability and portability across systems. For instance, GITSYNC_ADD_USER and GITSYNC_CHANGE_PERMISSIONS make sure the synced files are accessible to Airflow even when permissions differ across Docker environments.
GITSYNC_DEPTH limits the clone to just the latest commit (keeping it lightweight), while GITSYNC_STALE_WORKTREE_TIMEOUT helps clean up old syncs if something goes wrong.
The shared volume, airflow-dags-volume, acts as the bridge between git-sync and Airflow. It stores all synced DAGs in one central location accessible by both containers. The health check at the end ensures that git-sync is functioning, it verifies that the /current/dags directory exists and contains files before Airflow tries to load them.
Finally, the healthcheck section ensures that Airflow doesn’t start until git-sync has successfully cloned your repository. It runs a small shell command that checks three things, whether the symbolic link /dags/git-sync/current exists, whether the dags directory is present inside it, and whether that directory actually contains files. Only when all these conditions pass does Docker mark the git-sync service as healthy. The interval and retry parameters control how often and how long these checks run, ensuring that Airflow’s scheduler, webserver, and other components wait patiently until the DAGs are fully available. This simple step prevents race conditions and guarantees a smooth startup every time.
Together, these settings ensure that your Airflow instance always runs the latest DAGs from GitHub, automatically, securely, and without manual file transfers.
Generally, this configuration does the following:
- Creates a shared volume (
airflow-dags-volume) where the DAGs are cloned. - Mounts it into both
git-syncand Airflow services. - Runs
git-syncas root to fix permission issues on Windows. - Keeps DAGs up to date every 30 seconds.
Adjusting the Airflow Configuration
We’ve now added git-sync as part of our Airflow services, sitting right alongside the api-server, scheduler, triggerer, and dag-processor.
This new service continuously pulls our DAGs from GitHub and stores them inside a shared volume (airflow-dags-volume) that both git-sync and Airflow can access.
However, our Airflow setup still expects to find DAGs through local directory mounts defined under each service (via x-airflow-common), not global named volumes. The default configuration maps these paths as follows:
volumes:
    - ${AIRFLOW_PROJ_DIR:-.}/dags:/opt/airflow/dags
    - ${AIRFLOW_PROJ_DIR:-.}/logs:/opt/airflow/logs
    - ${AIRFLOW_PROJ_DIR:-.}/config:/opt/airflow/config
    - ${AIRFLOW_PROJ_DIR:-.}/plugins:/opt/airflow/plugins
This setup points Airflow to the local dags/ folder in your host machine, but now that we have git-sync, our DAGs will live inside a synchronized Git directory instead.
So we need to update the DAG volume mapping to pull from the new shared Git volume instead of the local one.
Replace the first line(- ${AIRFLOW_PROJ_DIR:-.}/dags:/opt/airflow/dags) under the volumes: section with: - airflow-dags-volume:/opt/airflow/dags
This tells Docker to mount the shared airflow-dags-volume (created by git-sync) into Airflow’s /opt/airflow/dags directory.
That way, any DAGs pulled by git-sync from your GitHub repository will immediately appear inside Airflow’s working environment, without needing to rebuild or copy files.
We also need to explicitly tell Airflow where the synced DAGs live.
In the environment section of your x-airflow-common block, add the following:
AIRFLOW__CORE__DAGS_FOLDER: /opt/airflow/dags/git-sync/current/dagsThis line links Airflow directly to the directory created by the git-sync container.
Here’s how it connects:
-
Inside the
git-syncconfiguration, we defined:GITSYNC_ROOT: "/dags/git-sync" GITSYNC_LINK: "current"Together, these ensure that the most recent repository clone is always available under
/dags/git-sync/current. -
When we mount
airflow-dags-volume:/opt/airflow/dags, this path becomes accessible inside the Airflow containers as/opt/airflow/dags/git-sync/current/dags.
By setting AIRFLOW__CORE__DAGS_FOLDER to that exact path, Airflow automatically watches the live Git-synced DAG directory for changes, meaning every new commit to your GitHub repo will reflect instantly in the Airflow UI.
Finally, ensure that Airflow waits for git-sync to finish cloning before starting up.
In each Airflow service (airflow-scheduler, airflow-apiserver, dag-processor, and triggerer), depends_on section, add:
depends_on:
  git-sync:
    condition: service_healthy
This guarantees that Airflow only starts once the git-sync container has successfully pulled your repository, preventing race conditions during startup.
Once complete, Airflow will read its DAGs directly from the synchronized Git directory , /opt/airflow/dags/git-sync/current/dags , instead of your local project folder.
This change transforms your setup into a live, Git-driven workflow, where Airflow continuously tracks and loads the latest DAGs from GitHub automatically.
Automating Validation with GitHub Actions
Our Git integration wouldn’t be truly powerful without CI/CD (Continuous Integration and Continuous Deployment).
While git-sync ensures that any change pushed to GitHub automatically reflects in Airflow, that alone can be risky, not every change should make it to production immediately.
Imagine pushing a DAG with a missing import, a syntax error, or a bad dependency.
Airflow might fail to parse it, causing your scheduler or api-server to crash or restart repeatedly. That’s why we need a safety net, a way to automatically check that every DAG in our repository is valid before it ever reaches Airflow.
This is exactly where GitHub Actions comes in.
We can set up a lightweight CI pipeline that validates all DAGs whenever someone pushes to the main branch. If a broken DAG is detected, the pipeline fails, preventing the merge and protecting your Airflow environment from unverified code.
GitHub also provides notifications directly in your repository interface, showing failed workflows and highlighting the cause of the issue.
Inside your airflow_dags repository, create a GitHub Actions workflow file at:
.github/workflows/validate-dags.yml
name: Validate Airflow DAGs

on:
  push:
    branches: [ main ]
    paths:
      - 'dags/**'

jobs:
  validate:
    runs-on: ubuntu-latest
    steps:
      - name: Checkout Repository
        uses: actions/checkout@v4

      - name: Set up Python
        uses: actions/setup-python@v5
        with:
          python-version: '3.11'

      - name: Install Airflow
        run: pip install apache-airflow==3.1.1

      - name: Validate DAGs
        run: |
          echo "Validating DAG syntax..."
          airflow dags list || exit 1
This simple workflow automatically runs every time you push a new commit to the main branch (or modify anything in the dags/ directory).
It installs Apache Airflow in a lightweight test environment, loads all your DAGs, and checks that they parse successfully, no missing imports, syntax issues, or circular dependencies.
If even one DAG fails to load, the validation job will exit with an error, causing the GitHub Actions pipeline to fail.
GitHub then immediately notifies you (and any collaborators) through the repository’s Actions tab, issue alerts, and optional email notifications.
By doing this, you’re adding a crucial layer of protection to your workflow:
- Pre-deployment safety: invalid DAGs never reach your running Airflow instance.
- Automatic feedback: failed DAGs trigger GitHub notifications, allowing you to fix errors early.
- Confidence in deployment: once the pipeline passes, you know every DAG is production-ready.
Together, this CI validation and your git-sync setup create a self-updating, automated Airflow environment that mirrors production deployment practices.
With this final step, your Airflow environment becomes a versioned, automated, and production-ready orchestration system, capable of handling real data pipelines the way modern engineering teams do.
You’ve now completed a full transformation:
from local DAG development to automated, Git-driven deployment, all within Docker, all powered by Apache Airflow.
-
Note that, both the
git-syncservice and the Airflow UI depend on your Docker containers running. As long as your containers are up,git-syncremains active, continuously checking for updates in your GitHub repository and syncing any new DAGs to your Airflow environment.Once you stop or shut down the containers (
docker compose down), this synchronization pauses. You also won’t be able to access the Airflow Web UI or trigger DAGs until the containers are started again.When you restart with
docker compose up -d, everything, includinggit-sync, resumes automatically, picking up the latest changes from GitHub and restoring your full Airflow setup just as you left it.
Summary and Up Next
In this tutorial, you completed the ETL lifecycle in Apache Airflow by adding the Load phase to your In this tutorial, you completed the ETL lifecycle in Apache Airflow by adding the Load phase to your workflow and connecting it to a local MySQL database. You learned how Airflow securely manages external connections, dynamically handles multiple data regions, and enables in-UI data previews through XCom and Connections.
You also took your setup a step closer to production by integrating Git-based DAG management with git-sync, and implementing GitHub Actions CI to validate DAGs automatically before deployment.
Together, these changes transformed your environment into a version-controlled, automated orchestration system that mirrors the structure of production-grade setups, a final step before deploying to the cloud.
In the next tutorial, you’ll move beyond simulated data and build a real-world data pipeline, extracting data from an API, transforming it with Python, and loading it into MySQL. You’ll also add retries, alerts, and monitoring, and deploy the full workflow through CI/CD, achieving a truly end-to-end, production-grade Airflow setup.