Introduction to Snowflake
Snowflake is one of the most in-demand tools for modern data engineers.
Many companies use it as part of their analytics pipelines and cloud data platforms, and it's frequently listed as a required or preferred skill in data engineering roles.
But what exactly is Snowflake? How does it work? And how do you actually use it day to day?
In this tutorial, you’ll get hands-on experience with Snowflake. You’ll learn how to navigate the interface, load data, run queries, and monitor credit usage, giving you the confidence to start using Snowflake in real-world projects.
So what is Snowflake?
Snowflake is a cloud-based data warehouse platform and scalable SQL interface. It handles all the infrastructure for you — including scaling up (or down) when needed, storing your data, and processing your queries.
You don’t need to worry about configuring servers or managing performance. You just load your data and start querying.
Who uses Snowflake, and why?
Companies like Capital One, HelloFresh, Penske, and Nissan use Snowflake to power their analytics and data operations. It’s especially popular with data engineering and analytics teams because it solves common problems: long query times, scattered or siloed data, and complicated infrastructure that’s difficult to scale.
With Snowflake, teams can combine data from various business departments, such as sales, finance, marketing, and support, and analyze it all in one place. They can also share live datasets between departments or with external partners, without needing to duplicate or export any data. And because Snowflake scales compute automatically, it can handle everything from routine dashboard queries to large-scale reporting during peak business hours.
Analysts use it to explore and visualize data in tools like Power BI or Tableau. Engineers use it to build pipelines that clean and transform raw data. And data scientists can run machine learning workflows directly against Snowflake tables, without needing to move data into separate systems.
Whether you’re working with structured tables, semi-structured logs (like JSON), or large flat files in cloud storage, Snowflake provides a single place to store, query, and share data efficiently.
What makes Snowflake different?
One reason Snowflake is so popular is how it handles performance at scale. In traditional systems like PostgreSQL, your queries run on the same machine that stores your data. In Snowflake, these two components are separated:
- Storage: where your data lives
- Compute: the resources that process your queries
This separation means different teams can run queries at the same time without slowing each other down. It also means you can scale your compute power up or down depending on your needs, and pause it entirely when you’re not using it to save costs.
Getting started with Snowflake
You can sign up for a free trial of Snowflake through their website.
You’ll be prompted to select a Snowflake edition. The “Standard” edition is ideal for learning because it gives you access to the core features at the lowest credit cost.
You’ll also be asked to choose a cloud provider (like AWS, GCP, or Azure). This doesn’t require any cloud account or prior knowledge — Snowflake runs on top of these platforms, and this step simply determines where your data and compute will be hosted behind the scenes.
For learning purposes, any provider is fine. You can safely go with AWS or pick whichever one you’re most familiar with as well as the default “Region”. You won’t need to interact with the cloud provider at all.
Snowflake’s free trial includes a set of credits you can use to explore the platform and run queries over a 30-day period. No payment method is required.
📝 Note: If you just signed up for a Snowflake account, you may see a pop-up offering to help you load data. You can close it for now because we’ll walk through that process step by step. We’re skipping the Quickstart in this tutorial so you can get hands-on with each part of the process. That way, you’ll understand not just what to do, but how Snowflake works behind the scenes.
Once you’ve completed signup and logged in and dismissed any quickstart pop-ups you see, you’ll land in Snowsight, Snowflake’s web-based interface. This is where you’ll spend most of your time.
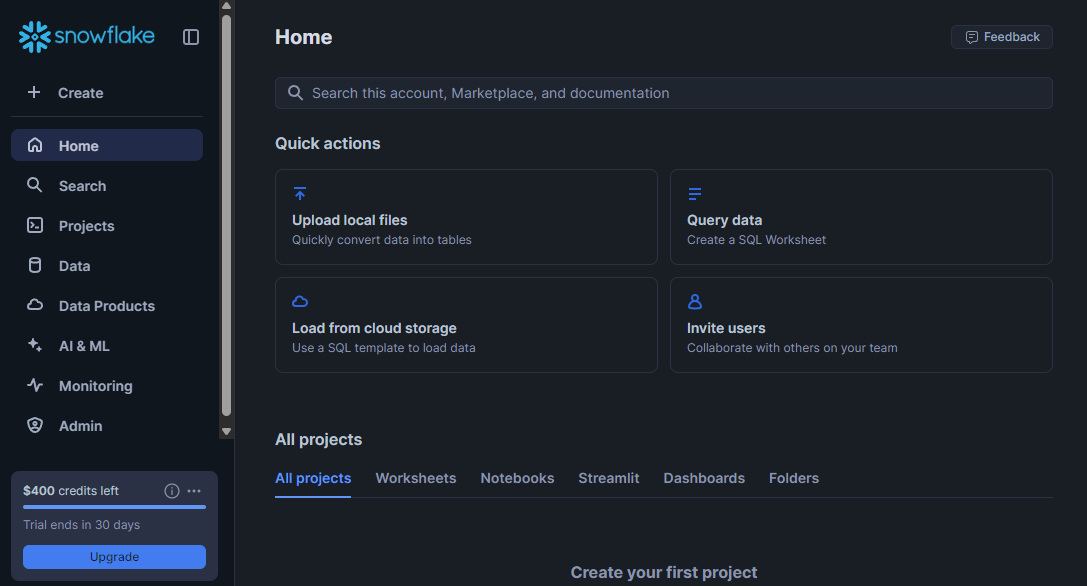
Start by locating the navigation panel on the left. You should see tabs for Projects, Data, Monitoring, Admin, and more. You don't need to explore everything immediately, but these are the main tools you'll use.
Let’s start with the component that does the heavy lifting: the virtual warehouse.
Understanding virtual warehouses
In Snowflake, your data is stored in centralized cloud storage. It stays there, regardless of how or when you query it.
To access and process that data, Snowflake uses something called a virtual warehouse. A warehouse isn’t a physical building, but instead is a temporary engine made up of compute resources that powers your SQL queries.
Every time you run a query, Snowflake uses a warehouse to process it. Because your data is stored separately, you can create multiple warehouses that all access the same data for different teams, projects, or use cases. Each warehouse runs independently, so teams can work in parallel without slowing each other down.
This separation of compute (warehouses) and storage (your data) is what makes Snowflake flexible, scalable, and cost-effective.
Creating a warehouse
You can create a warehouse from the Admin > Warehouses tab.
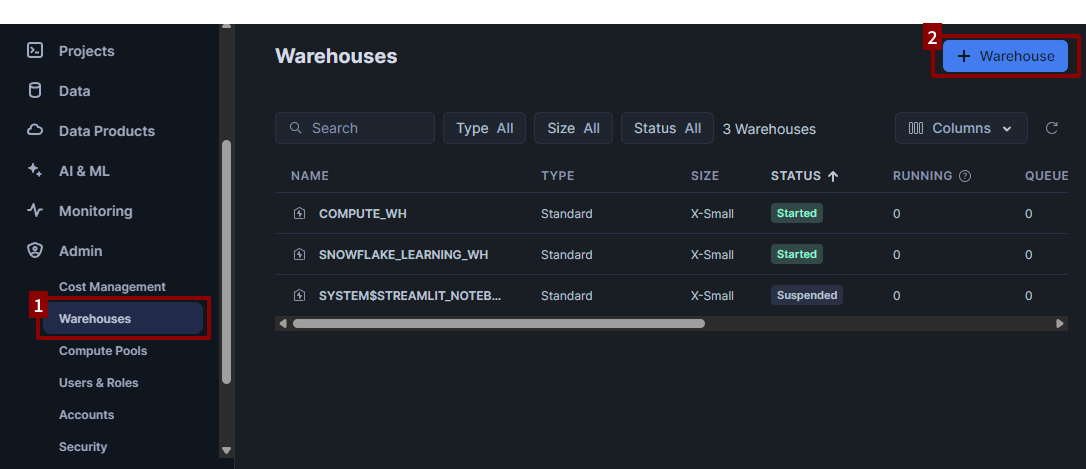
- Click + Warehouse in the upper right-hand corner.
- Give it a name like
LEARN_WH. -
Choose a size. For practice, the smallest size (X-Small) is fine.

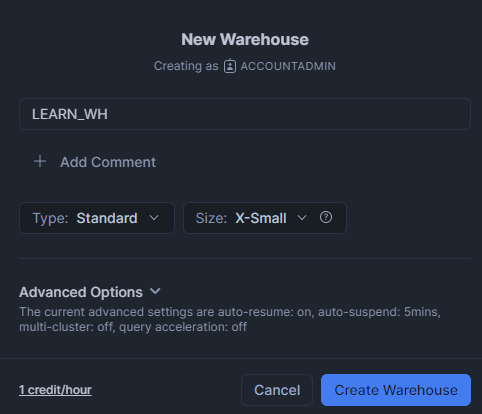
Snowflake charges compute credits per second while a warehouse is active. The good news? You can pause your warehouse when you’re not using it, and you should, to avoid unnecessary credit usage.
Once your warehouse is created, you can start or stop it at any time.
By default, Snowflake will also automatically suspend your warehouse after a few minutes of inactivity. You can check this setting in the Advanced Options when creating or editing your warehouse.
This auto-suspend feature helps you avoid accidentally leaving a warehouse running, which is especially useful when you’re experimenting or learning. We recommend keeping this option enabled.
Creating a database
Before you can load or query data in Snowflake, you'll need a database to hold your work.
In Snowflake, a database is essentially a container, similar to a folder, that stores your tables and other objects. It helps keep things organized and separate from other projects or datasets.
To create your first database:
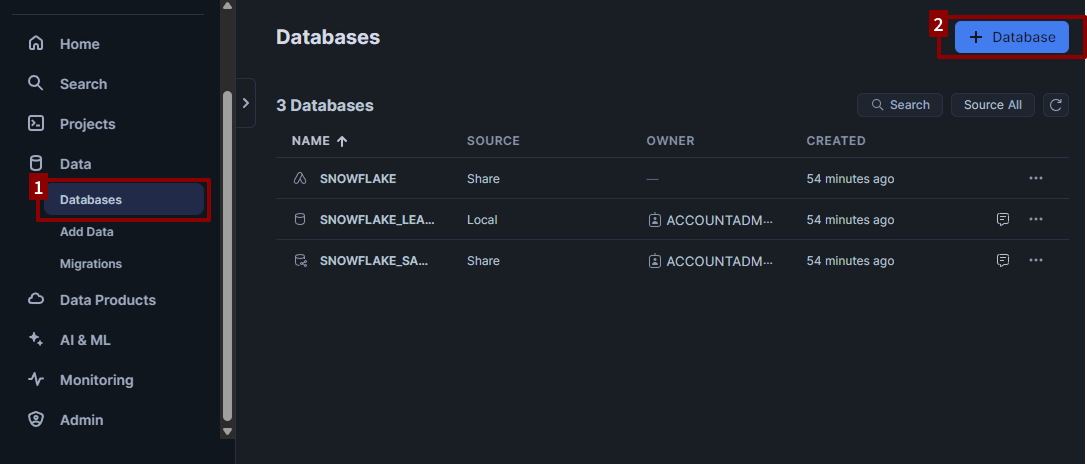
- Go to the Data > Databases tab in the left-hand sidebar.
- Click + Database.
- Name your database something related to the dataset. For this tutorial, we’ll use the name
BOOKSTORE. - Click Create.
That’s it — you've created a database. For now, we’ll keep things simple and work in this database.
Creating a table and loading data
Now that you have a database, let’s create a simple table so you can start writing SQL queries.
There are two ways to create a table in Snowflake: you can write a CREATE TABLE statement manually, or you can use the interface to upload a CSV file and have Snowflake create the table for you automatically.
In this tutorial, we’ll use the CSV upload method. It’s the fastest way to get started, and it helps you learn how to work with external data.
First, download the sample CSV file here.
We’ll use this dataset of online bookstore sales to practice loading and querying data in Snowflake.
Go to Data > Add Data and choose Load data into a Table.
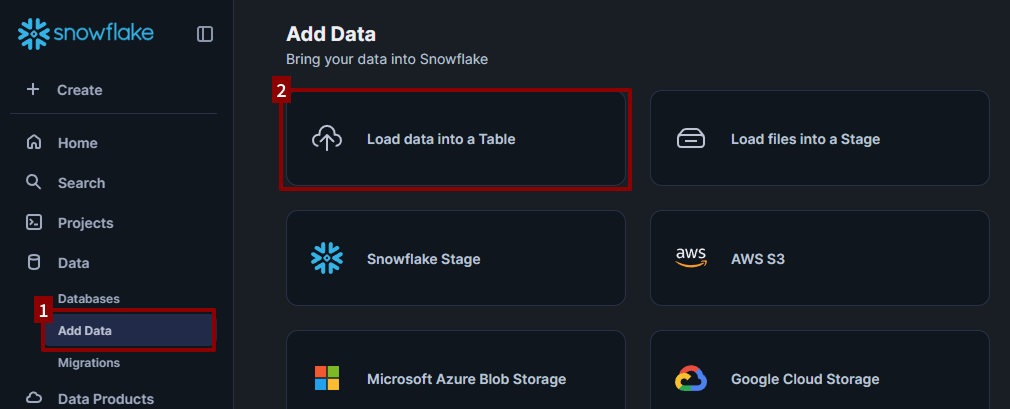
Before uploading, take a quick look at the top-right corner of the interface. You should see a dropdown for the Warehouse.
Even though you created a warehouse earlier (e.g., LEARN_WH), Snowflake may still default to one called COMPUTE_WH. That’s a pre-created warehouse that comes with new accounts.
For this tutorial, switch the dropdown to LEARN_WH (or whatever name you gave your warehouse) so you’re using the compute resources you set up yourself. It’s not strictly required for this step, but it’s a good habit to build.
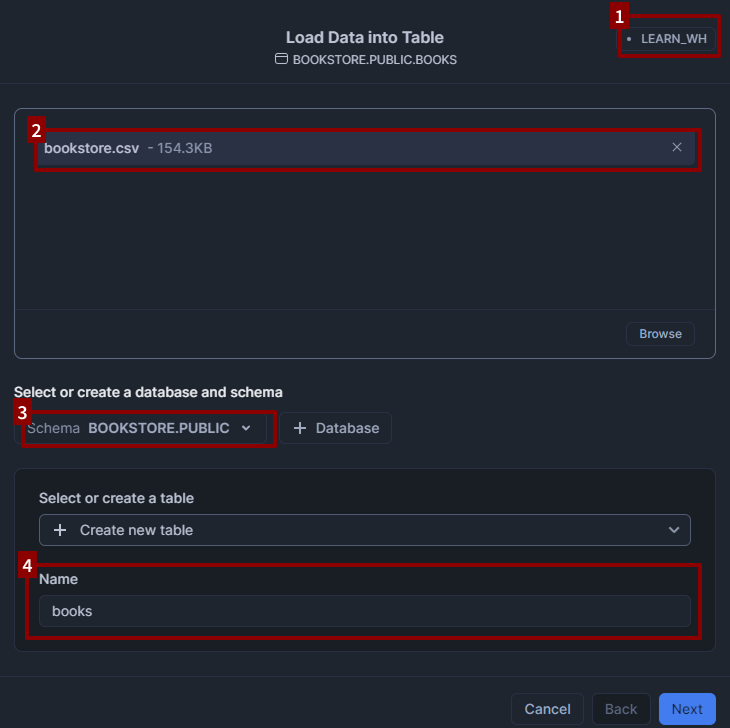
Now you’re ready to load the file:
- Drag and drop
bookstore.csvinto the Load Data into Table pane. - Select
BOOKSTOREas your database. The schema should automatically selectPUBLIC. -
Name your table something like
books.
Once you click Next, you’ll see options to help you successfully load the CSV contents into Snowflake.
- In the File format panel under “View Options”, specify Header > First line contains header.
-
Click Load.

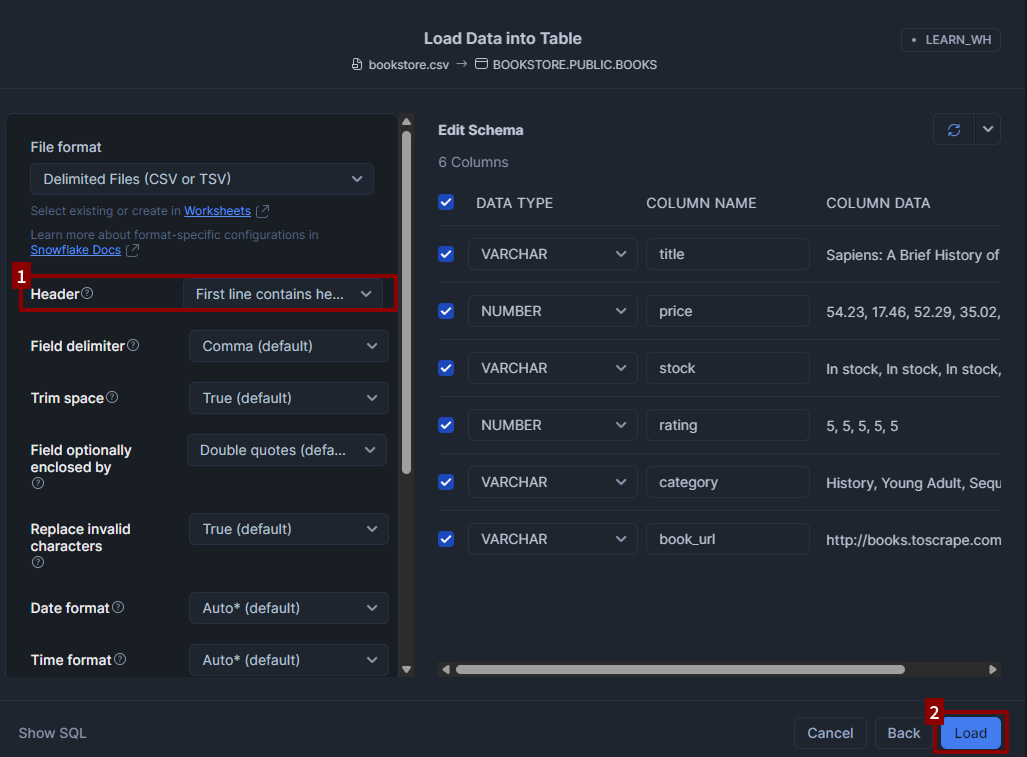
After loading the data, you may see a pop-up with the option to Query Data. Skip this for now and click Done.
Creating and using a worksheet
With your data loaded, you’re ready to start exploring it with SQL queries.
The place where you do this in Snowflake is called a worksheet. A worksheet is like a scratchpad where you can write, run, and save your SQL code.
To create a new worksheet:
- Go to the Projects >Worksheets tab in the left-hand sidebar.
- Click + Worksheet to create a new SQL worksheet.
By default, your new worksheet will have a generic name like Worksheet 1 or the current date/time. It’s a good habit to rename your worksheets so you can easily find them later.
To rename it:
- Double-click the worksheet name at the top.
-
Enter a new name, such as
Bookstore Queries.

Before you start writing SQL, double-check your context selectors in the toolbar:
- Warehouse: the compute resource running your queries (e.g.,
LEARN_WH) - Database: where your data is stored (e.g.,
BOOKSTORE) - Schema: a sub-container inside your database (most likely
PUBLIC)

These tell Snowflake where to look for your data and which compute resources to use. You can change them using the dropdown menus at the top of the worksheet. If your context selectors aren’t set correctly, your queries may return an error or no results, so it’s a good habit to always double-check them before running queries.
Writing and running queries
Now that you have a worksheet open, it’s time to use it to explore your data.
Snowflake uses a SQL dialect that’s mostly ANSI-compliant, which means the core syntax is very similar to what you’d find in other databases. If you’ve used SQL in PostgreSQL, MySQL, or SQLite, most of your queries will work the same way here.
Later on, you may notice some Snowflake-specific functions and behaviors, but for now, everything you need follows standard SQL.
To run a query:
- Click anywhere inside the query you want to run.
- Either click the Run button (the ▶️ icon), or use the keyboard shortcut:
- Mac:
Cmd + Enter - Windows/Linux:
Ctrl + Enter
- Mac:
Only the currently selected query will run, even if you have multiple queries in the worksheet. If you want to run several queries at once, you can highlight them all and click Run.
When you run a query, Snowflake displays the results in a panel at the bottom of the worksheet.
This panel always shows the results of your most recently run query. If you run another query, the panel will update to show the new results.
You won’t see the output of older queries in the worksheet unless you run them again.
In the next section, you’ll learn how to view your full query history, including past results, using the History tab.
Example queries
Let’s practice with a few simple queries on your BOOKS table.
-- preview the books table
SELECT *
FROM BOOKS
LIMIT 10;
-- average price by rating
SELECT RATING, AVG(PRICE)
FROM BOOKS
GROUP BY RATING
ORDER BY RATING DESC;
These examples should give you a good start. Try writing a few more queries of your own — you can keep adding them to your worksheet. For example:
- Find books with a price over 50
- Count the number of books per author
- Sort books by title
You don’t need to delete older queries; just click inside the one you want to run.
Modifying data
In addition to reading data, you can also use SQL to modify it. For example, to update records or create new tables. You can use statements like:
CREATE OR REPLACE TABLEUPDATEDELETEINSERT INTO
Just remember: modifying data consumes compute resources (credits), just like querying. Use small datasets while learning to keep costs low.
Viewing your query history
By now, you've run several queries in your worksheet. You may have noticed that Snowflake only shows the results of your last run query in the results panel.
But what if you want to see queries you ran earlier? Or check how long they took to run?
That’s where the Query History tab comes in.
You can find it in the left-hand sidebar: just click Monitoring > Query History.
This tab shows a list of all the queries you’ve run recently across all worksheets in your current Snowflake account.
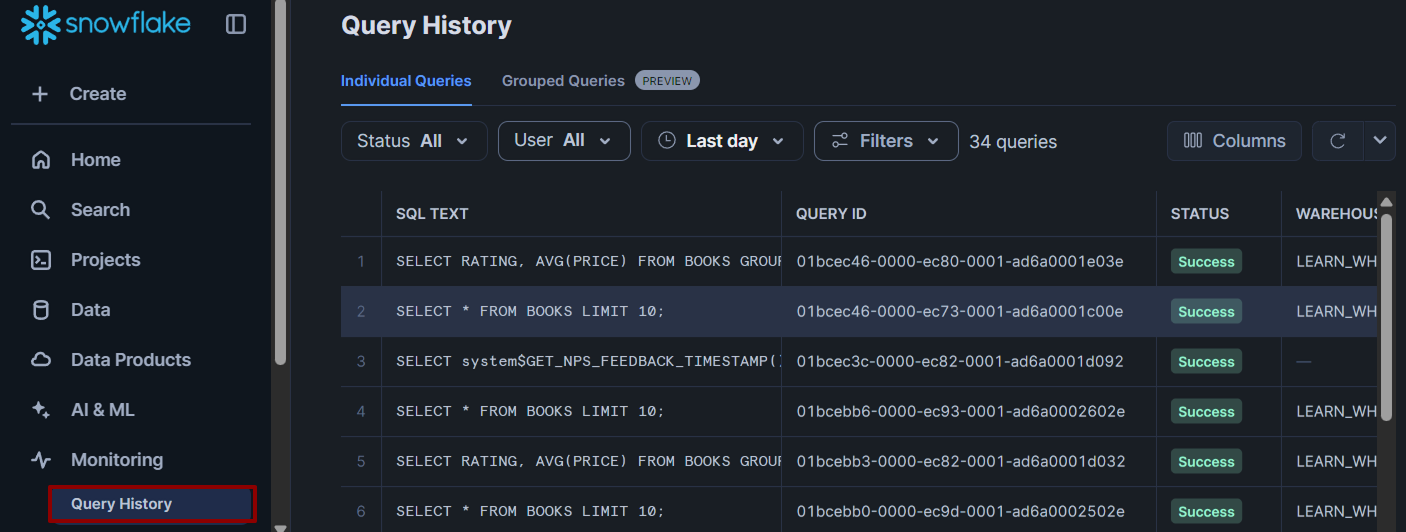
For each query, you can see:
- The SQL text you ran
- The time it ran and how long it took
- The warehouse that processed it
- The status (successful, failed, etc.)
You can click on any query in the History tab to view the exact SQL you ran, along with a preview of its results.
Why is this helpful?
- If you accidentally close a worksheet or lose your place, you can still find your past queries here.
- If you want to copy an earlier query and tweak it, this is the fastest way to find it.
The History tab only shows your own queries (not those of other users), and it stores a limited history. For long-term saving, it’s still a good idea to name and save important worksheets.
Understanding Snowflake credits and costs
Now that you’ve seen how to view your query history, let’s take a closer look at how Snowflake’s pricing works and how to manage your credit usage as you run queries.
Snowflake’s pricing model is based on usage. You pay separately for:
- Storage: priced per terabyte per month. In most learning cases, this cost is negligible.
- Compute: based on how long your warehouse is active. A running warehouse consumes credits by the second.
When you run queries, you use compute, which is what triggers credit consumption.
You can’t see credit usage for individual queries in the History tab, but you can view overall credit consumption in the Admin tab.
To check this:
- Go to Admin → Cost Management.
- The Cost Management view displays the number of credits your warehouses have consumed over time, broken down by day and warehouse.
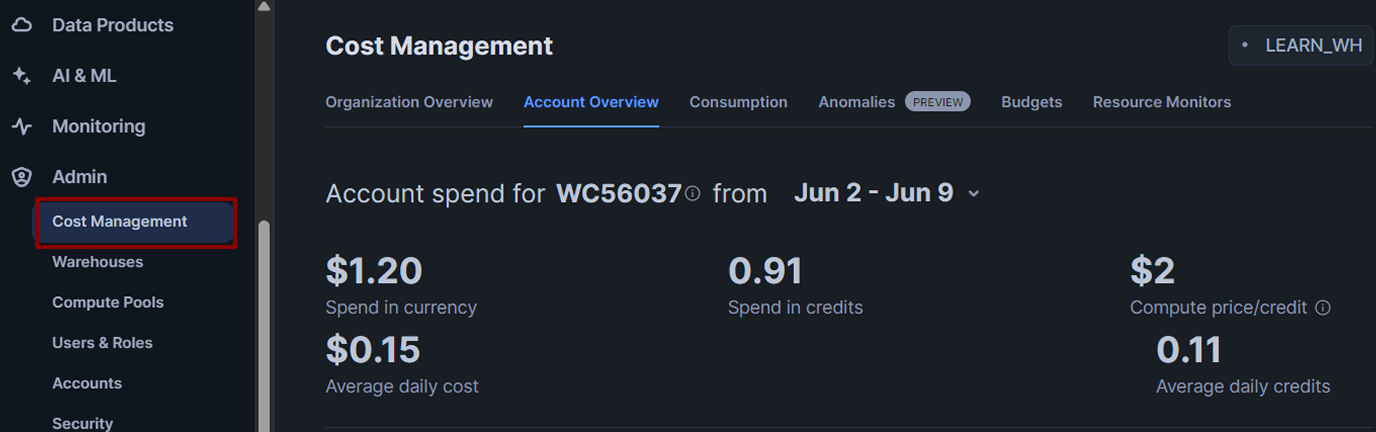
Monitor this in your trial account to make the most of your free credits. It’s a good habit to check this tab occasionally so you understand where your credits are going.
A few tips for keeping costs low while learning:
- Pause your warehouse when it's not in use. You only pay for compute while your warehouse is running.
- Use a small warehouse size (such as X-Small) unless you require more power.
- Avoid rerunning queries unnecessarily. Snowflake charges for each execution, even if the data hasn’t changed.
Learning to monitor your credit usage now will help you use Snowflake more efficiently in real projects.
Next steps
You’ve accomplished a lot already. You've:
- Uploaded data from a file
- Created and configured a warehouse
- Written and run SQL queries in Snowflake
- Explored Snowflake’s pricing and usage model
With these skills, you now have the foundation to use Snowflake in real-world data workflows — from loading and querying data to monitoring compute usage. You also understand what makes Snowflake different from traditional databases and why it’s a valuable tool for modern data engineering.
Now that you’re set up, the best way to keep learning is to keep using it. Try loading larger datasets. Experiment with different warehouse sizes. Monitor your credit usage as you go.
When you're ready, you can explore more of what Snowflake offers and start applying it to real projects:
- Organize your data with schemas to separate different projects, teams, or data types within the same account.
- Connect multiple data sources by uploading new files, using cloud storage integrations (like AWS S3), or querying data from external stages.
- Query semi-structured data like JSON, XML, or Parquet — directly, using SQL — to explore logs, API exports, or cloud-based event data.
- Explore public datasets through the Snowflake Marketplace, and join them with your own data for richer insights.
- Build a simple reporting pipeline: clean your data using SQL, summarize it into new tables, and visualize it in a BI tool like Power BI or Tableau.
- Manage access with roles to control who can query, modify, or administer specific databases or warehouses.
Each of these is a step toward building the kind of practical, portfolio-ready experience that employers look for.
And when that job description says "Snowflake experience preferred," you'll know what they mean and be ready to show it.