PySpark Tutorial for Beginners – Install and Learn Apache Spark with Python
Imagine you're an analyst who's responsible for analyzing customer data for a growing e-commerce company. Last year, your Python pandas scripts handled the data just fine. But now, with millions of customers and billions of transactions, your laptop freezes when you try to load a single month's worth of data. Python crashes. Even your beefed-up desktop machine runs out of memory when trying to load the data in Excel.
Your imaginary self has hit the wall that every data professional eventually faces: the point where traditional tools simply can't handle the scale of modern data.
When datasets grow beyond what a single machine can process, you need a different approach. You need distributed computing. You need a way to spread the work across multiple machines so they can tackle the problem together. That's exactly what Apache Spark was built to do.
PySpark brings this distributed processing power to Python developers, letting them write familiar Python code that runs across entire clusters of computers. Instead of being limited by your laptop's 16GB of RAM, you can process terabytes of data using the combined memory and processing power of dozens or even hundreds of machines.
In this tutorial, you'll learn:
- What Apache Spark and PySpark are, and their role in big data processing
- Spark's core architecture, including Drivers, Executors, and Clusters
- How to set up PySpark locally and run it within a Jupyter notebook environment using modern practices
By the end, you'll have PySpark running on your machine and understand how it transforms the way we think about data processing. Let's get started.
Why Big Data Processing Matters
Before we get into the specifics of PySpark, it's worth considering the problem it solves and how it does that. For decades, when data processing got slow, the solution was simple: scale up! Buy a bigger machine. Add more RAM. Get a faster CPU. This approach worked well when datasets were measured in megabytes or a couple of gigabytes.
But today's data is a different beast. Companies generate massive volumes of information on a daily basis: web logs, sensor data, transaction records, social media activity. We're talking about datasets that are hundreds of gigabytes, terabytes, or even petabytes in size. No single machine, no matter how powerful, can handle this scale efficiently or cost-effectively.
The alternative is to scale out: distribute the workload across multiple machines working together. Instead of one supercomputer, you use many regular computers as a coordinated team. This is the foundation of modern big data processing.
The Evolution from Hadoop to Spark
Early distributed systems like Hadoop and MapReduce made this possible, but they had a major limitation: they relied heavily on disk storage. Every step in the processing pipeline wrote intermediate results to disk, then read them back for the next step. This constant disk I/O made the systems slow and less responsive, especially for iterative tasks like machine learning or interactive data exploration.
Apache Spark changed this around by introducing in-memory computation. Instead of constantly writing to disk, Spark keeps data in memory between processing steps. This makes it dramatically faster for iterative workloads, sometimes 10x to 100x faster than Hadoop for certain tasks.
Built from the ground up for speed and scalability, Spark supports multiple programming languages, including Python through the PySpark API. This means you can cash in on the power of distributed computing using the Python skills you already have.
Understanding Apache Spark and PySpark
Let's start by clarifying what we're working with here.
Apache Spark is an open-source distributed computing engine designed to process large datasets across clusters of machines. While Spark itself is written in Scala (a language that runs on the Java Virtual Machine), it provides APIs for several programming languages.
PySpark is Spark's Python API. It's the bridge that lets you write Spark applications using Python syntax and libraries you're already familiar with. When you write PySpark code, you're actually controlling the Spark engine underneath, which handles all the complex distributed processing.
Apache Spark's Data Structures
At the heart of Spark are several data structures for working with distributed data, with these two being the most important for PySpark users:
- Resilient Distributed Datasets (RDDs) are Spark's foundational data structure. Think of an RDD as a collection of data that's automatically split into chunks and distributed across different machines in your cluster. These chunks can be processed in parallel, which is what makes Spark so fast.
- DataFrames are a higher-level abstraction built on top of RDDs that provide a table-like interface similar to pandas DataFrames or SQL tables. They offer better performance optimization and are easier to work with for many common data processing tasks.
In this tutorial, we'll focus on RDDs because they help you understand how Spark works at a fundamental level. Once you've got a good grip on RDD concepts, DataFrames become much easier to understand. We'll explore DataFrames in depth in future tutorials.
RDDs are:
- Resilient: If a machine fails or data is lost, Spark can rebuild the data from other machines
- Distributed: The data is spread across multiple machines, allowing parallel processing
- Datasets: Collections of data objects you can process, transform, and analyze
Now that you understand what Spark is and the data structures it uses, let's explore how you actually interact with Spark through its entry points.
Meet SparkSession: Your Entry Point to PySpark
When working with PySpark, you need a way to connect to and control the Spark engine. This connection point is called an entry point, your gateway to all of Spark's distributed processing capabilities.
In modern PySpark development (since 2016), that entry point is SparkSession.
What is SparkSession?
Think of it as your command center for all Spark operations. It's a unified interface that gives you access to every Spark feature you might need:
- RDD operations for low-level data processing
- DataFrame operations for structured data analysis
- SQL queries for familiar database-style operations
- Streaming data for real-time processing
- Machine learning libraries for building models
Before SparkSession existed, you had to create and manage separate entry points for each type of Spark operation. SparkSession simplified this by combining everything into one consistent interface.
Why SparkSession Became the Standard
SparkSession was introduced in Spark 2.0 as part of a major simplification effort. The Spark developers recognized that managing multiple entry points was confusing and error-prone, so they created SparkSession as a "one-stop shop" for all Spark functionality.
Here's what makes SparkSession powerful:
- Unified Access: Everything you need is available through one object
- Automatic Management: It handles complex setup and resource management behind the scenes
- Built-in Optimization: It includes performance improvements that weren't available in older approaches
- Future-Proof: New Spark features are built to work with
SparkSessionfirst
This unified approach means you can focus on solving data problems instead of wrestling with configuration and setup.
Now that you understand what SparkSession is and why it's the modern standard, let's see it in action.
Your First PySpark Program with SparkSession
Let's put theory into practice by loading and exploring a real dataset. We'll use data from The Daily Show with Jon Stewart, which contains information about guests who appeared on the show. You can download the daily_show.tsv file we’re using in this tutorial here.
This example will show you how SparkSession coordinates all the distributed processing we've been discussing:
from pyspark.sql import SparkSession

# Create a SparkSession
spark = SparkSession.builder.getOrCreate()

# Load data using RDD through SparkSession
daily_show_rdd = spark.sparkContext.textFile("daily_show.tsv")
daily_show_sample = daily_show_rdd.take(3)
print(daily_show_sample)
['YEAR\tGoogleKnowlege_Occupation\tShow\tGroup\tRaw_Guest_List', '1999\tactor\t1/11/99\tActing\tMichael J. Fox', '1999\tComedian\t1/12/99\tComedy\tSandra Bernhard']Let's break down what each part of this code does:
from pyspark.sql import SparkSession: Imports theSparkSessionclass from PySpark's SQL moduleSparkSession.builder: Starts the process of creating aSparkSessionusing the builder pattern (a common design pattern for complex object creation).getOrCreate(): This either creates a newSparkSessionor returns an existing one if it's already runningspark.sparkContext.textFile("daily_show.tsv"): Accesses RDD functionality through thesparkContextand loads the file line-by-line into an RDD.take(3): Is an action that tells Spark to actually execute the job and return the first three lines
Even though this looks like fairly simple Python code, there's something powerful happening behind the scenes here. Spark has created a distributed dataset (RDD) that's ready for processing across a cluster. The data is loaded lazily (only when we call .take()), and Spark has built an execution plan for processing it efficiently.
This is your first taste of how PySpark abstracts away the complexity of distributed computing while giving you the full power of cluster processing.
The Evolution of Spark Entry Points
Before we take a closer look at Spark's underlying architecture, it's important we discuss another key entry point you may encounter when working with PySpark: SparkContext.
SparkContext was Spark's original entry point, designed specifically for working with RDDs. In early versions of Spark, it was the only way to access Spark functionality. If you wanted to work with different types of data or operations, you had to create separate contexts for each.
This is why SparkSession was introduced in Spark 2.0 as a unified replacement, wrapping around SparkContext and other older contexts. Instead of managing multiple entry points, you now work with just one.
How They Connect
Here's the key insight: SparkSession actually contains and manages a SparkContext automatically. When you create a SparkSession, it creates a SparkContext behind the scenes and gives you access to it when needed.
Let's see this relationship in action by loading the same Daily Show dataset using both approaches:
from pyspark.sql import SparkSession
from pyspark import SparkContext

# Method 1: Using SparkSession (modern approach)
ss = SparkSession.builder.getOrCreate()
rdd_via_sparksession = ss.sparkContext.textFile("daily_show.tsv")

# Method 2: Using SparkContext directly (legacy approach)
sc = SparkContext.getOrCreate()
rdd_via_sparkcontext = sc.textFile("daily_show.tsv")

# Let's examine what we created
print("SparkSession object:           ", ss)
print("SparkContext from SparkSession:", ss.sparkContext)
print("Direct SparkContext object:    ", sc)

# The key insight: they're the same underlying object
print("\nAre they the same SparkContext?", sc is ss.sparkContext)

# Both RDDs work identically
sample_from_session = rdd_via_sparksession.take(10)
sample_from_context = rdd_via_sparkcontext.take(10)
print("Same data?", sample_from_session == sample_from_context)
SparkSession object: <pyspark.sql.session.SparkSession object at 0x7f9746bdc610>
SparkContext from SparkSession: <SparkContext master=local[*] appName=pyspark-shell>
Direct SparkContext object: <SparkContext master=local[*] appName=pyspark-shell>
Are they the same SparkContext? True
Same data? TrueThis example demonstrates several important points:
ss.sparkContextandscare literally the same object in memory- Both approaches create identical RDDs that work exactly the same way
SparkSessiondoesn't replaceSparkContext; it wraps and manages it- You can use either
ss.sparkContext.textFile()orsc.textFile()interchangeably
When You'll Encounter Each
- Use
SparkSessionfor all new PySpark development because it's the modern standard and gives you access to everything - You'll see
SparkContextin older tutorials, legacy codebases, and educational materials that focus specifically on RDD fundamentals - Both work together seamlessly since
SparkSessionmanagesSparkContextautomatically
Now let's explore how SparkSession orchestrates Spark's distributed architecture.
Spark's Architecture Deep Dive
To use PySpark effectively, it helps to see what's happening under the hood when you run a Spark application. Spark's architecture consists of three main components working together: the Driver, Executors, and the Cluster. Let's explore each one.
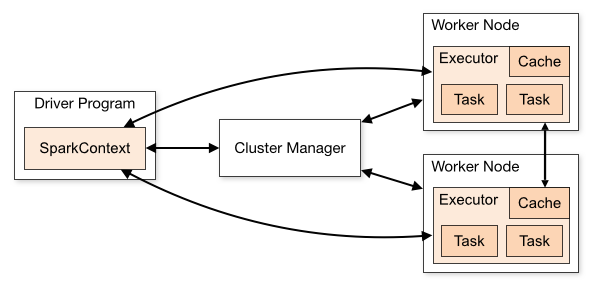
The Driver: Your Command Center
When you create a SparkSession, you're actually launching the Spark Driver—the central coordinator of your Spark application. The Driver is the process running your Python code, whether that's in a script, Jupyter notebook, or part of a larger data pipeline.
Think of the Driver as the conductor of an orchestra. It doesn't play any instruments itself, but it reads the music (your code), guides each musician (the executors), and ensures everything stays in sync.
The Driver's responsibilities include:
- Reading your code and creating execution plans: Analyzes your PySpark operations and builds a Directed Acyclic Graph (DAG) that maps out the most efficient way to process your data
- Managing resources: Communicates with cluster managers to allocate memory and CPU cores
- Distributing tasks: Breaks your job into smaller chunks and sends them to worker processes
- Coordinating everything: Tracks progress, handles failures, and collects results
- Hosting the monitoring interface: Provides a web-based UI (typically at
http://localhost:4040in local mode) where you can track job progress, examine execution plans, and debug performance issues
Let's see the Driver in action through SparkSession:
from pyspark.sql import SparkSession

# SparkSession creation launches the Driver
spark = (SparkSession.builder
    .appName("ArchitectureDemo")
    .master("local[*]")
    .config("spark.driver.memory", "2g")
    .getOrCreate()
)

# Driver properties accessible through SparkSession
print("Driver is running as:", spark.sparkContext.appName)
print("Running in mode:", spark.sparkContext.master)
print("Driver memory:", spark.conf.get("spark.driver.memory"))
print("Default parallelism:", spark.sparkContext.defaultParallelism)
Driver is running as: ArchitectureDemo
Running in mode: local[*]
Driver memory: 2g
Default parallelism: 8Let's examine what each part of this code does:
spark.buildercreates aSparkSessionbuilder that uses the builder pattern, allowing you to chain multiple configuration methods together before calling.getOrCreate(). The builder pattern lets you chain configurations in any order. You could write.master().appName().config()or.config().master().appName()with the same result..appName("ArchitectureDemo")sets the application name visible to monitoring tools.master("local[*]")sets where Spark runs:local[*]uses all CPU cores locally,local[4]uses 4 cores,yarnfor Hadoop clusters orspark://host:portfor standalone Spark clusters.config("spark.driver.memory", "2g")allocates 2 gigabytes of memory to the Driver process.getOrCreate()either creates a newSparkSessionwith your configurations or returns an existing one if it's already running (prevents multiple sessions from conflicting)spark.sparkContext.appNameretrieves the application name from the underlyingSparkContextspark.sparkContext.mastershows the current deployment mode and resource allocationspark.conf.get()retrieves configuration values you've setspark.sparkContext.defaultParallelismshows the default number of partitions Spark will create for RDDs when you don't specify the number explicitly
Behind the scenes, SparkSession handles all the complex initialization that used to require manual setup of multiple contexts. It creates the Driver, establishes connections to the cluster, and prepares everything for distributed processing.
Executors: Your Distributed Workers
If the Driver is the conductor, then Executors are the musicians doing the actual work. Executors are distributed worker processes that run on machines in your cluster (or on different cores of your local machine when developing). They are the worker processes that the Driver coordinates to handle your data processing tasks.
Once the Driver decides what needs to be done, tasks get sent to Executors, who:
- Process data chunks in parallel across different machines or CPU cores
- Cache intermediate results in memory for fast access in later operations
- Execute your transformations like filtering, mapping, and aggregating data
- Return results back to the Driver when work is complete
- Report status back to the Driver for monitoring and failure recovery
Here's where Spark's lazy evaluation becomes important. Your code doesn't immediately execute because Spark waits until you specifically request results:
from pyspark.sql import SparkSession

spark = SparkSession.builder.appName("LazyEvalDemo").getOrCreate()

# This creates a plan but doesn't execute anything yet
daily_show_rdd = spark.sparkContext.textFile("daily_show.tsv")
print("RDD created:", daily_show_rdd)
print("Type:", type(daily_show_rdd))

# Check Executor configuration
print("Executor memory:", spark.conf.get("spark.executor.memory", "default"))
print("Executor cores:", spark.conf.get("spark.executor.cores", "default"))

# Only when we call an action do Executors start working
print("\nTriggering execution...")
sample_data = daily_show_rdd.take(3)
print("Results:", sample_data)
RDD created: daily_show.tsv MapPartitionsRDD[4] at textFile at NativeMethodAccessorImpl.java:0
Type: <class 'pyspark.rdd.RDD'>
Executor memory: default
Executor cores: default
Triggering execution...
Results: ['YEAR\tGoogleKnowlege_Occupation\tShow\tGroup\tRaw_Guest_List', '1999\tactor\t1/11/99\tActing\tMichael J. Fox', '1999\tComedian\t1/12/99\tComedy\tSandra Bernhard']Breaking down this example:
spark.sparkContext.textFile()creates an RDD execution plan but doesn't read the file yet- The RDD object shows as a reference like
MapPartitionsRDD[1]- this is the execution plan, not data spark.conf.get()shows how memory and cores are allocated to Executors- Only
.take(3)triggers the Driver to send tasks to Executors for actual data processing - Executors read the file, process it, and return the first 3 lines to the Driver
What you just saw demonstrates two fundamental PySpark concepts:
Transformations like textFile() are lazy: they build an execution plan but don't process data. They return new RDDs that represent "what to do" rather than actual results.
- If an operation is lazy → it's a transformation
Actions like take() trigger execution: they force Spark to run all queued transformations and return actual data to your program.
- If an operation executes immediately → it's an action
In our next tutorial, we'll take a much closer look at transformations and actions to understand their differences in detail and explore the most important operations in each category.
Lazy evaluation allows Spark to optimize the entire workflow before Executors begin processing, potentially combining operations or skipping unnecessary work.
The Cluster: Where Everything Lives
The cluster is the collection of machines (or CPU cores) that provides the computational foundation for your Driver and Executors. Whether you're processing gigabytes or petabytes of data, the cluster gives you the distributed computing power that makes big data processing possible.
SparkSession automatically handles cluster management—coordinating resources, scheduling tasks, and managing communication between the Driver and Executors across your cluster.
Cluster deployment options that SparkSession supports include:
- Local Mode: Simulates a cluster using your machine's CPU cores - perfect for development and learning
- Standalone: Spark's built-in cluster manager for dedicated Spark clusters
- YARN: Integrates with Hadoop ecosystems and shared cluster resources
- Kubernetes: Modern choice for container-based deployments in cloud environments
- Mesos: General-purpose cluster resource manager
For learning PySpark, local mode is ideal because it simulates distributed behavior on your single machine:
from pyspark.sql import SparkSession

# Configure local cluster through SparkSession
spark = (SparkSession.builder
    .master("local[4]")
    .appName("LocalClusterDemo")
    .config("spark.sql.adaptive.enabled", "true")
    .config("spark.executor.memory", "1g")
    .getOrCreate()
)

print("Cluster mode:", spark.sparkContext.master)
print("Application name:", spark.sparkContext.appName)
print("Default partitions:", spark.sparkContext.defaultParallelism)
print("Total executor memory:", spark.conf.get("spark.executor.memory"))

# Clean shutdown
spark.stop()
Cluster mode: local[4]
Application name: LocalClusterDemo
Parallelism level: 4Breaking down the cluster configuration:
.master("local[4]")creates a simulated 4-core cluster on your machinespark.sql.adaptive.enabledenables query optimization across the "cluster"spark.executor.memoryallocates memory for each simulated Executorspark.sparkContext.defaultParallelismshows the default number of partitions Spark will create for RDDs, which determines how many parallel tasks will be generated for processing the dataspark.stop()properly shuts down all cluster connections and releases resources
Even in local mode, you experience the same distributed processing patterns you'd use on a real multi-machine cluster. This makes local development an excellent way to learn cluster computing concepts before scaling up.
Setting Up Your Local PySpark Environment
Now that you've seen how PySpark works conceptually, it's time to get it running on your own machine so you can experiment freely and build your own Spark applications.
Setting up PySpark requires two main components:
- Java — because Spark runs on the Java Virtual Machine
- PySpark — the Python API for Apache Spark
Let's walk through installing both.
Installing Java (The Foundation)
Even though you'll write Python code with SparkSession, Spark's core engine is built in Scala and runs on the Java Virtual Machine (JVM). Without Java, PySpark can't launch or manage Spark jobs.
First, check if Java is already installed on your local machine by opening a terminal or command prompt and running:
java -versionIf Java is installed, you'll see output like:
java version "1.8.0_451"If Java isn't installed, here's how to get it:
Mac and Linux
Use your system's package manager for the easiest installation:
Ubuntu/Debian:
sudo apt update
sudo apt install default-jdk
macOS with Homebrew:
brew install openjdkIf you don't have Homebrew, install it first from brew.sh, then run the command above.
Windows
You have a couple of options:
Option 1: Manual Installation
Download and install the JDK from the official Oracle website. Follow the installer instructions.
Option 2: Using Chocolatey
If you have Chocolatey installed, you can install Java from the command line:
choco install openjdkVerify Your Installation
After installing Java, restart your terminal and run java -version again to confirm it's working properly. You should see version information displayed.
Installing PySpark
With Java installed, getting PySpark is straightforward. In your terminal, navigate to your project directory and install PySpark using pip:
pip install pysparkThis installs the PySpark package, which includes everything needed to create SparkSession objects and work with distributed data. By default, PySpark will run in local mode, using your machine as a single-node Spark cluster — perfect for development and learning.
Jupyter Notebook Integration
While you can run PySpark from any Python environment, Jupyter Notebook provides the best experience for interactive development and learning. The combination of live code, visualizations, and documentation makes it ideal for exploring data with PySpark.
Installing Jupyter via Anaconda
The most reliable way to get Jupyter working smoothly with PySpark is through the Anaconda distribution. Anaconda includes Jupyter along with many scientific computing libraries, and it handles environment management automatically.
Download Anaconda from the official website and follow the installation instructions for your operating system.
Once installed, launch Jupyter by running this command in your terminal or Anaconda Prompt:
jupyter notebookThis opens a browser window where you can create new notebooks and start coding with Python.
Essential Configuration for PySpark
Here's an important step for ensuring smooth PySpark operation in Jupyter: you need to make sure that Spark's worker processes use the same Python interpreter as your Jupyter kernel. This prevents compatibility issues between different Python environments.
Without this configuration, you might encounter errors like "Python worker failed to connect back" or timeout issues when Spark tries to distribute tasks.
Add this code at the top of any notebook where you'll use PySpark:
import os
import sys

# Ensures PySpark uses the same Python interpreter as Jupyter
os.environ["PYSPARK_PYTHON"] = sys.executable
Here's what this does:
import osandimport sysgive you access to system environment variables and Python interpreter informationsys.executablecontains the path to the Python interpreter running your Jupyter kernelos.environ["PYSPARK_PYTHON"]sets an environment variable that tells PySpark which Python interpreter to use for its worker processes
This environment variable tells PySpark exactly which Python interpreter to use for its worker processes, avoiding compatibility issues between the driver (your Jupyter kernel) and the executors (worker processes).
Pro tip: After adding this code, restart your kernel and run all cells to ensure the environment variable is properly set before PySpark starts up.
Test Your Setup
Let's verify that SparkSession is working correctly and can access RDD functionality. In a new Jupyter notebook, run:
import os
import sys

# Set the Python executable for PySpark
os.environ["PYSPARK_PYTHON"] = sys.executable

# Test PySpark import and version
import pyspark
print("PySpark version:", pyspark.__version__)

# Test SparkSession creation (same pattern as architecture sections)
from pyspark.sql import SparkSession

spark = (SparkSession.builder
    .appName("SetupTest")
    .master("local[*]")
    .config("spark.driver.memory", "2g")
    .getOrCreate()
)

print("SparkSession created successfully")
print("Application name:", spark.sparkContext.appName)
print("Running in mode:", spark.sparkContext.master)
print("Default partitions:", spark.sparkContext.defaultParallelism)

# Test with daily show data (same as lazy evaluation example)
daily_show_rdd = spark.sparkContext.textFile("daily_show.tsv")
print("RDD created:", daily_show_rdd)

# Use the same action from the architecture section
sample_data = daily_show_rdd.take(3)
print("Sample data retrieved:")
for line in sample_data:
    print(line)

# Clean shutdown
spark.stop()
print("SparkSession stopped successfully")
If your setup is working correctly, you should see output similar to this:
PySpark version: 3.5.0
SparkSession created successfully
Application name: SetupTest
Running in mode: local[*]
Default partitions: 8
RDD created: daily_show.tsv MapPartitionsRDD[1] at textFile at NativeMethodAccessorImpl.java:0
Sample data retrieved:
YEAR    GoogleKnowlege_Occupation   Show    Group   Raw_Guest_List
1999    actor   1/11/99 Acting  Michael J. Fox
1999    Comedian    1/12/99 Comedy  Sandra Bernhard
SparkSession stopped successfully
What each part tells you:
- PySpark version confirms the installation worked
- SparkSession created successfully means Java and PySpark are communicating properly
- Running in mode:
local[*]shows Spark is using all your CPU cores for local development - RDD created with a reference like
MapPartitionsRDD[1]indicates lazy evaluation is working but no data has been read yet - Sample data retrieved proves Spark can actually read files and execute actions
- SparkSession stopped successfully confirms proper resource cleanup
Common issues and solutions:
- "Java not found" errors: Make sure you've installed Java and restarted your terminal
- "Python worker failed to connect": Double-check that you've set the
PYSPARK_PYTHONenvironment variable - File not found errors: Ensure
daily_show.tsvis in the same directory as your notebook - Permission errors on Windows: Try running Jupyter as administrator
- Memory warnings: These are usually safe to ignore in local mode, but you can reduce
spark.driver.memoryif needed
If you see this output without errors, your PySpark environment is ready for data processing!
What You've Accomplished
Congratulations! You've successfully:
- Installed Java and PySpark with a modern development environment
- Configured Jupyter Notebook to work seamlessly with
SparkSession - Created your first
SparkSessionwith proper configuration and resource management - Loaded and explored real data using RDDs accessed through
SparkSession - Observed distributed processing in action through Driver coordination and lazy evaluation
- Executed both transformations and actions to process distributed data
- Properly managed resources with clean
SparkSessionshutdown
You now have a fully functional modern PySpark development environment and understand how SparkSession coordinates Spark's distributed architecture. This foundation will serve you well as you dive deeper into data processing, transformations, and analysis.
The approach you've learned here—using SparkSession as your entry point while understanding the underlying RDD operations—represents current best practices in the PySpark ecosystem.
Review and Next Steps
In this tutorial, you've built a solid foundation in modern PySpark development. Let's recap what you've learned and where to go from here.
Key Takeaways
Apache Spark and PySpark Fundamentals:
- Apache Spark is a distributed computing engine that processes large datasets across clusters of machines using in-memory computation for dramatic speed improvements over disk-based systems
- PySpark provides a Python interface to Spark, letting you use familiar Python syntax for big data processing
SparkSessionis the modern unified entry point introduced in Spark 2.0 that consolidates all Spark functionality into a single, easy-to-use interface
Modern Spark Architecture:
SparkSessionserves as your command center, automatically managing the Driver process that coordinates your entire Spark application- The Driver builds execution plans, distributes tasks, and coordinates results across your distributed cluster
- Executors are the distributed workers that process data in parallel, managed seamlessly by
SparkSession - Lazy evaluation means
SparkSessionbuilds execution plans but waits until actions are called to actually process data, enabling powerful optimizations
Development Environment:
- Java is required because Spark runs on the JVM, even when using Python through PySpark
SparkSessionsetup is straightforward and provides immediate access to both high-level DataFrame operations and low-level RDD functionality- Jupyter integration works smoothly with proper Python interpreter configuration
- Local mode gives you full distributed processing simulation on your development machine
What's Next
You've built a strong foundation, but this is just the beginning of your PySpark journey. Your next learning steps include:
Advanced RDD Operations: Now that you understand RDD basics through SparkSession, you can explore powerful transformations like map(), filter(), reduceByKey(), and join() that make distributed data processing so effective.
DataFrames and Structured Data: SparkSession really shines when working with DataFrames—structured data that offers SQL-like operations, automatic optimizations, and better performance for most common data tasks.
Spark SQL: Learn how to query your data using familiar SQL syntax through SparkSession, making complex analytics more accessible and readable.
The modern SparkSession-based approach you've learned here will serve you well in all these areas. You now understand both the high-level interface and the underlying distributed processing concepts, giving you the flexibility to tackle a lot of big data challenges.
Keep Learning
Ready to continue your PySpark journey? Here is some valuable documentation for reference purposes:
- Apache Spark Documentation: The official documentation with comprehensive guides and API references
- PySpark API Reference: Detailed documentation for all PySpark functions and methods
To learn more about PySpark, continue with our tutorial series:
- PySpark Tutorial for Beginners - Install and Learn Apache Spark with Python ― You are here
- Working with RDDs in PySpark
- Working with DataFrames in PySpark
- Using Spark SQL in PySpark for Distributed Data Analysis
You've taken the first step into this exciting field using modern best practices. Keep experimenting, keep building, and most importantly, keep learning. See you in the next tutorial that focuses on Working with RDDs in PySpark!