Google Colab for Deep Learning: A Step-by-Step Guide
![]()
Google Colaboratory, commonly known as Google Colab, is a cloud-based Jupyter notebook environment that provides a platform for writing and executing Python code through your browser. It's especially popular in the data science and machine learning communities. In this tutorial, we’ll explore how to get started with Google Colab for deep learning.
What is Google Colab?
Google Colab is essentially a Jupyter notebook that runs in the cloud. You can write and execute code, and the results are displayed within the notebook. Google Colab offers free access to a graphics processing unit (GPU), which is particularly useful for training deep learning models due to their parallel processing capabilities.
Why Use Google Colab?
You might wonder, why use Google Colab for machine learning and deep learning? Well, there are several compelling reasons:
-
Accessibility
Google Colab provides free access to powerful computational resources like GPUs and TPUs (tensor processing units). These resources, typically reserved for high-end, expensive hardware, are key to training deep learning models efficiently.
-
Ease of Use
With Google Colab, there's no need for complex setup procedures. Everything runs in your browser, meaning you can focus on writing and executing your code rather than dealing with installation issues. This cloud-based nature also ensures that you can work from anywhere, on any device that has internet access.
-
Collaboration and Sharing
Google Colab inherits Google Docs' collaborative features. You can share your notebooks, have others comment on them, and even edit them in real-time - an excellent feature for team projects or teaching.
-
Integration with Google Drive
Google Colab automatically saves your work in Google Drive. This auto-save feature is a lifesaver, making sure you never lose your work, even if you forget to save manually.
-
Pre-installed Libraries
Google Colab comes pre-installed with popular Python libraries like TensorFlow, PyTorch, and Keras. This convenience allows you to jump right into coding without worrying about installing and updating libraries.
In a nutshell, Google Colab is an accessible, user-friendly platform that alleviates much of the typical setup pains associated with machine learning and deep learning, leaving you free to focus on what matters most - building and refining your models.
Setting up Google Colab
Since Google Colab runs in the cloud, there’s no installation required. All you need is a Google account. Here’s how to get started:
-
Open Google Colab: Go to Google Colab and sign in with your Google account.
-
Create a New Notebook: Once you’re on the Google Colab interface, click on
File>New notebookto create a new notebook.
-
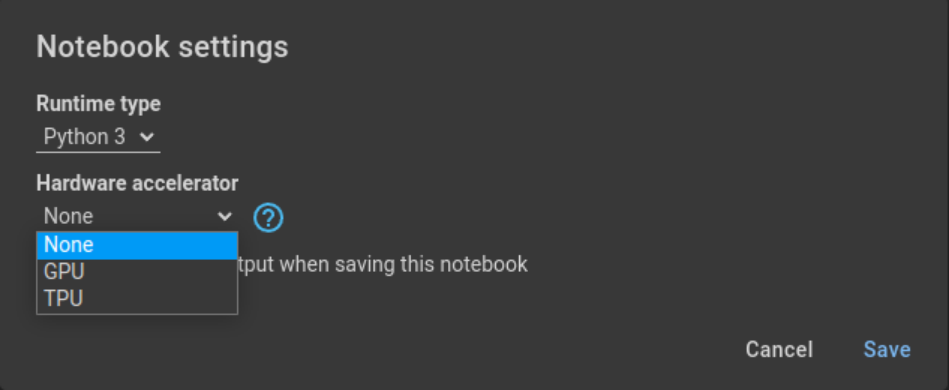
Change the Runtime Type: For deep learning, you’ll want to utilize the power of a GPU. Click on
Runtime>Change runtime type, and selectGPUfrom the Hardware Accelerator drop-down menu.

Uploading Files to Google Colab
Before we dive into writing deep learning code, let's talk about how to upload files to Google Colab, which you might need for training models.
-
Use the File Browser: On the left-hand side, click on the folder icon to open the file browser. You can upload files by clicking on the upload icon.

-
Use Code to Upload Files: You can also use code to upload files. Here's an example using Python:
from google.colab import files
uploaded = files.upload()
This will prompt you to select a file from your computer to upload.


Writing Your First Deep Learning Code
Let's start by importing TensorFlow, a popular deep learning library.
import tensorflow as tfNow, let's verify that we are using the GPU.
tf.test.gpu_device_name()This should return something like '/device:GPU:0', indicating that the GPU is available for use.
Building a Simple Neural Network
Now let’s build a simple neural network using TensorFlow. We will use the famous MNIST dataset of handwritten digits.
# Importing necessary libraries
from tensorflow.keras.datasets import mnist
from tensorflow.keras.models import Sequential
from tensorflow.keras.layers import Dense, Flatten
from tensorflow.keras.utils import to_categorical

# Loading the dataset
(train_images, train_labels), (test_images, test_labels) = mnist.load_data()

# Preprocessing the data
train_images = train_images / 255.0
test_images = test_images / 255.0
train_labels = to_categorical(train_labels)
test_labels = to_categorical(test_labels)

# Building the model
model = Sequential([
    Flatten(input_shape=(28, 28)),
    Dense(128, activation='relu'),
    Dense(10, activation='softmax')
])

# Compiling the model
model.compile(optimizer='adam', loss='categorical_crossentropy', metrics=['accuracy'])

# Training the model
model.fit(train_images, train_labels, epochs=5, batch_size=32)

# Evaluating the model

test_loss, test_acc = model.evaluate(test_images, test_labels)
print('Test accuracy:', test_acc)
If using a GPU, the model should finish training in about 30 seconds, and we can see the accuracy on the test set is around:
Test accuracy: 0.973800003528595Additional Resources in Colab
Google Colab also offers a variety of additional features that can be useful for deep learning:
-
Pre-installed Libraries: Colab comes with many popular libraries pre-installed, such as TensorFlow, Keras, and PyTorch, which can save you a lot of setup time.
-
Collaboration Features: You can collaborate in real-time, similar to Google Docs. This is particularly useful for team projects.
-
Tutorial Notebooks: Google Colab provides tutorial notebooks on a wide range of topics including machine learning, data visualization, and more. To access them, go to
File>Open notebookand select theExamplestab. -
Code Snippets: There’s a code snippets section that contains snippets of code that you might find useful. You can simply click on a snippet to insert it into your notebook.
Saving Your Work
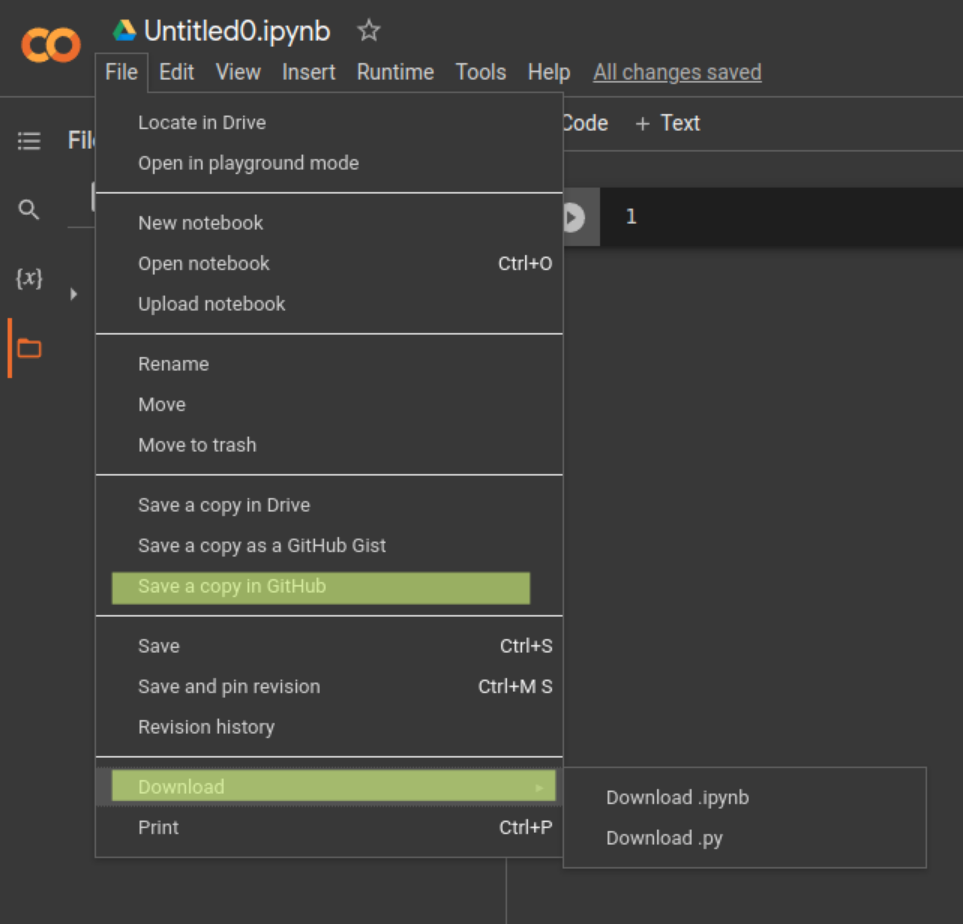
It's important to save your work periodically. You can save your notebook to Google Drive or download it to your computer as an .ipynb or .py file. Go to File > Save a copy in GitHub or File > Download.
Conclusion
Google Colab is an excellent tool for anyone looking to dive into deep learning without the hassle of setting up a local environment, especially given the free access to a GPU. It's user-friendly, cloud-based, and loaded with features that make it a go-to for data scientists and machine learning enthusiasts. Whether you are a beginner or an experienced practitioner, Google Colab has something to offer you.
Now that you have a basic understanding of how to use Google Colab for deep learning, it's time to start building more complex models and exploring other features that this powerful tool has to offer! Check out our new Deep Learning in TensorFlow skill path where you will learn how to build deep neural networks for sequential data, image data, and natural language processing tasks.
Happy learning!